TL;DR
- Kayangel features four distinct gates with unique mechanics requiring precise execution
- Normal (1540+) and Hard (1850+) modes offer tiered rewards with significant upgrade materials
- Elemental rock-paper-scissors system and mirror mechanics demand strategic positioning
- Proper orb management and platform awareness prevent instant-wipe mechanics
- Advanced coordination and timing are essential for Hard mode success
Welcome to our comprehensive Kayangel Abyssal Raid guide, designed to help you master this challenging Elgacia dungeon efficiently. While we focus on core mechanics here, detailed gate breakdowns are available in our extended guides for those seeking deeper tactical insights.
Kayangel represents the latest Abyssal Dungeon content, featuring streamlined mechanics compared to Legion Raids but requiring precise execution. The dungeon offers two distinct difficulty tiers: Normal Mode for item level 1540+ characters and Hard Mode requiring 1850+ gear score. Each mode provides unique reward structures with Hard mode offering substantially better upgrade materials and exclusive cosmetics.

Gate 1: Color Identification and Positioning
♢ At 55% health, immediately evade the expanding circular AoE pattern resembling pizza slices, then execute a rapid stagger check.
♢ Maintain positioning between the boss and protective shield spheres to avoid accumulating frostbite stacks from ground-based snowflake patterns.
♢ Critical color identification: distinguish between Cyan and Magenta orbs by observing linear explosion patterns and the boss’s aura coloration.
♢ Orb collection timing: retrieve designated orbs precisely when the boss emits its distinctive roar audio cue.
♢ At 25% health threshold, systematically collect orbs following the sequence: single-ring blue, double-ring white, triple-ring orange. Utilize your minimap during setup phases to pre-identify ore locations.
Gate 2: Platform Management and Evasion
♢ Strategic placement: avoid depositing luminous pools in central areas. Consistently position them along the outer perimeter of the square combat arena.
♢ Platform destruction sequence: at 55% health, outer platforms collapse, triggering intensive evasion mechanics with descending wind currents, electrical pillars, and TN sword projectiles.
♢ Mark management: players with targeting markers must immediately evade Tien’s sword attacks the moment markers dissipate. Subsequent light pole placements should exclusively target wall sections or corner positions.
Gate 3: Elemental Combat System
The core combat mechanic operates on elemental superiority principles: Fire dominates Grass, Grass overcomes Water, and Water extinguishes Fire.
♢ At approximately 60% health, execute full party purification and assume inverted triangular formation.
♢ Defensive rotation: intercept incoming projectiles while systematically moving counterclockwise through six distinct positions.
♢ Elemental response: after rotation completion, the boss reveals an elemental affinity, requiring destruction of the superior elemental type that withstood the initial blast wave.
♢ Escape preparation: ensure your spacebar interaction meter reaches 80-90% capacity before attempting liberation during the black explosion sequence.
♢ At roughly 40% health, the boss teleports centrally, summoning two waves of three minions each. Execute counters followed by stagger checks, then utilize counter opportunities to reset cooldowns twice.
♢ Final elemental phase: around 16% health, generate elemental rings and eliminate the dominant elemental type on each ring. The inner ring contains two central elements while the outer ring features four peripheral elements requiring removal.
 of Kayangel.jpg)
Gate 4: Mirror Mechanics and Shadow Management
Critical positioning: avoid rotating Lauriel’s head orientation during mirror pattern formation sequences.
At 180 stagger bar, luminous crystals spawn when struck by Lauriel’s offensive abilities. Destroy activated crystals to obtain essential buffs, which can be transferred to party members. Operating without this aura results in 99% damage reduction against Lauriel.
At 140% health threshold, laser projection targets triangular or inverted triangular formations. Players function as reflective surfaces, requiring precise laser redirection through four consecutive bounces to successfully stagger the boss.

Avoid dark circular zones. Utilize basic attacks for minor laser angle adjustments during reflection sequences.
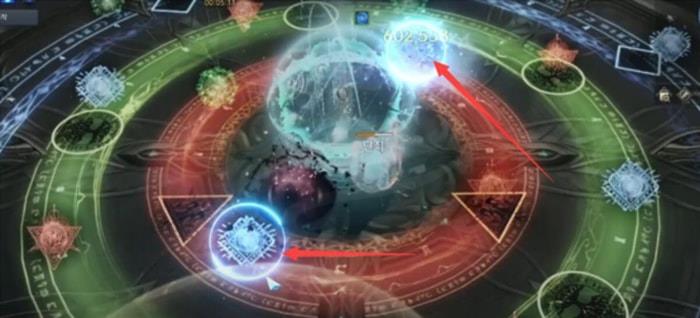
At 100% health, consolidate party positioning centrally. The boss generates multiple orb clusters, then emits illuminating waves revealing genuine white orbs. Collect exactly five authentic orbs before regrouping at the center point.
Critical warning: contact with counterfeit black orbs reduces your buff stacks and inflicts temporary incapacitation.
Shadow mechanics activate following two ring detonation sequences.

Central positioning provides adequate reaction time to relocate beneath required shadow zones. Position yourself under protective shadows during intervals between light wave detonations, repeating this sequence twice.
At 60% health, mass teleportation occurs, similar to sword-to-statue mechanics, activating all crimson pillars marked with Rune Symbols. When allies mark Lauriel Clones, execute stagger checks against duplicates to acquire protective shields.
From 60% to 0% health, your combat effectiveness progressively intensifies alongside recurring shadow mechanics. Monitor luminous pillars within Rune symbols to anticipate shadow locations. During shadow phases, Lauriel attempts displacement via mirror assaults. Consider Time Stop utilization or maintain constant mobility at maximum distance. Note that laser volleys follow shadow mechanics.
Mastering Kayangel requires more than mechanical knowledge—it demands strategic foresight and coordinated execution. For Normal mode, focus on mastering core mechanics, while Hard mode requires perfect execution and advanced positioning.
Party Coordination Essentials:
Establish clear communication protocols for orb collection sequences and elemental responses. Designate specific roles for stagger checks and counter opportunities to maximize efficiency.
Common Failure Points:
The most frequent wipe scenarios involve improper shadow positioning in Gate 4, failed elemental responses in Gate 3, and misidentified orb colors in Gate 1. Practice these mechanics in training modes before attempting serious runs.
Efficiency Improvements:
Optimize your clear times by pre-positioning for known mechanics. In Gate 2, always have escape routes planned for platform collapses. For advanced players, learn to anticipate boss teleportation patterns to maintain optimal DPS uptime.
Action Checklist
- Verify item level requirements (1540+ Normal, 1850+ Hard)
- Practice elemental identification and response timing in training mode
- Coordinate party roles for stagger checks, counters, and orb management
- Memorize shadow mechanic sequences and positioning requirements
- Review minimap usage for ore identification and platform awareness
No reproduction without permission:OnLineGames Guides » A Quick Guide of Abyss Dungeon – Kayangel in Lost Ark Master Kayangel's complex mechanics with expert strategies for both Normal and Hard mode progression