TL;DR
- Blood skills generate Health Globes that trigger massive Bone Spirit damage through gear synergy
- Prioritize Blood Wave and Blood Lance for optimal Health Globe generation
- Use Bloodcrafted Corpse’s Chest Armor for automatic Bone Spirit activation
- Maintain Essence above 50% for maximum Ossified Essence damage bonus
- Proper Paragon board progression is essential for scaling damage into billions
The Blood Wave Bone Spirit Necromancer represents one of the most powerful endgame builds available in Diablo 4’s Season 6: Vessel of Hatred. This specialized setup transforms your character into a devastating force capable of clearing the highest tier Nightmare Dungeons and conquering pinnacle bosses with unprecedented efficiency. What makes this build particularly exceptional is its dual focus on both offensive dominance and defensive resilience, creating a well-rounded approach that performs excellently in both solo progression and coordinated group play scenarios.
At the heart of this build lies a sophisticated mechanical interaction between blood-based abilities and your primary damage source. When you utilize skills like Blood Lance and Blood Wave, they generate numerous Health Globes across the battlefield. Through specific legendary item effects, particularly the Bloodcrafted Corpse’s Chest Armor, collecting these Health Globes automatically triggers Bone Spirit attacks without consuming resources. This creates a continuous damage loop where your blood skills fuel your bone skills automatically.
The damage scaling potential of this build is truly astronomical when properly optimized. Through careful Paragon board selection and glyph placement, combined with strategic skill point allocation, your Bone Spirit attacks can escalate to dealing damage in the tens of billions range. This exponential growth makes it particularly effective against elite packs and boss encounters where sustained high damage output is crucial for success.
This build’s effectiveness hinges on mastering a specific skill rotation that maximizes Health Globe generation while maintaining consistent damage pressure. The optimal sequence begins with Corpse Tendrils to group enemies and apply crowd control, followed by alternating between Blood Wave and Blood Lance to flood the area with Health Globes. Your curses should be maintained continuously to ensure damage amplification against all targets.
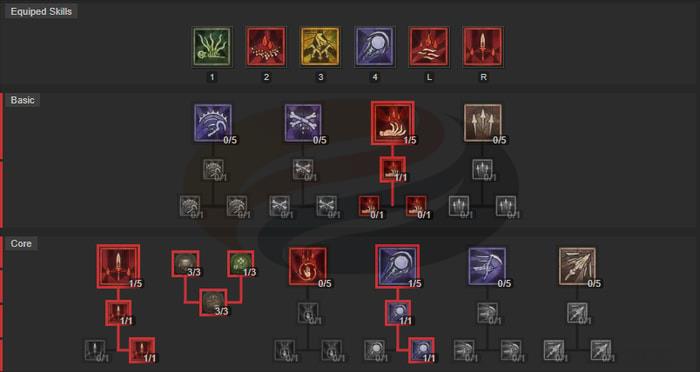
This build relies on the following skills:
Blood Lance: Your primary Health Globe generator that also consumes existing globes for additional effects. This skill should be used aggressively to maintain constant globe production.
Blood Wave: A must-max skill that creates massive Health Globe density while also providing area denial and mobility control.
Bone Spirit: Your main damage source that triggers automatically when you collect Health Globes generated by your blood skills.
Corpse Tendrils: Essential crowd control that groups enemies for efficient Health Globe collection and maximizes Bone Spirit area of effect impact.
Blood Mist: Provides crucial temporary invincibility during dangerous mechanics and can be used to reposition safely while still generating value.
Decrepify and Blight: These curses significantly enhance your damage output by applying vulnerability and other debuffs that allow Bone Spirit to achieve its maximum damage potential.
A common mistake players make is prioritizing Bone Spirit casts manually instead of focusing on Health Globe generation. Remember that your blood skills are what enable your bone skills – focus on generating globes and let your gear handle the Bone Spirit activation automatically for optimal results.
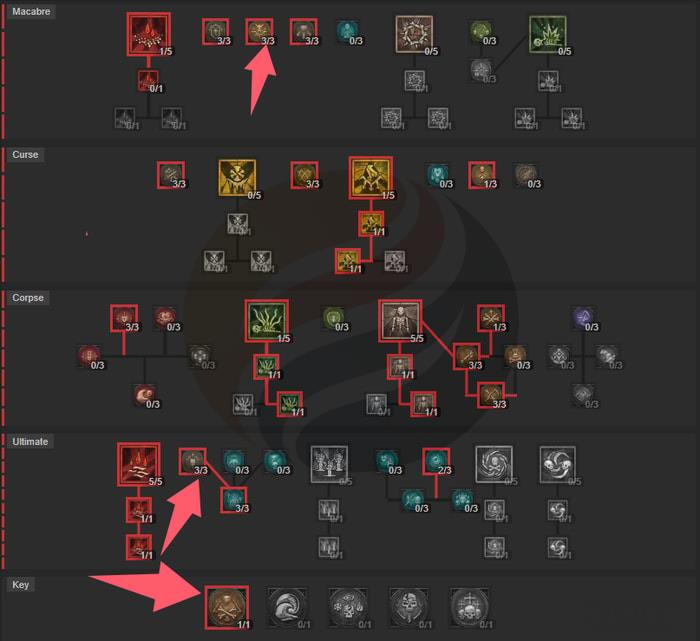
Your passive skill selection dramatically impacts both your damage ceiling and survival capabilities. The key is balancing offensive multipliers with defensive layers to create a build that can both deal massive damage and withstand counterattacks from powerful enemies.
Titan’s Fall: This new passive skill provides an 18% damage increase against elite enemies when you’re fortified, making it essential for pushing high-level content where elite density increases significantly.
Finality: Delivers a substantial 15% damage boost after using Blood Wave, creating natural synergy with your primary Health Globe generation tool.
Ossified Essence: Maintaining your Essence pool above 50% is absolutely critical as this passive multiplies your Bone Spirit damage based on your current Essence level.
Survival Passives: Incorporating defensive options like Spiked Armor and Necrotic Toughness becomes increasingly important in higher tier dungeons where enemy damage can quickly overwhelm less prepared characters.
Many players underestimate the importance of resource management with this build. Since Ossified Essence requires maintaining high Essence levels, you need to balance your skill usage to avoid draining your resource pool completely, which would significantly reduce your damage output during crucial moments.
Gear selection is paramount for unlocking the full potential of the Blood Wave Bone Spirit build. Each equipment piece serves a specific purpose in the damage chain, and substituting key items will dramatically reduce your effectiveness. For players looking to expand their arsenal knowledge, our BF6 Weapons Unlock Guide offers valuable insights into optimal gear acquisition strategies that can be applied to Diablo 4’s loot system.
To maximize the potential of the Blood Wave Bone Spirit build, it’s crucial to equip your Necromancer with the right gear. In Diablo 4, each piece of equipment plays a vital role in enhancing your skills and survivability. Here’s a detailed breakdown of the recommended equipment:
Helmet: Utilize the new unique helmet that provides 200% increased damage against demons, or alternatively the military cap for additional skill points and valuable cooldown reduction.
Chest Armor: Bloodcrafted Corpse’s Chest Armor is non-negotiable for its game-changing effect of generating free Bone Spirits whenever you collect Health Globes.
Gloves: Tidal Gloves significantly boost your Health Globe generation rate, directly increasing your Bone Spirit activation frequency.
Pants: Employ the Shockwave Aspect to enhance your area control and damage spread capabilities.
Boots: Use the Cursed Aura Aspect, ideally with ancient affixes to maximize the defensive and utility benefits.
One-Handed Sword: The rare unique Doombringer provides substantial maximum life percentage increases that synergize with your fortification mechanics.
Rings: Equip the Starless Night Ring alongside the Serrated Bone Aspect for dramatically increased critical strike damage potential.
Amulet: Utilize the Blood Surge Aspect to significantly reduce Blood Wave cooldown, enabling more frequent Health Globe generation cycles.
Off-Hand: Implement the Flesh Piercer Power which provides a chance for your Bone Spirit to deal double damage, creating massive spike damage opportunities.
When farming for these items, prioritize activities that target your specific missing pieces. Greater Rifts and targeted legendary farming provide the most efficient paths to completing your build. Ancient versions of these items with optimal stat rolls can increase your overall effectiveness by 30-40% compared to their regular counterparts.
Strategic rune selection amplifies your build’s core strengths while patching potential weaknesses. The right rune combinations can transform a functional build into an exceptional one capable of tackling the game’s most demanding content.
Selecting the right runes to enhance your build is essential. These runes will complement your skills and provide additional benefits:
First Set: Deploy core skill runes combined with Druid’s Petrify to enhance crowd control capabilities and create additional damage windows.
Second Set: Implement cooldown skill runes alongside Barbarian’s War Cry to reduce your critical skill cooldowns and increase overall skill uptime.
Advanced players should experiment with rune activation timing to maximize uptime on critical damage phases. Activating your runes during elite engagements or boss damage windows ensures maximum value from their temporary buffs and effects. Proper rune management can increase your overall damage output by 15-20% compared to random activation.
Your Paragon board progression directly determines your damage scaling ceiling. Following the correct board order and glyph placement sequence is crucial for achieving the billions of damage potential this build promises. For comprehensive character building strategies that apply across different game systems, check out our BF6 Class Selection Guide which covers fundamental principles that translate well to Diablo 4’s progression systems.
Initial Board: Implement the Blood Drinker Glyph to establish consistent fortification generation while amplifying all magic nodes within its effective radius.
Second Board: Utilize Bone Graft to substantially increase both your maximum Essence pool and overall damage output, utilizing the Essence Glyph for enhanced critical strike damage multipliers.
Third Board: Deploy Death’s Breath combined with the Control Glyph to further amplify your damage against controlled targets.
Fourth Board: Activate Blood and Bone alongside the Fearless Glyph to gain both offensive and defensive benefits when fortified.
Fifth Board: Complete your progression with the Frailty Board enhanced by the Heart Eater Glyph for significant Intelligence boosts and additional damage scaling.
When optimizing your Paragon boards, prioritize magic nodes that enhance your primary stats and damage multipliers. Rare nodes that synergize with your build’s core mechanics should always be activated regardless of glyph coverage, as their standalone value often justifies the point investment.
Mastering the Blood Wave Bone Spirit build requires understanding both its strengths and limitations. The most common failure point occurs when Health Globe generation falls below the threshold needed to sustain consistent Bone Spirit activations. This typically happens when players become too passive or fail to maintain proper skill rotation timing.
This build is relatively straightforward to assemble but contains one significant vulnerability: inadequate Health Globe production during intense combat situations can completely halt your damage output. To prevent this, always maintain aggressive positioning that allows you to consistently generate and collect Health Globes.
For players seeking to master multiple builds and playstyles, our Battlefield 6 Complete Guide provides valuable framework thinking that applies to optimizing any character build across different games.
Advanced optimization involves timing your Blood Wave usage to coincide with elite spawns or boss phase transitions. This ensures maximum Health Globe density during critical damage windows. Additionally, learning to pre-position before major engagements allows you to establish optimal Health Globe generation patterns from the encounter’s outset.
When pushing higher difficulty content, pay close attention to your positioning relative to Health Globes. Moving efficiently between globes while maintaining damage pressure on enemies separates competent players from exceptional ones with this build.
Action Checklist
- Acquire Bloodcrafted Corpse’s Chest Armor for automatic Bone Spirit triggers
- Max out Blood Wave and Blood Lance skills for Health Globe generation
- Set up Paragon boards in correct sequence with optimal glyph placement
- Practice skill rotation: Corpse Tendrils → Blood Wave → Blood Lance → collect globes
- Farm for optimal rune combinations and test activation timing
- Optimize gear with ancient affixes and correct stat priorities
No reproduction without permission:OnLineGames Guides » Diablo 4 Season 6 Best Necromancer Build: Blood Wave Bone Spirit Master the Blood Wave Bone Spirit Necromancer build for Diablo 4 Season 6 with optimized gear, skills, and strategy