TL;DR
- Amhuluk requires lightning rod management and orb positioning awareness
- Magitek Core focuses on add control while navigating cannon fire patterns
- Lunar Bahamut demands precise movement during nail explosion sequences
- All bosses feature tankbusters requiring proper cooldown usage
- Group-wide damage mechanics necessitate proactive healing preparation
Paglth’an represents the latest dungeon addition introduced through Final Fantasy XIV’s patch 5.5 – Death Unto Dawn, offering players challenging new encounters within the expanding Shadowbringers content.
This comprehensive guide synthesizes strategic insights from expert sources to help you navigate this demanding instance successfully. Understanding boss mechanics thoroughly provides the foundation for conquering each phase of this dungeon.
Success in Paglth’an hinges on recognizing attack patterns, executing proper positioning, and coordinating role-specific responsibilities across your party composition.
Amhuluk serves as the initial major encounter, presenting multiple mechanics that test party coordination and individual awareness simultaneously.
Critical Rip functions as a classic tankbuster ability, inflicting massive damage exclusively on the main tank. Proper mitigation through defensive cooldowns proves essential for surviving this high-damage attack without requiring excessive healing resources.
Tanks should strategically deploy damage reduction abilities like Rampart or Shadow Wall precisely when Amhuluk begins casting this dangerous technique.
Lightning Bolt targets all party members with expansive blue indicators while applying the lightning rod status effect. This debuff necessitates immediate action to prevent catastrophic consequences.
Players must quickly transfer their accumulated electrical charge to designated lightning rods positioned along the arena’s perimeter. Failure to complete this transfer within the brief window results in substantial damage and applies a magic vulnerability enhancement debuff, dramatically increasing susceptibility to subsequent magical attacks.
Following unsuccessful lightning dissipation, Amhuluk immediately executes Electric Burst, dealing severe area-of-effect damage across the entire party. Afflicted players carrying vulnerability stacks face extreme danger during this sequence.
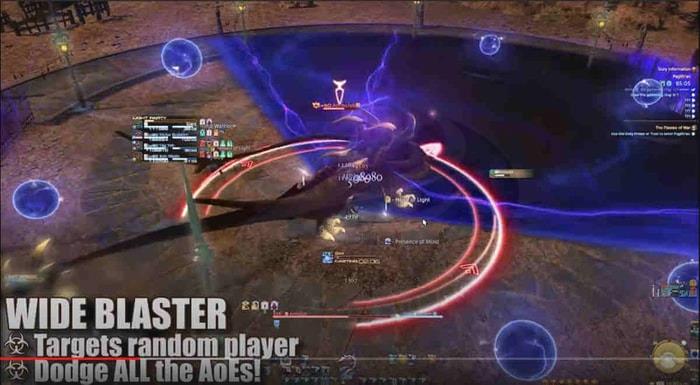
Thundercall generates numerous energy orbs throughout the battlefield that periodically emit damaging pulses. Navigating between these hazardous zones requires constant spatial awareness and repositioning.
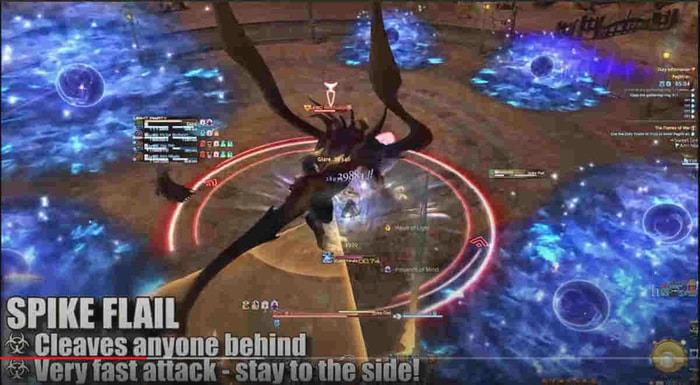
During orb activation periods, Amhuluk simultaneously employs Spike Flail targeting players positioned directly behind him, followed rapidly by Wide Blaster. This combination attack demands lateral movement toward the boss’s flank to evade both directional assaults effectively.
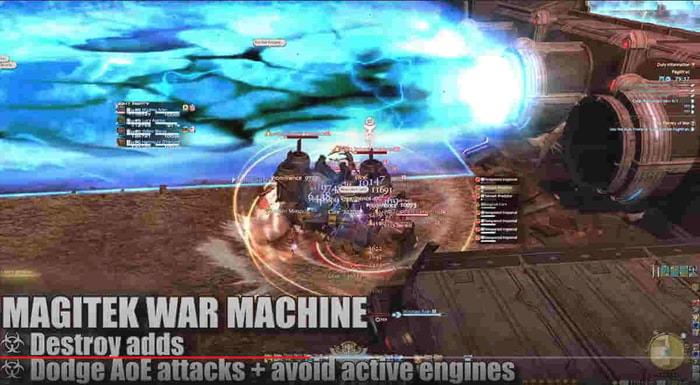
The Magitek Core confrontation primarily involves managing successive waves of additional enemies (adds) while evading coordinated cannon barrages from multiple directions.
Successful navigation requires monitoring wall-mounted engines to identify safe zones during each artillery sequence. Prioritize eliminating add groups while conscientiously avoiding ground-based area attacks.
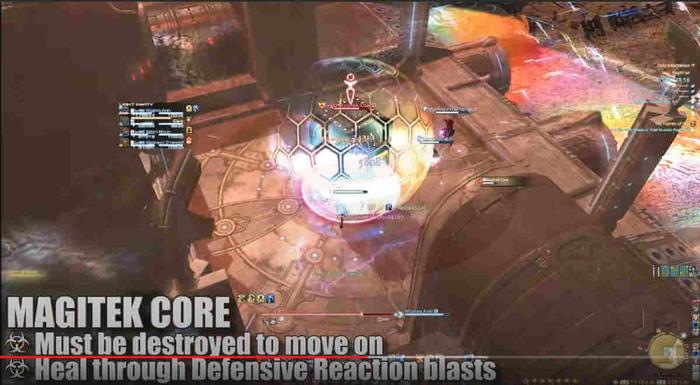
Progressive cannon fire eventually creates access pathways to the primary Magitek Core objective, enabling party members to assault the central mechanism directly.
Defensive Reaction unleashes powerful group-wide damage that demands immediate healing response. Healers should prepare regenerative and shielding abilities in anticipation of this predictable damage spike.
Advanced strategy suggests assigning specific players to cannon duty while others focus exclusively on add control, optimizing damage distribution and survival probability.
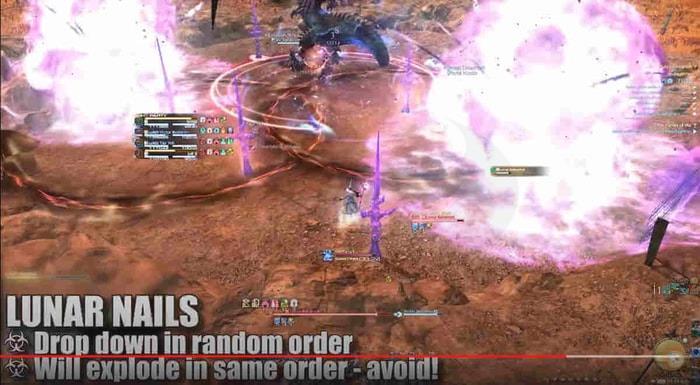
Lunar Bahamut stands as the culminating boss encounter, testing everything learned throughout the dungeon.
Twisted Scream delivers substantial raid-wide damage that necessitates preparatory healing measures. Healers should coordinate mitigation cooldowns and regeneration abilities to manage this predictable damage source efficiently.
Lunar Nails descend onto the platform sequentially, detonating in extensive circular patterns matching their arrival order.
Strategic positioning involves evacuating the initial nail impact zones, then rapidly transitioning into the safety areas created post-detonation. This dance requires anticipating explosion sequences and prepositioning accordingly.
Common errors include misjudging nail explosion timing or failing to recognize the safe zone rotation pattern, often resulting in unnecessary damage accumulation.
Additional abilities include Perigean Breath, Akh Morn, Megaflare, Megaflare Dive, Kan Rhai, Lunar Flare, and Gigaflare. These similarly named techniques benefit from visual association for improved recognition and response timing.
Optimization strategies involve coordinating party mitigation for group-wide attacks, assigning position priorities for mechanics, and developing muscle memory for repeated pattern sequences.
For players seeking deeper mechanical understanding, analyzing ability telegraphs and developing response protocols significantly enhances performance consistency across multiple attempts.
We hope these strategic insights assist Final Fantasy XIV adventurers in conquering Paglth’an’s challenges. Should you possess superior tactics, we encourage sharing them within our community. MmoGah remains dedicated to constructing the premier gaming resource worldwide, offering both FFXIV Gil purchasing services and comprehensive FFXIV news coverage. For inquiries or assistance, utilize our live chat feature – your requirements continually drive our advancement.
Action Checklist
- Study boss ability telegraphs and develop response protocols before attempting
- Coordinate tank cooldown usage for Critical Rip and similar tankbusters
- Practice lightning rod transfer timing to avoid vulnerability debuffs
- Master lunar nail explosion patterns through repeated observation
- Develop add prioritization systems and cannon avoidance routes
No reproduction without permission:OnLineGames Guides » FFXIV 5.5: Paglth’an Dungeon Guide Master Paglth'an dungeon with expert strategies for all three bosses and mechanics