TL;DR
- Master four key positioning formations: clock spots, corners, spreads, and wall assignments
- Learn to resolve Stoneringer + Smash combinations through precise tank positioning and movement
- Execute Sinister Seeds using proximity-based role assignments and safe spot identification
- Coordinate Strange Seeds with either locked or fixed strategy based on group preference
- Manage final phase mechanics with coordinated burst windows and survival priorities
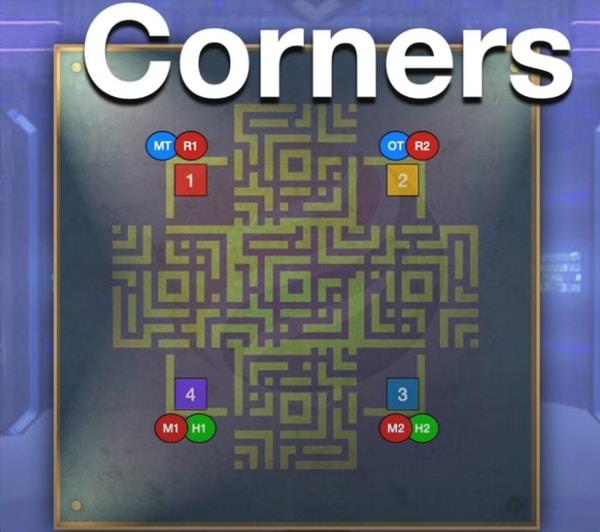
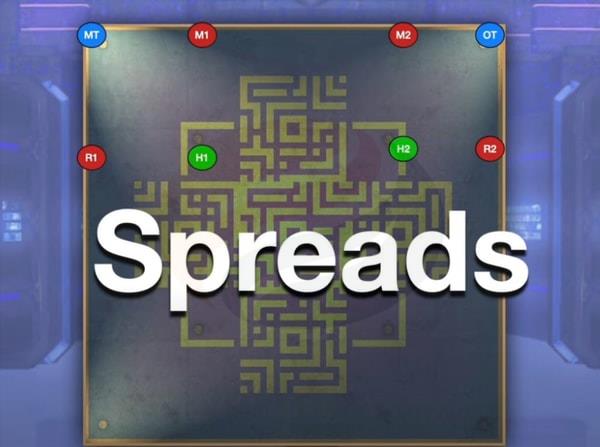
Conquering the AAC Cruiserweight M7 Savage demands mastery of four critical positioning formations that form the foundation for surviving this high-intensity encounter. Each formation serves specific mechanical purposes and must be executed with precision to avoid catastrophic failures.
Standard Clock Positions establish your primary reference points for spread mechanics and directional awareness. These positions provide consistent spacing for avoiding overlapping damage while maintaining optimal uptime.

Corner positioning becomes essential for resolving mechanics like Sinister Seeds and certain Stoneringer combinations. Corner assignments ensure proper spacing for proximity-based mechanics while minimizing movement requirements.
Spread formations will be necessary multiple times throughout the encounter to avoid overlapping AoE damage. Proper spacing prevents chain reactions where one player’s mistake can wipe the entire raid.
Brutal Impact Raid-wide Management
This devastating raid-wide attack strikes six consecutive times, requiring coordinated mitigation and healing strategies. Teams should layer defensive cooldowns throughout the sequence rather than blowing everything on the first hit.
Stoneringer + Smash Combinations
The boss initiates Stoneringer, spawning either a Club (indicating outward movement) or a Sword (signaling inward positioning), followed immediately by either Smash Here or Smash There. Understanding the four possible combinations is critical for survival:
- Club + Smash Here
- Evacuate outward immediately
- Tanks advance inward with defensive cooldowns active for a shared tankbuster
- Strategic Option: One tank can invulnerability the buster to conserve healing resources
- Club + Smash There
- Begin positioned outward
- All players enter the boss’s hitbox, positioning tanks as the furthest targets for the buster
- Sword + Smash Here
- Start positioned inward
- After initial positioning, the party slides outward so tanks become the nearest targets
- Sword + Smash There
- Commence inward
- Tanks slide outward to position themselves as the furthest targets for the buster
Spore Sac Pattern Recognition
- Deploys four distinct area-of-effect patterns
- Vines materialize, generating expanding danger zones
- Only two mirrored safe spot configurations exist—commit these to memory
Sinister Seeds Resolution
Targets Four Players with Distinct Mechanics:
- Pink AoEs → Deposit Starburst area effects
- Puddles → Place four total lingering AoEs that detonate again after a delay period
Proximity-Based Assignment System:
- The nearest four players receive one mechanic type, while the furthest four get the alternative
- Which group receives which assignment is randomly determined
Executing Sinister Seeds
1. Toxic Friends / Raidplan Strategy
-
- Entire raid stacks southern position for initial AoE baiting
- Slide to the southern safe zone after initial AoEs resolve
- Tanks/Melee = nearest positions, Healers/Ranged = furthest positions
- Pink AoE designated players proceed to assigned corner circles
-
- Puddle assigned players sprint to corners, splitting: Group 1 → Left flank, Group 2 → Right flank
- Melee roles experience downtime; tanks can initiate add acquisition during this phase
- Evade Starburst patterns → Assume light party stacks (Eastern/Western positions) → Transition opposite your original corner assignment
2. Kindred Uptime Strategy
-
- Maintains optimal uptime but necessitates dynamic positional adjustments
- Group 1 → Western sector, Group 2 → Eastern sector
- Melee roles = interior safe zones, Ranged roles = exterior safe zones
Example Scenario: Ranged roles receive pink AoEs
-
- Healer → Left position, DPS → Right position (facing boss orientation)
- Deposit AoEs at Cardinal positions
- Melee roles circulate clockwise, concluding in the diametrically opposite corner
- Assemble in reformed light party configurations (4:4 division)
- Relocate to corners promptly to avoid delayed AoE detonations
Example Scenario: Melee roles receive pink AoEs
-
- Place Starburst patterns in close proximity, healers/ranged circulate clockwise around perimeter
- Minuscule safe zones Eastern/Western—utilize visual cues, maintain precision
Wall Mechanics and Targetability
- Brute Abombinator adheres to a wall surface—becomes temporarily untargetable
- When auto-attack animation triggers (purple visual indicator), targetability resumes
Stoneringer (Club/Sword) with Glower Power
- Subsequent Glower Power activation: Linear AoE frontal assault + distributed spread patterns
- Employ pre-designated spread positions for consistency
Revenge of the Vines + Thorny Deathmatch
Revenge constitutes a raid-wide damage event. Deathmatch establishes tether connection to the primary aggro holder with vine mechanics, applying damage-over-time based on proximity:
- Close proximity tick: Minimal damage, universally safe
- Medium range tick: Moderate damage, still manageable with healing
- Distant tick: Significant damage (~100k to non-tank roles), potentially lethal
- Maximum range tick: Instantly fatal — consistently evade this range
- Tanks can utilize Provoke ability to manipulate tether control
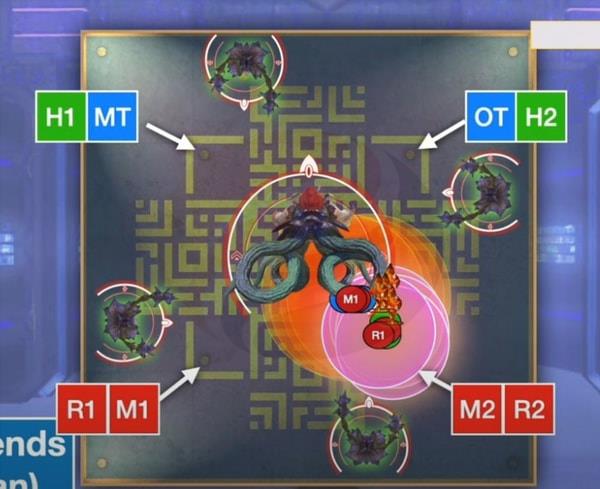
Stoneringer (club or sword) + Abominable Blink
One of the two primary tanks receives flare designation. The non-flare tank should activate Provoke to assume tether responsibility. The flare-designated tank can either distance themselves with defensive cooldowns or conceal in corner positions while the party clusters at maximum melee range. This impact delivers substantial damage, requiring appropriate mitigation deployment.
Sporesplosion + Brutish Swing
Subsequently occurs Sporesplosion (3:1 or 2:1 AoE evasion). Immediately following, the boss executes Brutish Swing — reposition rapidly.
Glower Power Execution
Afterward, disperse for Glower Power resolution (identical positions as previous but inverted orientation), succeeded by another Revenge of the Vines raid-wide assault.
Demolition Deathmatch + Abominable Blink
- Primary aggro holder acquires vine tether
- Two proximity tethers materialize — the closest players should intercept them
- Tethers remain swappable before vine transformation, but become fixed afterward
Then, another Abominable Blink sequence follows — resolve identically with flare tank positioned in corner
Strange Seeds Mechanics
Starburst AoEs (Targeted Players):
- Players receive targeting two simultaneously
- Each pairing consistently incorporates one support role and one damage role
- These designated players deposit Starburst AoEs at their current locations
- After all eight party members receive hits, the mechanic concludes with stack marker assignment targeting either all support roles or all damage roles
Throughout the complete sequence, one tank and two additional selected players become tethered to walls. These individuals must remain proximate to assigned walls and cannot freely reposition like other members. Multiple established strategies exist, including locked seeds and fixed seeds approaches. Select whichever methodology your group prefers.
Strange Seeds (Locked Seeds Strategy)
Tether Role Assignments:
- The ranged damage player assumes wall tether opposite boss orientation
- One healer acquires true northern tether
- These two players constitute the “tethered” personnel and will manage alternating positions between square (odd sequence drops) and circular (even sequence drops) markers. They will alternate square → circle → square → circle throughout mechanic duration
- The healer and ranged both execute this pattern within their respective corners
Remaining Personnel (Non-Tethered Players):
- Division: Support roles left flank, Damage roles right flank (relative to boss positioning)
- Each group maintains assigned drop locations
- When not actively dropping, players remain positioned within the “chill zone” (designated safety area)
Mechanical Sequence Flow:
- Initial drop – Tethered players relocate to square markers
- Secondary drop – Tethered players transition to circular markers; targeted players simultaneously move outward to deposit
- Tertiary drop – Return to square positions
- Quaternary drop – Revert to circular markers
Afterward, the tethered players return to square positions, and remaining personnel can relax within the chill zone. Subsequently, transition to partner stack configurations.
Partner Stack Organization:
- Untethered ranged and healer pair with the complementary role from the tethered contingent
- This generates substantial movement requirements, particularly for casting roles, but this positioning naturally guides them toward correct alignment for subsequent mechanics
- Once stack resolutions complete, all personnel already position along outer perimeters and can evade either toward circular zones or the chill zone for safety
Strange Seeds (EU Fixed Seeds Strategy)
- This methodology predominates within European Party Finder environments
- Deposits maintain static positioning; each player deposits their seed and minimally adjusts toward another player’s position to avoid personal AoE damage
- Despite apparent spatial constraints, every AoE can be cleanly evaded provided positioning maintains precision
- Employ visual awareness and spatial recognition—minimal misalignment can produce damage clipping
- If positioning becomes disordered (e.g., overlapping AoE patterns), certain players might necessitate evasion into downtime positions for survival
- The boss descends into the combat arena. You’ll observe waymark indicators present—these cannot be deployed unless someone within the party has previously cleared the encounter. Ensure a cleared participant positions them
- Activate your secondary potion and two-minute burst cooldowns immediately upon boss landing to optimize damage output
- The encounter commences with Brutal Impact, striking seven times initially. All subsequent activations will impact eight times—mitigate appropriately
Stoneringer + Brute Swing + Lariat
- The boss initiates Stoneringer 2: Stoneringers, generating both sword and club manifestations, with one illuminated
- Subsequent cast: Brutish Swing, knockback effect originating from the wall the boss leaps toward
- Players should already bias toward the quarter side because subsequent activation is Lariat—linear AoE traversing the entire arena
- The secure side for Lariat evasion opposes the glowing weapon orientation
- Mitigate the Brutish Swing impact—this immediately precedes a substantial untelegraphed raid-wide assault
- Another Brutish Swing follows—players initiate transition toward spread positions
- Glower Power discharges—disperse to prevent overlapping AoE damage
- Succeeded by Slaminator, a tankbuster: Can be shared, but proves safer for a tank to solo with mitigation deployment
Debris Deathmatch
This constitutes a critical body-check mechanism:
- Four proximity tethers materialize—one from each cardinal direction. Assign these exclusively to ranged damage players
- If a ranged role perishes, the tether will reassign to a melee role, likely eliminating them before reaction capability
- Boss activates Spore Sac—sequential AoE patterns requiring players to slide clear without excessively extending their tethers
- Ranged personnel should position at corners to restrict tether damage to two ticks
- Tanks should employ brief cooldowns on ranged roles to guarantee survival
- Simultaneously, either all support roles or all damage roles receive stack marker assignment
- These deposit in paired configurations at cardinal positions, spaced against perimeter walls
- Healers and ranged must prevent over-extension of their tethers throughout this sequence
Add Phase and Cory Swamp
- Four additional enemies spawn, one at each cardinal orientation
- Primary tank secures northern + western adds, secondary tank acquires southern + eastern adds
- Do NOT damage the additional enemies—they’ll undergo petrification and elimination automatically
- The boss casts Quarry Swamp
- Tanks must establish line-of-sight blocking against the boss, rotating the adds clockwise
- Ranged and healers must prepare for their safe zones to shift marginally
Sinister Seeds Final Patterns
Ranged roles proceed to left flank of their assigned wall, and tanks/melee cluster northwestern position
Two Distinct Pattern Variations:
Pattern A: Ranged roles receive puddle assignments, tanks/melee acquire starburst designations
- Tanks and Melee roles advance to corners and deposit AoEs on waymark indicators
- Healers and Ranged roles slide along their wall from left to right orientation
- After four puddle deposits, Starburst AoEs activate, and vine obstructions dissipate. Ranged roles regain free movement capability
- A Pulp Smash sequence follows
Pattern B: Tanks/melee receive puddle assignments, and ranged acquire starburst designations
- Healers and ranged proceed to mid-cardinal positions, and tanks/melee circulate clockwise
- Ranged must rapidly transition toward four-corner safety zone subsequently
- After AoE resolutions complete, the boss casts Pulp Smash—assemble beneath boss hitbox
- Immediately relocate to clock positions determined by current boss facing orientation
Stoneringer 2 + Strange Seeds Finale
- Dual Stoneringer activation—similar to previous iterations, but now incorporates Strange Seeds mechanics
- Either all damage roles or support roles deposit seeds in corner assignments
- Brutish Swing + Starburst combination: Monitor boss facing orientation—the secure zone positions directly frontal to boss
- Transition toward Lariat safe side (opposing weapon glow) once more
- Subsequent group deposits their seeds—position them neatly within corners
- Another Brutish Swing with interior safe positioning this iteration
- Slaminator reactivation—tank should solo utilizing invulnerability
- Ultimate sequence: Stoneringer → Smash Here/There combination → Brutal Impact (8-strike sequence)
- If the boss remains active, Special Bombarian Special activation commences—must eliminate the boss before this completes, otherwise constitutes raid wipe
Action Checklist
- Establish and memorize four positioning formations: clock spots, corners, spreads, and wall assignments
- Practice Stoneringer + Smash combinations with tank positioning adjustments
- Execute Sinister Seeds using assigned role positions and safe spot recognition
- Coordinate Strange Seeds with either locked or fixed strategy based on group consensus
- Manage final phase mechanics with coordinated burst timing and survival prioritization
No reproduction without permission:OnLineGames Guides » FFXIV AAC Cruiserweight M7 Savage Mechanics Guide – How to Defeat the Brute Abombinator Master the chaotic mechanics of AAC Cruiserweight M7 Savage with detailed positioning strategies and execution guides