TL;DR
- Viper uses a dual-sword system with color-coded gauges that guide combo execution
- Positional attacks and buff management are critical for maximizing damage output
- Twin-blade combos provide burst damage windows with specific ability sequencing
- Advanced mechanics like Rattling Coil and Reawaken unlock powerful combat options
- Proper rotation timing and resource management separate beginner from expert Vipers
Viper stands out as an exhilarating melee damage dealer in Final Fantasy XIV, featuring a unique weapon system where dual swords can merge into a formidable twin-bladed weapon. This guide provides a comprehensive breakdown of how to effectively master this complex job, drawing from expert gameplay analysis and community-tested strategies.
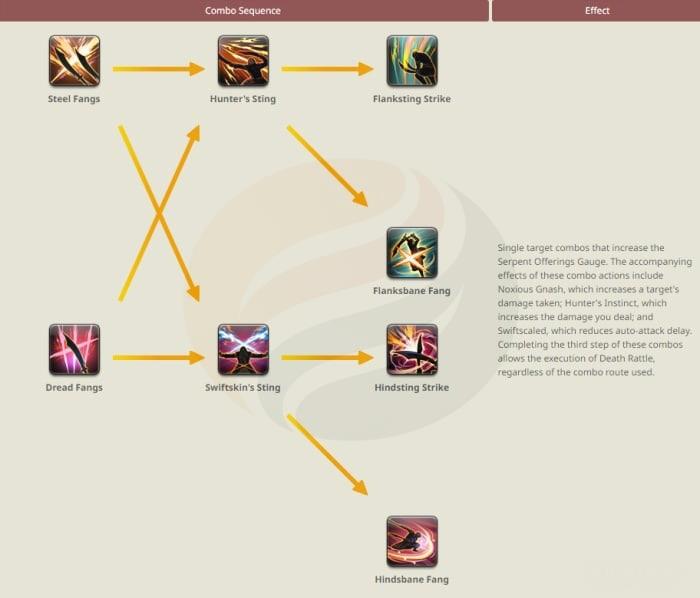
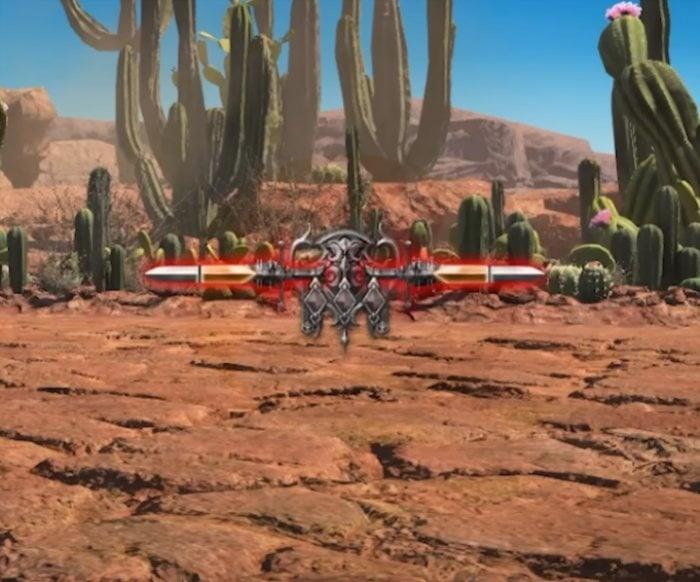
Your primary combo foundation begins with Steel Fangs or Dread Fangs as the initial step. When executing these abilities, you’ll observe the sword gauge displays orange on both segments, clearly indicating you’ve initiated the first phase of your attack sequence.
Dread Fangs applies the Noxious Gnash debuff to your target, lasting 20 seconds and amplifying your damage by 10%. Advanced players can extend this duration to 40 seconds through proper rotation timing.
The second combo segment presents a strategic choice between Hunter’s Sting or Swiftskin’s Sting, each providing distinct combat advantages. This selection causes the sword gauge to display both blue and orange sections, with blue representing completion of the second combo phase.
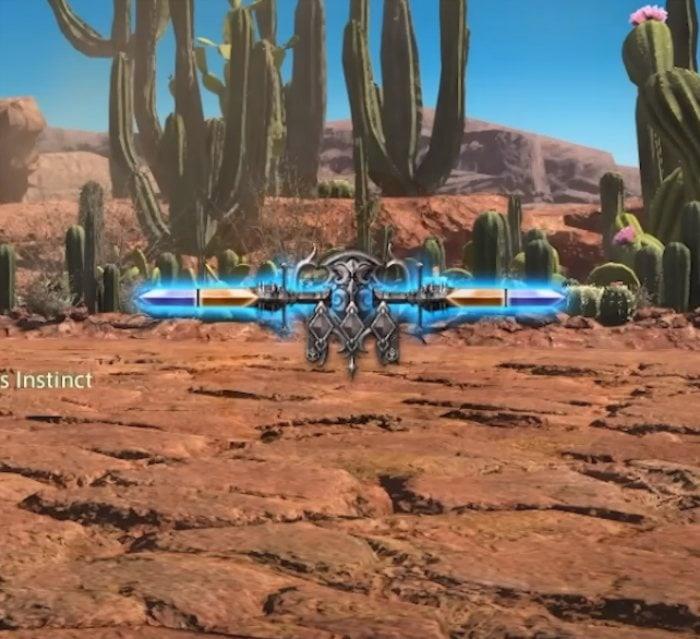
Hunter’s Sting grants Hunter’s Instinct, a 10% damage increase for 40 seconds. Alternatively, Swiftskin’s Sting provides Swiftscaled, reducing your global cooldown by 15% for 40 seconds, significantly increasing your attack speed and overall damage potential.
Your combo finale depends entirely on your second-step selection. Following Hunter’s Sting, you’ll access Flanksting Strike or Flanksbane Fang, both requiring flank positioning. Choosing Swiftskin’s Sting unlocks Hindsting Strike or Hindsbane Fang, which demand rear positional execution for maximum effectiveness.
Executing any combo finisher resets your sword gauge while granting a buff that enhances your subsequent finisher. Each ability features an orange dotted border interface, clearly indicating the correct sequence to follow.

While the system offers flexibility, the combo interface intelligently guides you toward optimal buff maintenance and proper finisher selection. The sword gauge’s outer border provides additional visual cues for proper ability sequencing.
Viper’s area damage capabilities operate on similar principles to single-target combos but with crucial distinctions in execution and target prioritization.
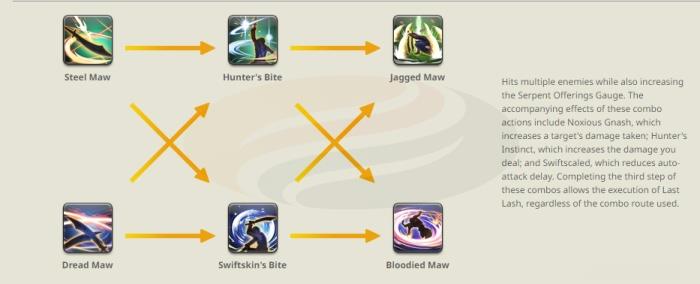
Your AoE rotation begins with Steel Maw or Dread Maw as the initial step. Dread Maw applies Noxious Gnash to all enemies within range for 20 seconds. The subsequent phase offers Hunter’s Bite for Hunter’s Instinct or Swiftskin’s Bite for Swiftscaled buffs. Your finale consists of Jagged Maw or Bloodied Maw, with each finisher granting a buff that enhances the subsequent one.
Unlike single-target combos, the AoE sequence provides less explicit guidance for ability selection beyond the finishers. This requires careful attention to your active buffs or implementing an alternating pattern between available options.
All combo finishers activate Serpent’s Tail, transforming into Death Rattle for single targets or Last Lash for area damage scenarios.
Viper’s signature twin-blade mechanics introduce a separate but interconnected combat system that significantly boosts your burst damage potential during specific engagement windows.
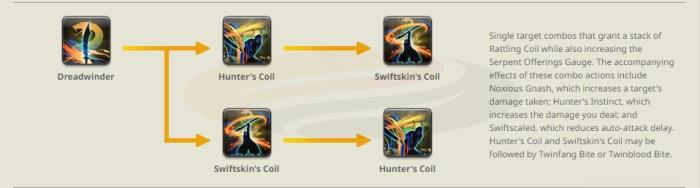
Initiating your twin-blade sequence requires activating Dreadwinder, a weapon skill featuring a 40-second cooldown with two available charges. This applies Noxious Gnash while enabling access to Hunter’s Coil (flank positional) or Swiftskin’s Coil (rear positional). Hunter’s Coil provides Hunter’s Instinct while Swiftskin’s Coil grants Swiftscaled, mirroring your main combo buffs but with distinct execution requirements.
Both transformation skills convert Twinfang and Twinblood into Twinfang Bite and Twinblood Bite respectively. Activating Hunter’s Coil grants Hunter’s Venom, sequentially enhancing Twinfang Bite followed by Twinblood Bite. Conversely, Swiftskin’s Coil provides Swiftskin’s Venom, boosting Twinblood Bite then Twinfang Bite.
Similar to primary combos, these abilities display orange dotted borders for sequence guidance. These are off-global cooldown abilities that must be executed before your next weapon skill. Failing to utilize both off-globals before activating another weapon skill results in losing these opportunities until you re-activate either transformation skill.
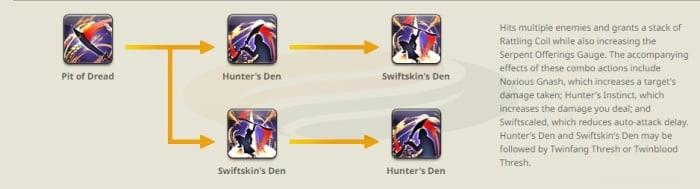
The area damage variant of this system utilizes Pit of Dread, which shares cooldown timing and charge capacity with Dreadwinder. Activating Pit of Dread applies Noxious Gnash to all nearby enemies while enabling Hunter’s Den or Swiftskin’s Den. These transformations convert Twinfang and Twinblood into Twinfang Thresh and Twinblood Thresh respectively, while providing identical buff mechanics to their single-target counterparts.
As you progress through Viper’s leveling journey, you’ll unlock increasingly sophisticated combat mechanics that dramatically enhance your damage output and strategic flexibility.
At level 82, you gain access to Uncoiled Fury alongside the Vipers Rattle trait. Whenever you utilize Dreadwinder, Pit of Dread, or your level 86 ability Serpent’s Ire, you accumulate one stack of Rattling Coil. These stacks can be expended on Uncoiled Fury, a potent ranged weapon skill delivering substantial damage.
Upon reaching level 92, Uncoiled Fury transforms Twinfang and Twinblood into Uncoil Twinfang and Uncoil Twinblood respectively. Similar to Dreadwinder abilities, these off-globals must be executed before activating another weapon skill. Your standard ranged attack remains Writhing Snap for consistent distance engagement.
At level 90, you unlock the transformative Reawaken ability and the Serpent Offerings Gauge. Each time you execute a combo finisher from either your primary or AoE sequences, you gain 10 Serpent Offerings. Utilizing any weapon skill from Dreadwinder or Pit of Dread provides five Serpent Offerings. Accumulating 50 Serpent Offerings enables Reawaken activation. Serpent’s Ire additionally grants the capability to use Reawaken without consuming Serpent Offerings.
Reawaken converts Steel Fangs, Dread Fangs, Hunter’s Coil, and Swiftskin’s Coil into First, Second, Third, and Fourth Generation abilities. These must be executed sequentially from First to Fourth, as each successive action significantly amplifies the damage of the following one, creating a powerful damage escalation sequence.
At level 96, during Reawakening activation, the Reawaken button transforms into Ouroboros, serving as the ultimate finisher for this specialized combo sequence.
Reaching level 100 enhances this system further, with each Generation ability converting Serpent’s Tail into First, Second, Third, and Fourth Legacy. Each Legacy represents an off-global ability that should be interwoven between each weapon skill to maximize damage potential. Viper’s mobility tool Slither provides gap-closing capability to maintain optimal positioning, and can also target party members for strategic repositioning.
Action Checklist
- Master the basic 3-step combo sequence with proper positional execution
- Practice AoE rotation patterns on training dummies with multiple targets
- Learn twin-blade transformation timing and off-global ability sequencing
- Integrate Rattling Coil management into your standard rotation
No reproduction without permission:OnLineGames Guides » FFXIV Dawntrail Viper Beginner’s Guide Master FFXIV's Viper job with comprehensive combos, gauge mechanics, and advanced optimization strategies