TL;DR
- Assign light parties with specific spread positions before engaging Queen Eternal
- Master Virtual Shift transitions between wind, earth, and ice elemental phases
- Coordinate meteor placement and Weighty Blow execution in earth phase
- Resolve Absolute Authority with proper flare placement and isolation mechanics
- Navigate ice bridges carefully and prepare for repeated mechanics in final phase
The Minstrel’s Ballad: Sphene’s Burden represents one of Final Fantasy XIV’s most demanding extreme trials, introduced in the 7.1 content update. Players can access this challenging encounter by conversing with the Wandering Minstrel located in Tulola, provided they have completed the primary narrative quests from version 7.0. This confrontation pits adventurers against Queen Eternal, a reconstructed monarch with devastating capabilities. Successful completion yields powerful item level 725 weapons alongside valuable additional rewards including exclusive mounts and specialized crafting materials. The encounter demands exceptional coordination, precise mechanical execution, and thorough understanding of phase transitions. While content creator Mrhappy offers comprehensive guidance through his video resources, teams should prepare for approximately 12-15 minutes of intense execution. Proper preparation includes studying each phase’s unique demands and establishing clear communication protocols.
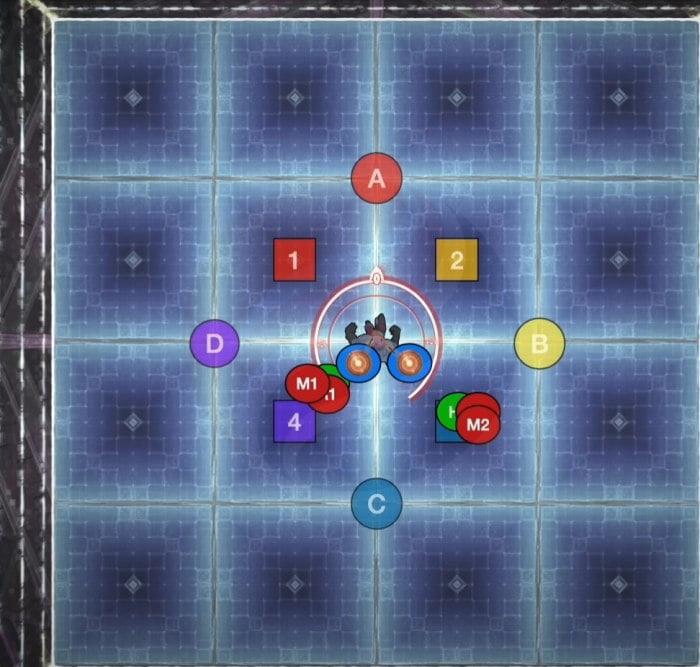
Before initiating combat, establish clear light party assignments with predetermined spread formations. This foundational positioning strategy proves crucial throughout the encounter, particularly during mechanics requiring coordinated movement and role-specific responsibilities.
Aethertithe: Sustained Damage Management
The encounter commences with Aethertithe, imposing continuous moderate damage on the entire party while Queen Eternal executes three consecutive conical area-of-effect attacks. These dangerous projections mirror patterns encountered during the normal difficulty version, with distorted ground textures providing visual indicators of impending impact zones. Following each conical assault, the monarch targets both healing specialists with linear AoEs that distribute severe damage among all players struck. Teams should divide with group one occupying the chamber’s left sector and group two positioned on the right. When conical coverage threatens either lateral section, the affected group must reposition toward the central area for both evasion and stacking purposes. If the boss’s conical attack traverses the midline, both light parties must maintain positions on their designated sides relative to the attack path. Maintain robust damage mitigation throughout this sequence and monitor protective barriers carefully, as Aethertithe persistently erodes defensive shields.
Virtual Shift: Wind Phase Execution
Virtual Shift introduces the first elemental transition, inflicting substantial party-wide damage while transporting combatants to the center of a newly formed X-shaped platform. Immediately separate into pre-assigned light parties, positioning northwest and southeast between the parallel platforms. Each healing specialist receives a split-damage AoE designated Aeroquell that requires collective absorption. These interactions generate persistent wind hazards that must be avoided throughout the phase duration.
Aeroquell applications also impart debuffs—either East Wind of Change or West Wind of Change. Upon expiration, these effects propel players directly eastward or westward, corresponding to directional indicators displayed above characters or within debuff icons. As debuff durations conclude, ensure positioning on the appropriate side of the two horizontal demarcations to safely endure the directional knockbacks.
Following knockback resolution, all members should converge at the center for Chain mechanics. Damage dealers become linked to support roles; once Chain debuffs manifest, DPS should advance northeast while supports move southwest, utilizing pathways clear of wind-based hazards. Shortly thereafter, Queen Eternal begins charging Legitimate Force, executing sequential half-room AoEs. Observe which appendage elevates initially and evade that assault before dodging the subsequently raised attack.
While navigating Legitimate Force patterns, remain cognizant of impending Winds of Change expirations. Teams may have merely two to three seconds to reach safe positions following the second fist impact if debuff requirements mandate specific lateral positioning—sprint abilities prove invaluable when debuff timers drop below ten seconds. After wind mechanics conclude, mitigate the World Shatter raid-wide assault, which also restores the arena to its standard configuration. Subsequent to this, a two-strike tank buster targets the primary tank, which can be addressed through invulnerability cooldowns or standard tank-swapping protocols.
Divide & Conquer: Precision Positioning
Divide & Conquer sequentially targets each player with linear AoEs, then repeats identical patterns in the exact same locations. Adopt the illustrated formation—damage dealers, additional DPS, tanks, and healers arranged from the perimeter inward, with group one left and group two right.

While not excessively movement-intensive, this mechanic demands careful sidestepping of individual AoEs after activation, utilizing available spacing between them. Advance toward the boss while avoiding overlapping damage zones. Two-minute party buffs activate during this sequence; if members remain at the extreme periphery, they risk missing beneficial effects from the opposite side. Alternative approaches positioning DPS nearer the center remain viable, though having all participants step inward generally yields superior results.
Virtual Shift: Earth Phase Navigation
The subsequent Virtual Shift transports participants to the earth elemental phase, separating teams onto distinct platforms featuring central Gravity Wells. These interactive elements elevate characters from the surface when stepped upon or lower them back down if already airborne.
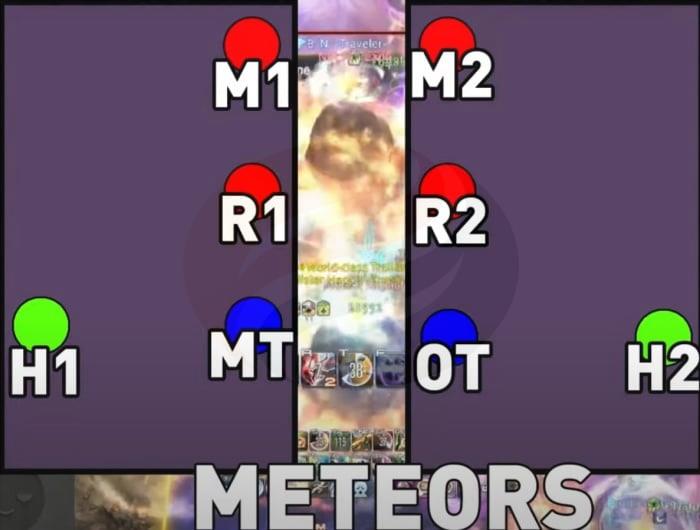
Initiate by having all members immediately ascend and proceed to the room’s center. Confront two Legitimate Force patterns before four Earth Towers manifest on each platform. Designate group one for the western platform and group two for the eastern, employing the previously established spread formation with DPS north and supports south.
Following tower absorption, two randomly selected players per platform receive targeted assaults—one marked with a prey tether while the other receives a substantial AoE marker. These designated individuals should utilize Gravity Wells for positional adjustment. The tethered player should advance toward the chamber’s front off to the side, while the AoE-marked combatant moves toward the arena’s edge while maintaining aerial positioning. Crucially, the platform boundaries remain lethal—avoid contacting the edges entirely. The remaining two players per platform receive two additional towers; ensure these individuals remain grounded rather than airborne. Implement a relaxed spread with the leftmost unmarked player assuming the forward tower and the rightmost unmarked player taking the rear tower. Ample time exists for these adjustments, so avoid excessive haste. After all assaults resolve, all members should maintain aerial positioning to facilitate movement for the subsequent mechanic.
Meteor Management and Weighty Blow Execution
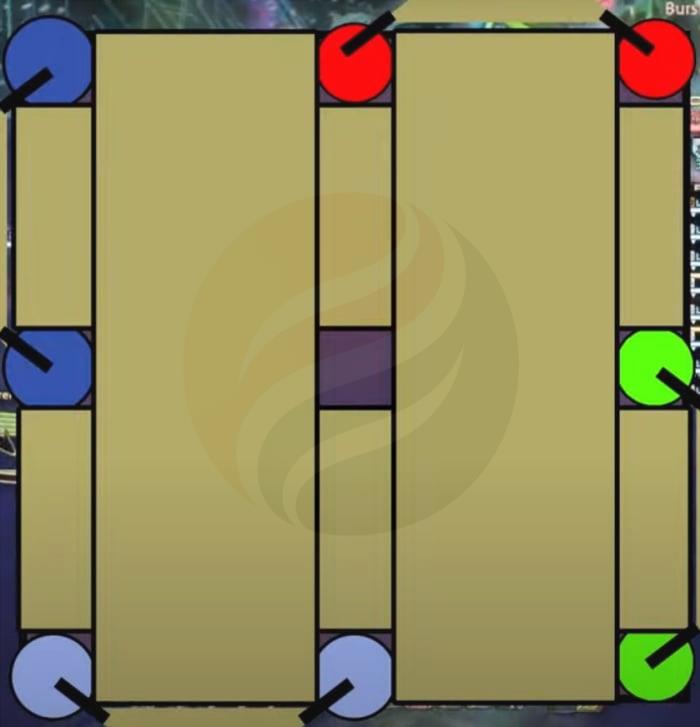
During this sequence, all eight players receive meteor targeting markers. Each impact deposits a meteor if striking a platform surface, generating splash damage to nearby allies. However, meteors dropped into the abyss while airborne avoid generating large AoE splash effects—they simply strike the targeted player then vanish without contacting solid ground. Teams require precisely four meteors per platform for the following mechanic. For the initial set while airborne, establish the L-shaped configuration demonstrated below.
Maintain aerial positioning while depositing the second meteor set off-platform edges. Note that these celestial projectiles inflict significant damage even when directed into the void, necessitating adequate mitigation and healing between impacts. Following the second meteor disposal, light parties should return to their respective platforms and descend. The boss then initiates Weighty Blow, targeting a random platform occupant with a potentially fatal assault. However, positioning immediately behind a meteor causes the obstruction to intercept the strike and detonate. Commence from the foremost meteor and, coordinating as a unit, retreat backward into each meteor to systematically detonate all four on each side.
The L-shaped formation proves advantageous because linear meteor arrangements toward the platform’s rear can create precarious positioning for obtaining cover. Positioning the final meteor laterally provides more reliable coverage. Any remaining meteors on platforms when World Shatter activates—returning the arena to normal—will catastrophically explode, creating undesirable complications.
Coronation: Linear AoE Resolution
Following World Shatter and additional tank busters, the Coronation mechanic manifests four linear AoEs, each connecting to two players. These tethered individuals can influence AoE movement based on their lateral or longitudinal distance from the attack origin.
Each participant should observe their connected linear AoE. If tethered to the left aspect, position directly on the cardinal point where the AoE initiated. For players connected to the right AoE side, proceed to the clockwise corner. This methodology safely evades all linear assaults. Subsequently, every player receives a substantial spread marker; maintain dispersed positioning using the illustrated formations.
Absolute Authority: Role-based Coordination
Absolute Authority designates one role with four flare debuffs while a player from the opposing role receives a split-damage AoE. The objective involves positioning flares in the arena’s corners while non-flare individuals converge centrally for the stack AoE. The split-damage AoE lacks magical vulnerability mechanics, enabling all four flare markers to stack within the split-damage area. Moving collectively as a unit with sufficient raid-wide mitigation allows survival without employing alternative strategies. However, if party finder groups prefer conventional approaches, implement the standard methodology.
Initiate with all members centralized—melee specialists and tanks advancing toward the boss while ranged combatants and healers retreat, depositing baited AoEs along their paths. Group one members then diverge westward once comfortably near the platform edge, while group two proceeds eastward. Flare-designated players should reach corners while non-flares proceed toward the center following separation. After flare and stack AoE resolution, every player receives an Isolation AoE overhead, necessitating proximity to at least one other player to prevent detrimental effects. To facilitate flare resolution, have melee and ranged groups meet midway between the room’s center and their respective partner’s flare position. Thus, group one melee and tank would converge midway with group one ranged and healer.
Virtual Shift: Ice Phase Navigation
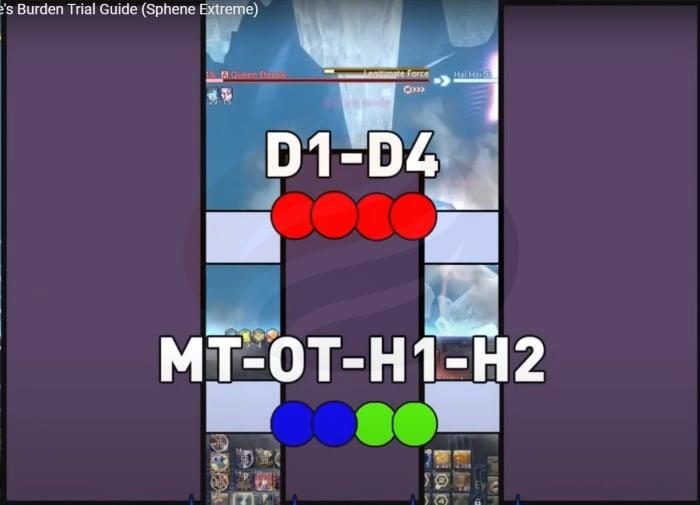
A directional knockback from the northern chamber sector precedes the final major phase mechanic—the ice elemental Virtual Shift. This transition positions all players on a narrow central platform. Establish formations with DPS forward and supports rearward, creating a compact alignment of D1 through D4 left to right and main tank, off-tank, H1, and H2 left to right in the backline. Law of Ice compels continuous movement until the ice debuff dissipates. This mechanic also generates four ice bridges, each capable of supporting only one individual simultaneously. Exercise extreme caution when traversing these structures individually to resolve subsequent mechanics efficiently. Destroyed bridges only regenerate upon subsequent Law of Ice casts, so maintain structural integrity.
Fundamentally, the player nearest their required crossing point proceeds first, while the most distant individual follows second. Thus, the leftmost DPS must extend their tether westward. They can cross immediately upon recognition since they’re closest to that bridge, while remaining players observe their traversal before proceeding. However, if that leftmost player required eastern crossing, they’d await another’s initial crossing.
While parallel icicle crossing remains technically possible, stretching tethers and taking lateral steps to avoid icicle paths proves effective. Immediately following icicle resolution, players resolving eastern and western icicles should return centrally via the nearest bridge. Players requiring far northern extension can either alternate using the northernmost platform—the individual closest to the center crossing first and the other second—or the more distant player can sprint completely rearward and cross to prevent congestion. Teams must reach the chamber’s center again to evade Legitimate Force, so ensure correct lateral positioning upon arrival.
We designate the innermost northern player for the north bridge and the outer player for the south bridge, though this demands considerable movement. Since Legitimate Force isn’t immediately fatal, accepting the impact proves safer than focusing exclusively on crossing, resulting in a vulnerability stack but survival. Healing specialists must verify all members approach optimal health tiers following icicle resolution. However, returning to the center before the next mechanic commences remains advisable regardless.
Radical Shift and Dimensional Distortion
The primary mechanic of this concluding phase involves Radical Shift, summoning dual replicas of various elemental arenas positioned east and west of the primary battleground, rotated 90 degrees. The Radical Shift animation displays the background behind Queen Eternal rotating clockwise or counterclockwise, indicating which arena Sphene will transform your platform into. Clockwise rotation activates the eastern arena, while counterclockwise engages the western arena. Participants become airborne during this transition, followed by spread AoEs targeting every combatant. Essentially, identify the emerging arena type, disperse according to that layout, then endure the spread impacts while maintaining sufficient health reserves, as these assaults inflict substantial damage. Both Radical Shift and accompanying AoEs deliver significant impact, necessitating robust mitigation and protective barriers for every strike.
Following two Radical Shifts, the boss executes Dimensional Distortion, producing alternating X-pattern assaults from the chamber’s front. Evade the initial sequence and advance into vacated zones after resolution to avoid subsequent attacks. The team must rapidly withdraw southward afterward to evade the boss’s half-room AoE, with each tank mitigating a dedicated damage tower. Designate group one’s tank for the western tower and group two’s tank for the eastern. Subsequently, numerous consecutive AoEs require mitigation and healing before the arena normalizes again.
From this juncture, the encounter repeats previously established patterns. Maintain exceptional healing and damage reduction throughout this concluding phase, as it progresses rapidly toward conclusion.
Action Checklist
- Establish light party assignments with predetermined spread positions before engagement
- Execute Aethertithe with proper lateral positioning and mitigation management
- Navigate Wind Virtual Shift with correct knockback positioning and chain resolution
- Coordinate Earth phase meteor placement using L-formation strategy
- Resolve Absolute Authority with proper flare placement and isolation mechanics
- Carefully traverse ice bridges one player at a time during final phase
No reproduction without permission:OnLineGames Guides » FFXIV Patch 7.1 – Minstrel’s Ballad: Sphene’s Burden Trial Guide Master Queen Eternal's complex mechanics with expert positioning strategies and phase-by-phase execution guides