TL;DR
- Complete normal trial first, then unlock extreme via Wandering Minstrel in Tuliyollal
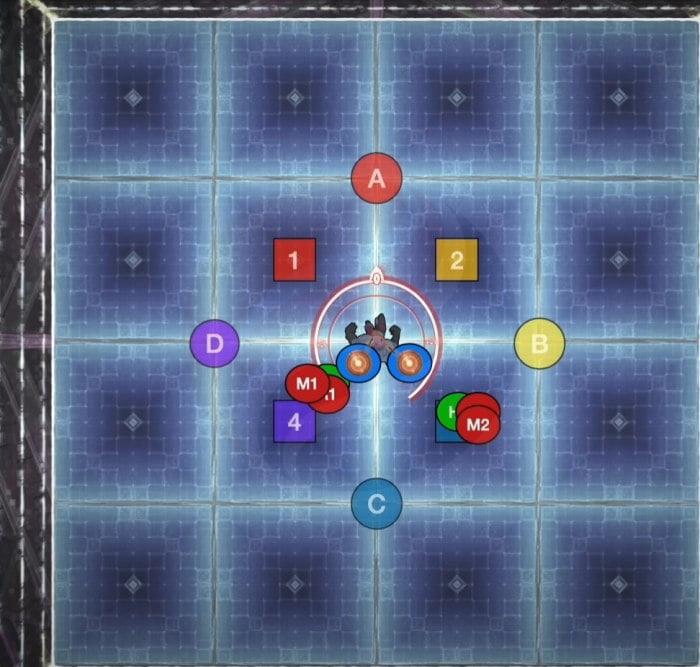
- Assign DPS to intercardinal clock spots and supports to cardinal positions
- Master the alternating pattern of Thorned Catharsis, Specter of the Lost, and Escelon’s Fall mechanics
- Coordinate Roseblood Bloom patterns with precise movement timing and positioning
- Execute final phase mechanics with calm precision to avoid enrage wipe
Final Fantasy XIV’s Recollection Extreme trial represents the pinnacle of Patch 7.2 content, presenting a formidable challenge against the boss Zelenia. This encounter demands exceptional spatial awareness, precise timing execution, and seamless team coordination to overcome its intricate mechanics. While content creator Mrhappy provides excellent visual guidance through his YouTube tutorial, this comprehensive guide delivers detailed written strategies for mastering every phase. For those seeking immediate access to rewards, professional completion services offer an alternative path through experienced raiders.
Unlocking Requirements: Before attempting the extreme difficulty, players must successfully clear the standard version as part of the Main Scenario Quest progression. Upon normal mode completion, visit the Wandering Minstrel located in Tuliyollal to unlock the significantly more challenging extreme variant.
Loot and Equipment Drops: Victorious parties receive item-level 745 weapons alongside various high-value crafting materials and endgame gear suitable for optimizing character performance.
Success in this encounter hinges on meticulous positioning preparation before engaging Zelenia. Establish specific clock positions around the arena perimeter, with damage dealers occupying intercardinal spots (NE, SE, SW, NW) while maintaining light party formations as the baseline organizational structure. Additionally, implement lineup assignments that position DPS roles on the Eastern sector and support classes on the Western flank to optimize mechanic resolution.
Zelenia employs an alternating combat rhythm between elaborate dance-style mechanics and conventional raid-wide assaults or tank-buster attacks. Understanding this pattern flow is crucial for anticipating and properly responding to each mechanic sequence.
Opening Sequence: Zelenia initiates combat with Thorned Catharsis, a substantial raid-wide damage event immediately followed by Shock. This dual-phase assault designates one role category to receive expansive area-of-effect damage while the other role must manage concentrated, player-baited AoE patterns. Simultaneously, four Tower mechanisms materialize in each arena quadrant with slight Eastern or Western displacement. Players must immediately relocate to predetermined clock positions and form partnerships according to color designations.
- Deploy large-scale AoE effects directly into Tower structures where they remain stationary throughout their duration.
- Compact AoE markers require rapid evacuation from group formations once they materialize. Accidental contact with donut-shaped AoE patterns triggers center-pull effects requiring careful positioning awareness.
Specter of the Lost: Following the initial engagement, Zelenia channels Specter of the Lost, spawning two tank-specific tethers. Each tank must secure one tether and orient them away from other party members. This phase demands substantial damage mitigation coordination, necessitating rapid party consolidation to minimize avoidable damage intake.
Escelons’ Fall: Zelenia executes Escelon’s Fall, delivering four consecutive cleave attacks. The targeting parameters for these cleaves depend on marker configurations displayed above Zelenia’s head.
- When markers appear in close proximity, cleaves target the four nearest combatants.
- When markers display wide separation, cleaves target the four most distant players.
Support roles should intercept the first and third cleave sequences, while damage dealers manage the second and fourth iterations, all while maintaining assigned positional designations. The movement sequences to employ include:
- Stay, Swap, Stay: Appropriate when the secondary marker set opposes the initial configuration.
- Swap, Stay, Swap: Used when the initial and final marker pairs share identical patterns.
Stock Break: After Escelon’s Fall concludes, Zelenia activates Stock Break, a four-stage divided-damage area attack. Healing specialists must maintain party health stabilization throughout this sequence. She subsequently channels Blessed Barricade, becoming immune to targeting, and summons four Roseblood drop Additional Duty System units. The primary objective becomes eliminating these ADS entities before the Aether measurement completes its accumulation.
Clone Mechanics: Duplicate entities then spawn along Eastern and Western boundaries, each establishing a connection with one player from their respective sides. Upon tether expiration, these clones deliver massive cleaving attacks across their designated sectors. The Eastern clone specifically targets damage dealers, while the Western clone focuses on support roles, making precise positioning absolutely critical. During this sequence, participants must also congregate in Tower structures according to their designated room side assignments.
Perfumed Quietus and Rose Blood Bloom: Following the additional duty phase, Zelenia casts Perfumed Quietus, another raid-wide mechanic requiring appropriate mitigation response. Then commences the encounter’s central feature with Roseblood Bloom activation. This mechanic generates floor patterns that interact dynamically with various area effects and boss abilities. Players must avoid the central bleeding hazard zone, as it inflicts substantial damage-over-time effects.
Roseblood Bloom 1: The initial iteration summons a floor configuration featuring a serpentine green safety zone. This protected pathway facilitates navigation through the rotating area effects Zelenia begins casting. The AoE patterns progress deliberately, allowing methodical movement rather than rushed reactions. Upon reaching the crimson termination point of the safety zone, all participants should remain stationary while the remaining rotational patterns complete. Subsequently, immediately disperse throughout the arena. Traversing red panel areas proves safe when no active AoEs are present, eliminating the necessity to remain confined within the serpentine pattern. Ensure you maintain proper spacing from other players and avoid standing on hazardous tiles.
Roseblood Bloom 2: The secondary Roseblood Bloom constitutes a comprehensive evasion mechanic. Upon activation, two secure sections become visible: one containing two safe positions along the outer perimeter and another with two safe locations along the inner ring. The objective involves relocating to the appropriate safety zone based on impending area effects. Zelenia casts Thunder Slash, generating a ring-shaped AoE followed by a close-range AoE combination. This sequence concludes with six successive cleaves originating from the boss individually. If uncertain about correct safety zone selection, attempt to evade the cleaves in reverse chronological sequence—maneuver into the final appearing cleave first, then into the preceding one. This technique presents considerable difficulty, making review of recorded gameplay footage valuable for practice and mastery.
Beyond fundamental mechanic execution, several advanced strategies significantly enhance success probability. For the opening Thorned Catharsis sequence, pre-positioning slightly toward your designated tower location before the cast completes reduces movement requirements and positioning errors. During Escelon’s Fall patterns, maintaining visual focus on Zelenia’s head markers rather than ground indicators improves reaction time and pattern recognition.
Common Positioning Errors: The most frequent mistakes involve improper clock spot alignment during phase transitions. Players often drift slightly from their positions during complex mechanics, creating cascading failures in subsequent patterns. Establish clear visual landmarks relative to your position to maintain consistency throughout the encounter.
Optimization Techniques: Experienced groups can implement role-specific cooldown rotations for predictable damage spikes. Assign specific mitigation responsibilities for each Thorned Catharsis and Perfumed Quietus casts, coordinating party-wide defensive abilities for optimal damage reduction. For Roseblood Bloom sequences, practicing the “last-first” dodge methodology in isolation helps build muscle memory for these counterintuitive movement patterns.
Timing Considerations: Most mechanics allow approximately 5-7 seconds for positioning and resolution. However, the final phase compression reduces this window to 3-4 seconds, requiring preemptive movement and heightened situational awareness.
Action Checklist
- Complete normal trial and unlock extreme via Wandering Minstrel in Tuliyollal
- Establish clock positions with DPS on intercardinals and supports on cardinals
- Practice Thorned Catharsis tower assignments and Shock baiting patterns
- Master Escelon’s Fall marker recognition and movement patterns
- Coordinate Roseblood Bloom navigation with team positioning
No reproduction without permission:OnLineGames Guides » FFXIV Patch 7.2: Recollection Extreme Trial Guide Master FFXIV's Recollection Extreme trial with comprehensive mechanics breakdown and advanced positioning strategies