TL;DR
- Use diamond formation for Limit Cut with counterclockwise movement based on wing direction
- Assign tower positions pre-fight with MT NW, OT SE, DPS intercardinals, healers flexible
- Position at third circle from center during Devour pattern for donut AoE safety
- Bait puddles in sequence: middle → tower positions → safe areas
- Coordinate laser mechanics by targeting specific crystals and timing cross-back movements
Prepare for an intense encounter with Arkveld in The Windward Wilds (Extreme), a mechanically demanding trial that tests party coordination and positional awareness. This Final Fantasy XIV extreme trial requires precise execution of complex mechanics with minimal margin for error. Drawing from Hector Lectures’ comprehensive analysis, we’ve developed enhanced strategies to streamline your progression and ensure consistent clears.
For players seeking alternative progression paths, professional raid completion services are available through trusted providers like MmoGah, offering skilled player assistance for those preferring to bypass the learning curve while still obtaining rewards.
Successful execution begins with strategic party organization. Form two light parties, but deviate from conventional composition by grouping both melee DPS together to maximize damage uptime, while positioning both ranged players in outward positions for mechanics resolution.

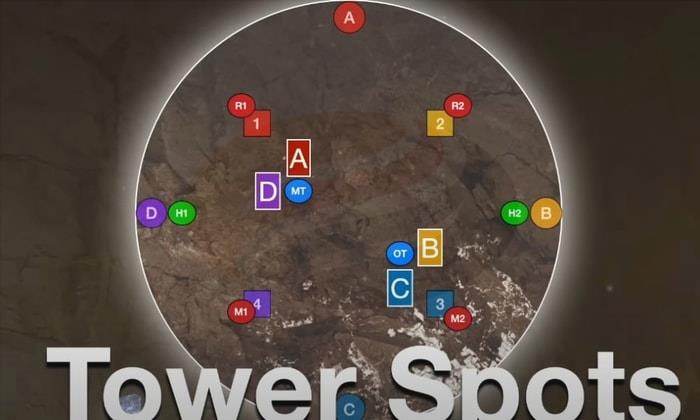
Mechanics resolution can utilize either 5-3 stacking configurations based on group preference. The off-tank has flexibility to either join the outward group or remain positioned for mitigation application and uptime maintenance. Pre-assign tower soaking positions to ensure efficient mechanic resolution:
Main Tank (MT): Northwest priority positioning
Off Tank (OT): Southeast priority assignment
DPS: Intercardinal positions coverage
Healers: Flexible filling based on mechanic requirements
Arkveld initiates combat with a distinctive crouching animation signaling an immediate raid-wide area-of-effect attack. Healers should prepare mitigation cooldowns and healing responses accordingly.
Side Swipe Combo Execution
The boss prepares a sequential two-hit side swipe combination. The initial cleave targets the arena center, followed immediately by a directional side cleave. Evade the center impact first, then rapidly reposition to the opposite side to avoid the secondary attack.
Crack Pattern Recognition and Response
Arkveld subsequently leaps to one arena side while the floor displays distinctive crack patterns:
- White cracks: Evacuate the central area initially, then relocate to the side position.
- Red cracks: Move outward initially, then return toward the middle section.
During crack pattern resolution, light party stacking mechanics activate:
- Group 1: Position proximate to the boss’s landing location.
- Group 2: Establish position slightly further outward.
Concurrently, linear area-of-effect attacks and player-targeted puddles appear. Prioritize puddle evasion first, then address line attacks. Following successful resolution of both white and red crack patterns, anticipate this sequence:
- Additional side cleave attack
- Subsequent crouching raid-wide area-of-effect
- The Devour area-of-effect pattern from normal difficulty
When Arkveld leaps northward and begins channeling the Devour mechanic, identify the third concentric circle from the arena center and position adjacent to it. Maintain this position until the boss reaches the designated circle, then move into the safe zone—this strategic positioning provides protection from all donut-shaped area-of-effect attacks.
Following this sequence, Arkveld returns to the central position and executes another directional cleave. Observe which wing the boss raises during the swipe animation—this indicates the hazardous side. Simultaneously, all party members receive spreading area-of-effect markers. Relocate to the secure side while maintaining adequate spacing between players.
Cleave vs Spread Priority Decision Making
When forced to choose between cleave damage exposure and overlapping spread markers, prioritize taking the cleave impact. Overlapping spread area-of-effect attacks will result in fatal damage to both affected players.
Subsequently, when Arkveld elevates its tail, avoid positioning directly behind the boss—this triggers a narrow linear attack rearward. Conclude this sequence with a coordinated party stack at the outer edge of the boss’s hitbox.
Following additional cleave sequences and raid-wide attacks, tower mechanics activate. Typically, smaller towers spawn near cardinal directions while two larger tank-buster towers require specific attention. Tank players should activate damage mitigation abilities before tower soaking.
Puddle Baiting Sequence Protocol
Before tower activation, three sequential puddle sets require strategic placement:
- First puddles: Position centrally for initial baiting
- Second puddles: Bait proximate to your pre-assigned tower location
- Third puddles: Place in any secure location—avoid tower proximity
Following puddle resolution, proceed with tower soaking assignments. Healers provide backup coverage for DPS roles when necessary. Upon successful tower activation, crystals materialize beneath them—standard towers generate smaller crystals while tank towers produce larger variants.
Exaflare patterns subsequently initiate movement from the central area outward. Maintain distance from crystals, as Exaflare contact triggers explosive detonations. Players simultaneously receive role-based spreading area-of-effect markers alternating between groups—maintain loose spacing while evading the advancing waves.
The text notification “Guardian Arkveld brings its might to bear” signals three consecutive raid-wide attacks: two moderate intensity followed by one severe impact. Coordinate substantial mitigation deployment for this sequence.
Phase 2 commences with another raid-wide attack, followed by the primary wipe mechanic: Limit Cut. Each party member receives numerical assignment 1-8. Arkveld establishes tether connection with Player 1 initially, then sequentially dives toward players in numerical order.
Diamond Limit Cut Strategy (Recommended Approach)
Each player should execute counterclockwise diamond pattern movement around the arena perimeter. When the boss tethers to your position, move away from the extended wing direction. This strategic positioning ensures cleave directions face away from the collective group. Player 1 positions at D, Player 2 continues counterclockwise progression, Player 3 moves to B, establishing continuous rotational pattern.
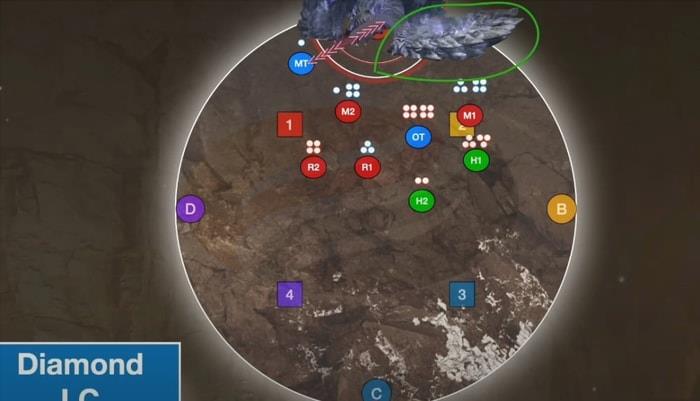
As each player receives targeting, advance slightly forward after impact to prevent cleave overlap. If the boss’s wing initiates on the opposing side, Player 1 instead positions at B, with the rotational pattern proceeding clockwise. Proper execution transforms Limit Cut into manageable, consistent mechanic resolution.
Following Limit Cut completion, another raid-wide occurs, succeeded by an additional tower phase resolved identically to previous iterations.
A new mechanical sequence follows: Laser targeting. One player receives marker designation, with pursuing laser tracking their position, annihilating any crystals encountered. Resolution protocol:
- Identify the substantial crystal positioned nearest to the boss.
- The marked player advances toward the designated crystal while remaining party members relocate to the opposite arena side.
- Once telegraph indication appears, the marked player crosses back toward the group—the crystal detonates harmlessly distant from all players.
Subsequent laser iterations repeat this pattern with light party stacking requirements:
- Group 1: Interior positioning
- Group 2: Exterior positioning
A third laser subsequently appears—execute crossing maneuver again and maintain loose spacing for subsequent area-of-effect attacks.
Arkveld cycles through previously encountered mechanical patterns:
- Exa area-of-effect attacks (vertical + horizontal orientations)
- Side cleave sequences
- Devour pattern execution
- Spread + Tail Swipe + Stack combinations
The concluding new mechanic involves Exaflare waves materializing in paired sequences. These traverse the arena and trigger crystal detonations upon contact. For safe resolution, position along one of the final Exaflare lines that generate, maintaining distance from all crystals.
Following this, Arkveld reiterates familiar mechanical sequences for several minutes. Eventually, the text “Guardian Arkveld brings its might to bear” reappears. Maximize damage output and defeat the boss before the ultimate raid-wide activation, otherwise encounter failure occurs.
The Windward Wilds (Extreme) presents an extended, pattern-intensive encounter emphasizing precise positioning, situational awareness, and coordinated party execution. Mastery of Limit Cut and tower phases establishes foundation for consistent progression, with remaining encounter comprising primarily mechanical repetition. Maintain composure, communicate mechanics clearly, and Arkveld will succumb to your party’s coordinated assault.
Action Checklist
- Assign tower positions pre-pull with MT NW, OT SE, DPS intercardinals
- Position at third circle during Devour pattern, move in when boss reaches it
- Execute diamond pattern for Limit Cut based on wing direction
- Bait puddles in sequence: middle → tower spots → safe areas
- Coordinate laser mechanics by targeting specific crystals and timing cross-back
- Maximize DPS during final phase to beat enrage timer
No reproduction without permission:OnLineGames Guides » FFXIV Patch 7.35 The Windward Wilds (Extreme) Guide – How to Defeat Arkveld Master Arkveld's mechanics with expert strategies, positioning tips, and common mistake avoidance for The Windward Wilds (Extreme)