TL;DR
- Soil Power’s hidden mechanic disables enemy damage reduction auras when combined with centipede skills
- Maintain maximum ferocity stacks by casting Jaguar skills within Mystic Circle boundaries
- Prioritize elite pack elimination over trash mobs for faster progression completion
- Strategic boss selection with add-spawning capabilities dramatically reduces clear times
- Movement speed bug exploitation provides 200% speed boost for efficient map traversal
Conquering Diablo 4’s Pit 150 during Season 6 demands precise gear optimization, particularly when utilizing the Quill Volley Spiritborn specialization. This comprehensive guide delivers actionable strategies that transform near-success into consistent victory through calculated equipment choices and combat execution.
Your core equipment foundation should incorporate these critical components:
• Duelist Aspect: Functions as your primary damage amplifier through ferocity stacking mechanics.
• Shroud of False Death: Delivers essential survivability through damage mitigation and health recovery systems.
• Plains Power on Gloves: Provides substantial attack power escalation that scales with your accumulated ferocity.
• Interdiction on Pants: Enhances defensive capabilities through crowd control resistance and damage reduction.
• Soil Power: Selected over Apprehension for its superior utility against specific enemy types.
• Banish Lord’s Talisman: Boosts comprehensive character statistics across multiple combat dimensions.
• Redirected Force Legendary Aspect: Amplifies targeted skill effectiveness when positioned on ring slots.
• Fell Soothsayer: Generates additional combat buffs when equipped on secondary ring position.
• Rod of Keepeleke: Serves as the definitive build-completing item that unlocks maximum potential.
Strategic gear selection prioritizes Soil Power instead of Apprehension, especially when your equipment quality remains suboptimal. Soil Power currently exhibits an advantageous interaction where encountering enemies displaying purple damage reduction auras triggers a transformative mechanic. Deploying a Mystic Circle followed by any centipede skill execution within the circle’s perimeter transforms its visual indicator to green. This color shift signifies the Mystic Circle has been influenced by centipede abilities, effectively neutralizing the enemy’s damage reduction aura entirely. This undocumented feature can accelerate clear speeds by 15-20% when properly utilized against aura-protected enemy groups.
Critical optimization involves securing gloves with Lucky Hit properties, specifically those offering up to 15% chance to replenish primary resources. These specialized gloves enable replacement of the Midnight Sun ring while maintaining complete build functionality. Additionally, the Duelist aspect must occupy your helmet slot to maximize ferocity stack accumulation while providing multiplicative damage scaling from Plains Power based on your current ferocity level. The Duelist aspect’s mechanics specify that casting any Jaguar skill within a Mystic Circle (all Spiritborn skills qualify as Jaguar skills) maintains ferocity at maximum capacity while increasing damage output according to legendary aspect specifications. Consequently, throughout your entire Pit run, you must concentrate on drawing all hostile entities into the Mystic Circle’s area of influence whenever possible.
Mastering Pit 150 clearance requires sophisticated combat execution centered around elite pack elimination as your primary progression method. This approach represents the most time-efficient strategy for filling the completion bar while minimizing unnecessary combat engagements.
Execute these strategic phases systematically:
1. Elite Pack Targeting: Identify and eliminate elite enemy groups to rapidly advance progression metrics.
2. Aggressive Pulling: Utilize the Fell Soothsayer aspect to draw additional enemies into the Mystic Circle, maximizing area-of-effect skill efficiency.
3. Aura Disruption: Position damage reduction aura enemies within the Mystic Circle and employ rapid skill execution to neutralize them.
4. Rotation Consistency: Maintain identical skill sequencing patterns while casting all abilities within the Mystic Circle to optimize damage output.
Advanced Skill Rotation Execution
Initiate combat sequences with Armored Hide, followed by Scourge, Vortex, Hunter, and secondary Vortex activation to maximize resilience stacking. Scourge enhances the Mystic Circle’s properties while removing damage dampening effects, Vortex draws enemies into optimal positioning, and Hunter resets your most recent skill (typically Vortex) while exceeding maximum ferocity capacity. Employ Quill Volley Jaguar skills for exceptional single-target damage delivery. When Ra’s taunt activates every 25 seconds, you receive a 15% multiplicative damage increase, while Onion provides attack speed acceleration. Throughout Pit 150 execution, maintain elite pack focus while anticipating encounters with problematic damage reduction enemies. Equipment featuring Soil Power effectively counters these defensive mechanisms. Maintaining approximately 13 minutes remaining upon reaching the second floor indicates optimal pacing. Rapidly bypass standard enemy groups while continuously scanning for elite targets, execute your rotation combo, then advance immediately. Consistently maintain Ravager activation while preserving all beneficial buffs throughout the engagement.
Combat within the Mystic Circle demonstrates dramatic damage differentials. Once the Mystic Circle activates, damage output escalates significantly, though remain vigilant as enemies will retaliate aggressively. Without maximum resistance and armor values, you risk significant health depletion. Activating Protection Shrines substantially improves defensive posturing. Progress forward methodically, familiarize yourself with map layouts, and anticipate elite monster concentrations in central areas. Following Mystic Circle placement, execute Armored Hide, Scourge, Vortex, Hunter, and subsequent Vortex in sequential order, perpetually keeping Ravager active. Utilize Quill Volley skills for rapid repositioning. When confronting enemies with damage reduction auras, the green-tinted Mystic Circle (empowered by Soil Power) provides the necessary countermeasure.
Strategic boss selection critically impacts your Pit 150 completion efficiency. Progress toward the boss location while prioritizing encounters with adds-spawning bosses. Engaging bosses without additional minions proves suboptimal for time management. These specific bosses should be avoided due to their time-wasting characteristics:
• Bramble: Lacks sufficient add mechanics for efficient elimination.
• Mother’s Judgment: Provides inadequate opportunities for damage amplification through add elimination.
• Chief Marauder: Features limited add spawning that slows progression pace.
• Den Mother: Although spawning adds at approximately 40% health threshold, still represents inefficient time investment.
Upon reaching the boss encounter within time constraints, you possess flexibility to attempt additional runs for simplified completion. Continuing forward, the boss materializes—Slither. Slither represents an optimal boss selection due to consistent add spawning mechanics. You’ll observe his positioning within a Mystic Circle, enabling ferocity stack accumulation. When additional enemies appear, draw them into optimal positioning and attempt to capture vulnerable targets using Fell Soothsayer mechanics. This approach enables approximately 25% health reduction per add elimination cycle.
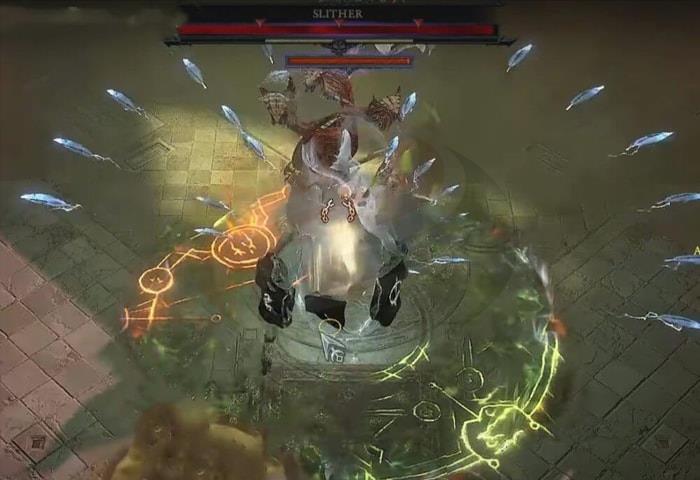
Maintain identical rotation patterns, await add respawning, and you can efficiently defeat the boss. Position additional enemies toward the boss, consolidate them collectively. You’ll witness substantial boss health depletion throughout Pit 150. These Slither encounters conclude rapidly. With numerous additional enemies present, Belial activates, and you successfully complete Pit 150 utilizing this strategic methodology.
Mercenary configuration significantly influences your combat effectiveness throughout Pit 150 progression. For mercenary specialization, I strongly recommend the Valiance tree, incorporating Shield Charge, Raheir’s Guard, Provoke, and Mocking Lure, which amplifies your damage output every 25 seconds. For reinforcement mercenaries, select Varyana with the Bloodthirsty option, which triggers automatically whenever you execute any skill during combat sequences.
Additionally, remain cognizant of the movement speed anomaly when activating skills during combat. You can strategically leverage this technique, commonly referred to as the mount bug or movement speed exploit. Access your character interface and locate movement speed statistics. Within the skill tree navigation, proceed to the Efficiency category, where the Brilliant node exists, enhancing Quill Volley damage proportional to your movement speed values.
To execute this technique effectively, simultaneously press mount and sprint commands, then press mount again. Following auditory confirmation, press mount once more. Examine your statistical overview and material inventory; your movement speed will display 200% enhancement. Upon dismounting, you’ll observe wind trail effects surrounding your character, indicating maximum movement speed attainment. This strategic exploitation facilitates accelerated movement between enemy groups, enabling more efficient Pit 150 completion.
For those preferring comprehensive instructional content, you can view the video tutorial by selecting this link. It offers sequential guidance and visual demonstrations to help perfect the strategies and methodologies detailed throughout this guide.
Action Checklist
- Configure gear with Soil Power to counter damage reduction auras through centipede skill interactions
- Execute movement speed bug for 200% speed boost between enemy groups
- Prioritize elite pack elimination while bypassing standard enemy groups
- Maintain Mystic Circle positioning for maximum ferocity stack maintenance
- Select bosses with add-spawning capabilities like Slither for efficient elimination
No reproduction without permission:OnLineGames Guides » How to Clear Pit 150 in Diablo 4 Season 6 Master the Quill Volley Spiritborn build with advanced strategies to conquer Diablo 4's Pit 150 challenge efficiently