TL;DR
- Install Palworld Dedicated Server from Steam Tools and perform initial launch to create necessary folders
- Configure server settings by copying DefaultPalWorldSettings.ini content to PalWorldSettings.ini
- Use local IP address with port 8211 to connect from the same network
- Set up port forwarding on your router using default gateway and IPv4 address
- Share public IP address with friends for external access while keeping server running
Palworld’s Steam edition enables players to establish dedicated servers supporting up to 32 concurrent participants in a shared gaming environment. While this feature provides excellent multiplayer opportunities, the initial setup process can present challenges for newcomers. This comprehensive tutorial provides detailed instructions for configuring a dedicated server specifically for the Steam version of Palworld.
It’s essential to recognize that servers created through this approach come with specific operational requirements: Your server must remain active whenever friends intend to join sessions. Additionally, dedicated server functionality is currently exclusive to the Steam platform, meaning Xbox and PC Game Pass users cannot access this feature at present.
For players across all platforms seeking enhanced gameplay experiences, MmoGah offers affordable access to Palworld items and gold coins to enhance your adventure.
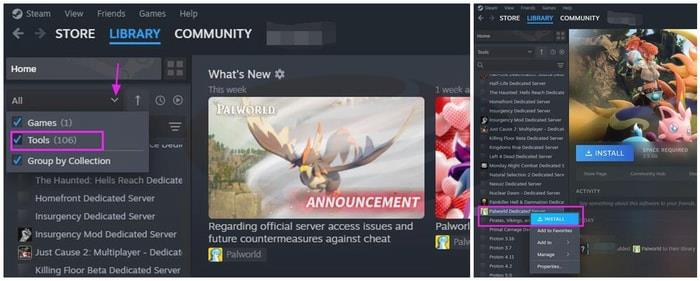
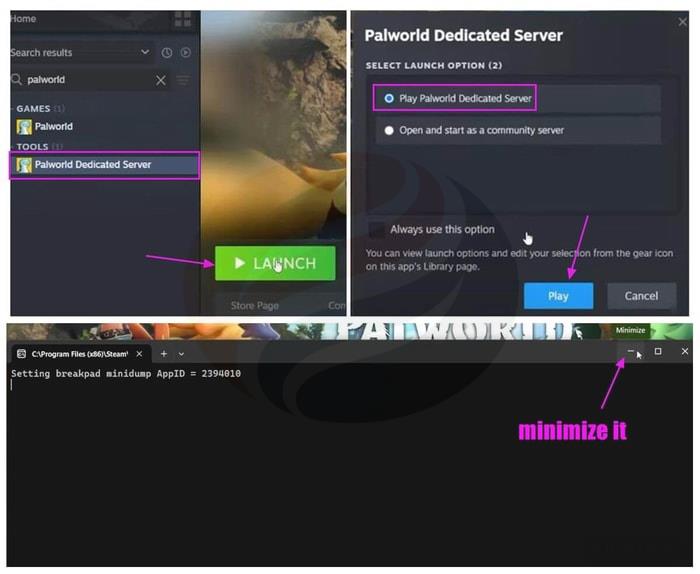
Begin by accessing your Steam Library and enabling the Tools filter option. Search for “Palworld” and right-click on “Palworld Dedicated Server” to initiate installation.
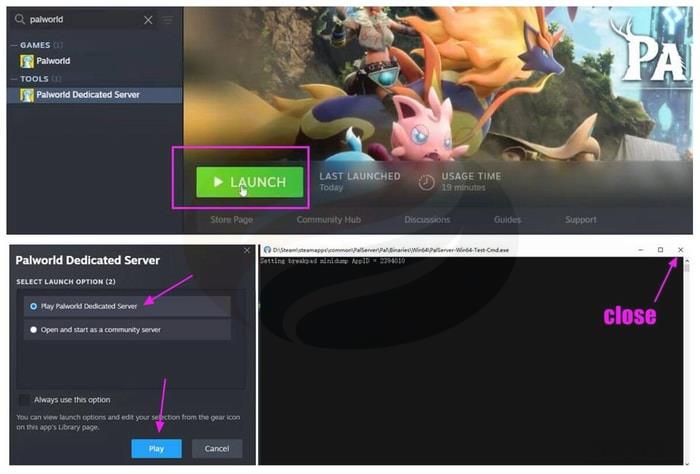
After installation completes, start the Palworld Dedicated Server application and select “Play Palworld Dedicated Server“. Once the command interface appears, close it immediately. This preliminary step is crucial because failing to execute the server initially will prevent creation of the essential “Saved” directory structure required for subsequent configuration.
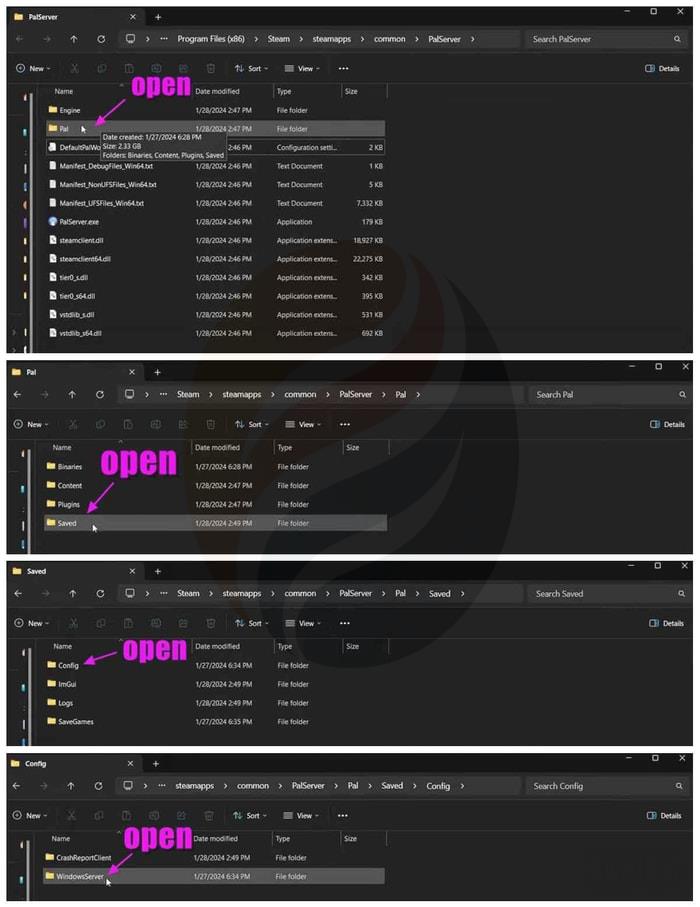
Right-click the Palworld Dedicated Server within your Steam interface, then navigate to “Manage” → “Browse local files“, which will open the primary “PalServer” directory.
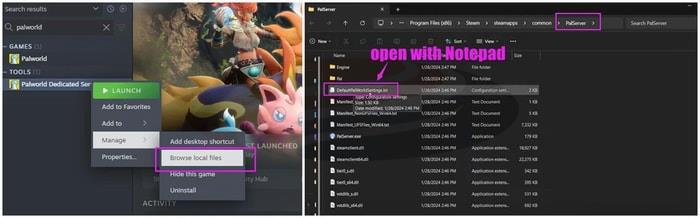
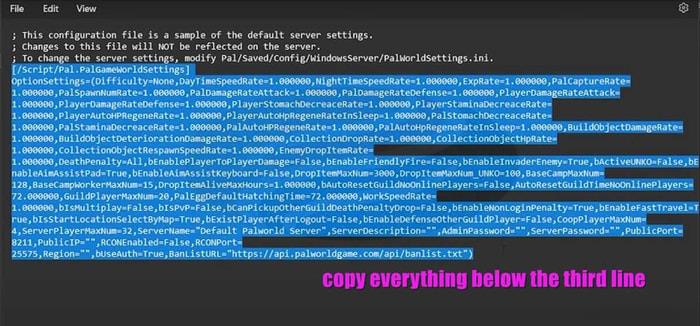
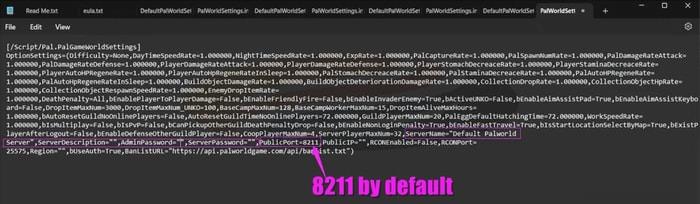
Locate the file named “DefaultPalWorldSettings.ini“, right-click it, and choose “Edit in Notepad“. Copy all content positioned below the third line within this document and locate another configuration file called “PalWorldSettings.ini” by sequentially accessing these directories: “Pal” → “Saved” → “Config” → “WindowsServer“.
*Important: The Saved directory will not exist unless you’ve previously executed the Dedicated Server application at least once.
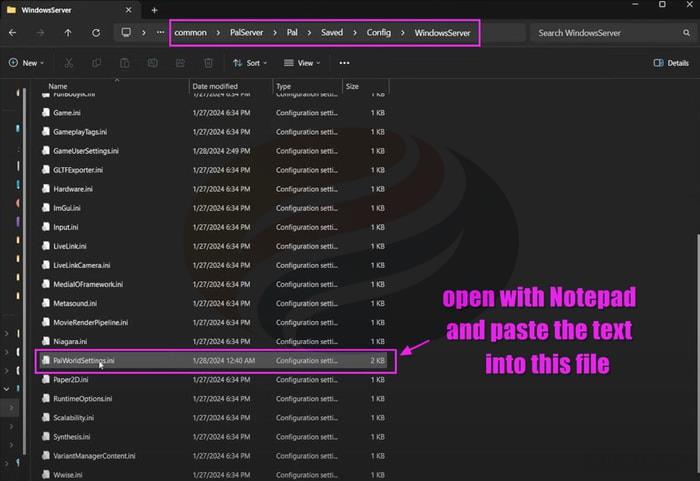
Transfer the copied configuration data into “PalWorldSettings.ini” and preserve changes. This configuration text contains critical server parameters, allowing customization of elements including server designation, descriptive information, access codes, and various gameplay settings. Additionally, it’s valuable to know that typically your PublicPort designation defaults to 8211.
Return to Steam, activate your Palworld Dedicated Server application, and choose “Play Palworld Dedicated Server“. This time, after the command interface launches, minimize it rather than terminating the process.
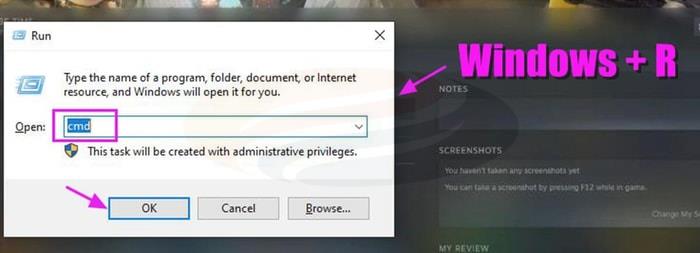
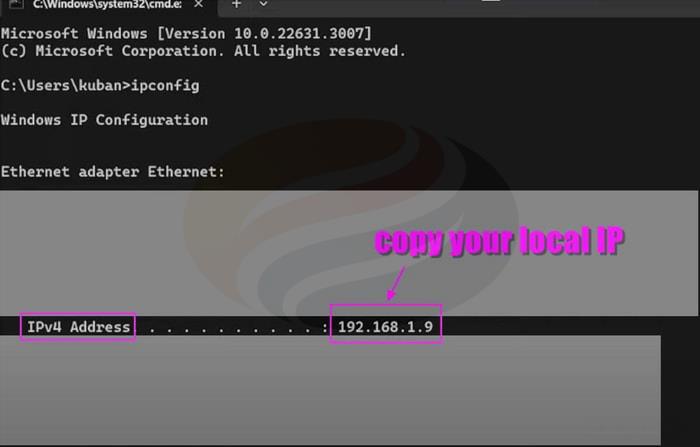
Next, you’ll need to obtain your local network IP address to establish connection with your server. To retrieve your local IP address, launch your computer’s command interface by pressing Windows + R simultaneously. When “cmd” displays, select “OK“. Within the terminal window, enter “ipconfig” and press Enter, then locate your IPv4 address entry. Copy the numerical sequence of your IPv4 designation using Ctrl + C and exit the command interface.
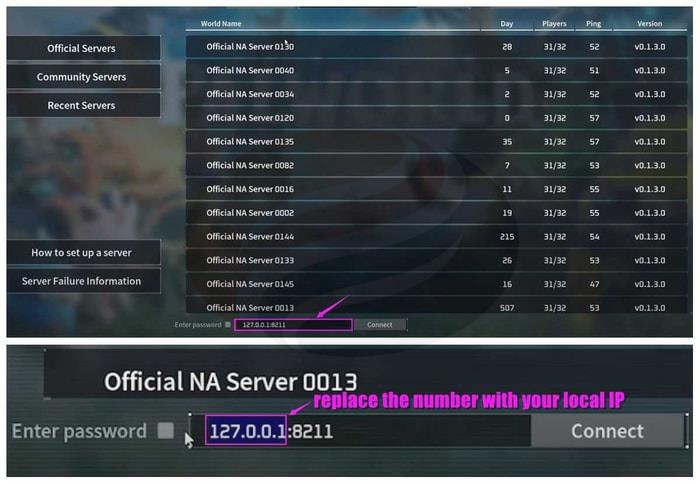
After securing your local IP address, open your Palworld game through Steam and select “Join Multiplayer Game“.

Substitute the numerical sequence preceding “:8211” with your personal local IP address and establish connection. Should you have previously configured server authentication credentials, you must also provide the password at this stage.
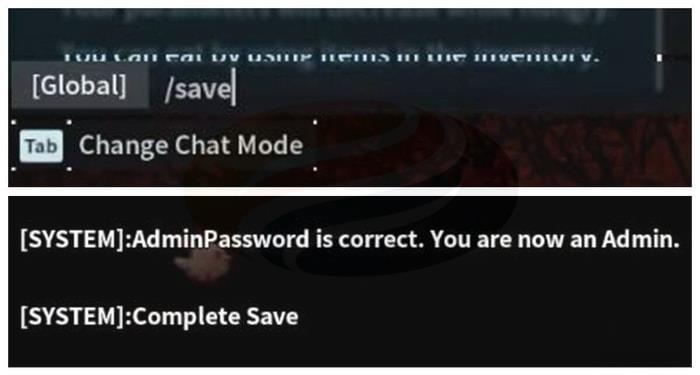
Upon successful server entry, you’ll likely want administrative control over your server environment: Press Enter and input “/adminpassword ****(your password) “then press Enter.
As demonstrated, you now possess administrative privileges. Subsequently preserve server state by pressing Enter and typing “/save“, then press Enter and terminate both game and server applications.

Now, proceed to enable external access for your friends to join your server sessions. To accomplish this, you must first configure port forwarding for your IP address.
Launch your command interface again using Windows + R and input “ipconfig” once more. This iteration, rather than copying the IPv4 address, you need to capture the numerical sequence of your Default Gateway designation. Accessing this address through your web browser will direct you to your router administration interface, where you can establish Port Forwarding configurations.

Pro Tips: Typically, you can employ “admin” as both username and password for authentication. Alternatively, examine the rear panel of your networking equipment to obtain login credentials.
Your primary objective within the router administration panel involves locating the functionality labeled “Port Forward“. This option might reside within Security sections, Network configurations, or Quick Setup menus. Thoroughly inspect all available options to identify the Port Forwarding feature (occasionally, this functionality may bear alternative naming conventions).
Within the Port-Forwarding configuration interface, you’ll need to provide your Service Port, Internal Port, IP address, and Protocol specifications.
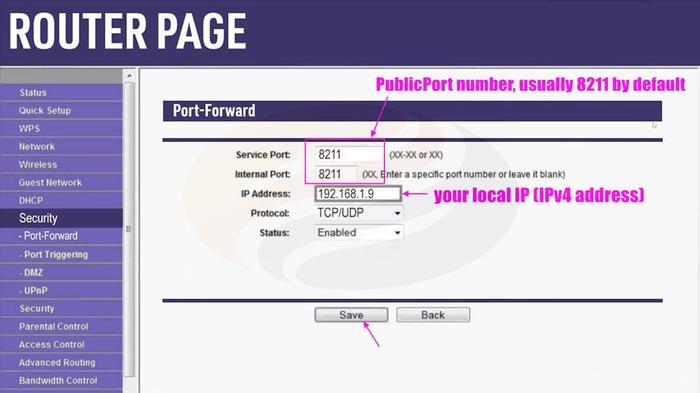
For both Service Port and Internal Port fields, input your PublicPort designation, typically defaulting to 8211. However, should you possess an alternative PublicPort number, enter your specific numerical values into these fields.
The third input field, IP Address, requires your IPv4 address (not your Default Gateway designation).
When completing the fourth configuration field, ensure the Protocol selection includes both TCP and UDP protocols. If your router interface doesn’t permit simultaneous protocol configuration, you must establish separate entries (perform Port-Forwarding procedures twice).
Finally, save all configuration modifications.
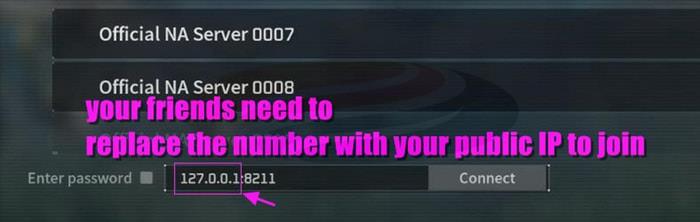
After successfully implementing port forwarding configurations, you can facilitate friend connections using your public IP address. But how exactly do you locate your public IP designation? The process is remarkably simple.
Access the whatismyipaddress website through your browser, where you’ll observe your IPv4 address displayed. Copy this IPv4 designation from the webpage. When companions wish to access your server, they simply need to substitute the numerical sequence preceding the PublicPort designation (:8211 by default) on Steam. Critical reminder: Your server must remain operational whenever friends intend to participate in sessions.

Action Checklist
- Install Palworld Dedicated Server from Steam Tools and perform initial launch
- Configure server settings by copying DefaultPalWorldSettings.ini to PalWorldSettings.ini
- Set up port forwarding using default gateway and IPv4 address
- Share public IP address with friends while keeping server running
- Test connections from both local and external networks
No reproduction without permission:OnLineGames Guides » How to Set Up a Palworld Dedicated Server on Steam for Free Complete guide to setting up and managing your own Palworld dedicated server with friends