TL;DR
- Prepare Time Stop Potions, Whirlwind/Dark Grenades, and movement aids for optimal performance
- Master the hallucination space by memorizing shapes and navigating safety zones with reversed controls
- Manage meteor drops strategically to preserve tile HP and prevent raid wipes
- Coordinate yellow meteor drops at specific HP thresholds (188, 137, 87, 37)
- Utilize Inanna and Xena strategically during critical gimmick phases
Strategic Battle Preparations
Before engaging Brelshaza’s sixth gate, meticulous item preparation separates successful raids from failed attempts. Your core inventory should include:
• Time Stop Potion: Critical for surviving lethal field mechanics and normal patterns
• Whirlwind Grenade: Essential for classes with low stagger capabilities
• Dark Grenade: Optimal DPS boost for high-stagger classes
• Swiftness Robe/Marching Flag: Movement speed enhancement for precise gimmick execution
Strategic Tip: Coordinate with your raid leader to ensure balanced item distribution across the party, avoiding duplicate coverage while maintaining all essential functions.
Shape Identification and Survival
At approximately 210 HP bars, Brelshaza initiates the hallucination phase, teleporting to center stage and isolating all eight combatants. Each player receives a unique geometric symbol: Circle, Diagram, Triangle, Square, Pentagon, Hourglass, Octagon, and Star. Immediate shape memorization is paramount—failure to recall your assigned form guarantees elimination in subsequent mechanics.
Common Mistake: Players often focus solely on dodging missiles from her backside while neglecting their shape memorization duty.
During isolation, monitor your mana bar for the pointer reverse debuff—a status effect that inverts movement commands. During three consecutive safety zone appearances, you must consciously move opposite your intended direction. Note: This debuff temporarily lifts during the second safety zone appearance.
Advanced Strategy: Record your three safety zone directions using clock positions (example: Star shape directions: 7, 0, 11—where 0 indicates center safety.
Post-survival, the boss reveals one shape visibly. The corresponding player must immediately communicate their memorized safety directions, as the entire party must relocate to these positions.
Critical Insight: If a player perishes during isolation, their shape may still appear, creating an information gap that requires educated guessing.
1ST Yellow Meteor: Tile Preservation Fundamentals
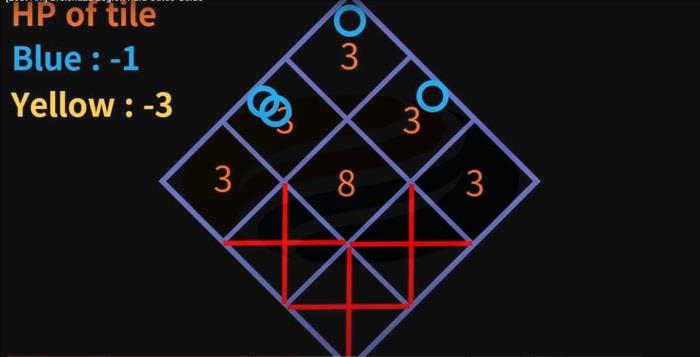
At 188 HP bars, witness the meteor strike cutscene and immediately converge at 12 o’clock position. Eight meteors distribute randomly: one yellow (3 HP damage) and seven blue (1 HP damage each).
Strategic Distribution: The optimized splitting pattern prevents tile overdestruction:
• Positions 1-3: 12 o’clock tile
• Positions 4-6: 11 o’clock tile
• Positions 7-8: 1 o’clock tile
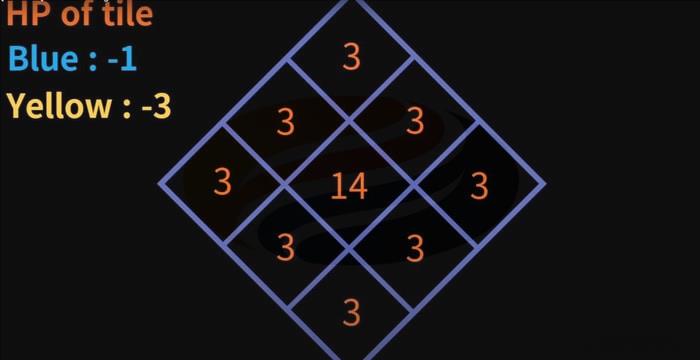
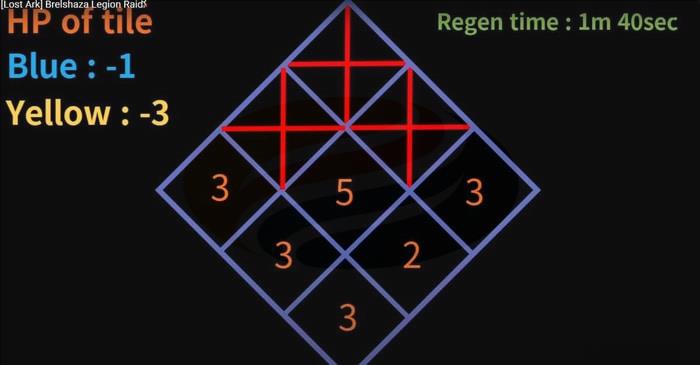
Tile HP Visualization: Peripheral tiles possess 3 HP each, while the central tile maintains 14 HP. Destruction occurs when HP reaches zero, and losing more than three tiles triggers immediate raid termination.
Regeneration Timing: Tiles restore after 1 minute 40 seconds from destruction. Calculate regeneration time by subtracting this duration from berserk timer.
2nd Yellow Meteor: Strategic Bottom Destruction
At 137 HP bars, the designated player must traverse to 6 o’clock position for meteor deployment.
DPS Management: Overly aggressive damage output can trigger the second yellow meteor before top tile regeneration, causing unavoidable raid failure.
Critical Calculation: For second yellow meteor timing, subtract one minute from berserk time rather than the standard 1:40.
Spare Tile Conservation: Preserve 3 and 9 o’clock positions as emergency reserves, deploying them only during dire positioning emergencies.
Giant Mommy Sequence: Orb Management Mastery
At approximately 113 HP bars, Brelshaza teleports centrally, initiating the cussing sequence. All tiles must be fully regenerated before this phase initiates.
Post-cussing, navigate two shrinking circle attacks, then dash according to party assignment formulas.
Orb Collection Phase: Four black orbs distribute randomly across tiles. Players in black orb positions must collect minimum one yellow orb while avoiding red orbs entirely.
Strategic Distribution: Non-black orb players require two yellow orbs each while deliberately contacting red orbs.
Phase Separation: Successful orb collection splits the party: four players transport to yellow field (inner side), while four remain with the boss (outer side).
Clone Mechanics: Outer side players must locate and ping clockwise/counterclockwise rotating clones for inner side coordination.
Twister Pattern: Strategic Mark Management
3rd Yellow Meteor: Final Phase Execution
At approximately 62 HP bars, twisters traverse the battlefield. Marked players must evade these projectiles while maintaining their status indicator.
Object Destruction: Players retaining their marks transport to alternate dimension containing destructible objectives. Failure to eliminate these targets generates movement-impeding black holes.
Final Hallucination: At 28 HP bars, the boss activates enhanced hallucination mechanics with three pre-destroyed tiles and randomized pointer reverse sequences.
Pro Tip: Deploy Inanna during this phase to neutralize the debilitating pointer reverse effect across your entire raid team.
Critical Normal Pattern Recognition
Beyond major gimmicks, Brelshaza employs numerous lethal normal patterns requiring precise execution and strategic Time Stop utilization.
In Raising Lines: Spike Transfer Protocol
Line and Spike Distribution: Designated players receive connecting lines while others manifest spikes. Spike-bearers must physically contact line-holders to assume their markers.
Failure Consequence: Unclaimed lines trigger massive meteor impacts on the original recipients, dealing catastrophic damage to unprepared parties.
Balls Gathering: Controlled Detonation Management
Gather and Split: Sequential Circle Management
Red Circle Protocol: Initial marker requires full party convergence, followed by strategic separation when larger circles appear on alternate players.
Strategic Insight: Maintain constant spatial awareness during pattern transitions, as delayed reactions to circle changes guarantee significant health depletion or instant elimination.
Glass Field Navigation: Safety Zone Prioritization
During glass field manifestation, simultaneously track safety zone locations while the designated beam-targeted player maneuvers the lethal projection away from secured areas.
Execution Priority: First redirect the beam to non-critical areas, then rapidly transition to identified safety zones.
Action Checklist
- Prepare Time Stop Potions, movement aids, and class-appropriate grenades
- Memorize assigned shape immediately upon hallucination phase initiation
- Navigate safety zones with reversed controls during three-sequence appearance
- Execute meteor splitting patterns at designated HP thresholds
- Coordinate yellow meteor drops at 188, 137, 87, and 37 HP bars
No reproduction without permission:OnLineGames Guides » Lost Ark: Brelshaza Legion Raid Gate 6 Guide Master Brelshaza Gate 6 with expert strategies, meteor management, and survival techniques for guaranteed success