TL;DR
- Blue boss requires active mechanics execution while purple boss demands safe zone positioning
- Orb color sequence (red, blue, green, white, black) repeats twice with specific gate color assignments
- Stagger checks at 37 and 12 bars require orb blocking and safe zone communication
- Normal patterns include one-two combos, dashes, lasers, and donut attacks with distinct safe zones
- Party coordination and communication are essential for raid success across both boss phases
This comprehensive Lost Ark Vykas Gate 1 Legion raid guide provides detailed breakdowns of all major mechanics and normal attack patterns. Understanding these mechanics is crucial for successful completion and avoiding costly wipes.
Vykas Gate 1 features two distinct bosses: the Incubus Morphe and Nightmarish Morphe, commonly referred to as the blue and purple bosses respectively. Upon entering the raid, your team will initially face Incubus Morphe. After dealing approximately 54 bars of damage, he teleports to the center, triggering the party split mechanic.
The raid divides into two groups – one handling the blue boss with active mechanics execution, while the other manages the purple boss requiring precise positioning within purple safety zones. Proper party balance is essential as the purple boss’s HP decreases more slowly when teams are evenly matched. The Neva sidereal skill should be deployed on the purple side to accelerate damage output. Once both bosses reach 30 bars or below, the parties swap bosses, requiring adaptation to different mechanics sets.
Orb Color Sequence and Gate Mechanics
The first major mechanic activates when the blue boss reaches approximately 49 bars. He teleports to the center and creates a white protective circle – remain inside until the explosion completes, then immediately assume your designated positions. Players should utilize the ‘times three plus one’ formation while awaiting orb spawns.
Critical mechanics knowledge: the orb color progression follows a fixed sequence of red, blue, green, white, and black. This pattern repeats exactly twice, requiring players to guide orbs to matching colored gates before the second circle sequence concludes.
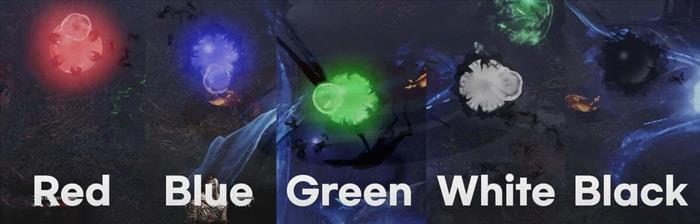
Gate color assignments are position-specific: one and seven o’clock gates accept only red or green orbs, while five and eleven o’clock positions accommodate blue or white exclusively. Orb movement patterns are predictable – top-positioned orbs drift leftward, while bottom orbs move right. Position accordingly to intercept and redirect them efficiently.
Failure consequences vary by difficulty: in normal mode, two or more failed players can utilize Time Stop Potions when the boss folds his wings, but hard mode imposes immediate raid wipe conditions for similar failures.
Stagger Check and Orb Blocking Mechanics
The second major mechanic triggers at 37 bars. After teleporting and gathering energy, a stagger check initiates – deploy whirlwind grenades and prioritize high-stagger skills. Successful completion grants players either blue or black orb assignments above their heads.
Positioning requirements: black orb carriers move to one and seven o’clock positions, while blue orb holders position at eleven and five o’clock.
Ground circles illuminate in sequences matching your orb color – memorize the activation order as orbs will travel from these locations toward the boss. Physically intercept and block incoming orbs using your character’s body – failure to prevent orb contact with the boss results in immediate raid restart.
Pro tip: slower character classes should activate Swiftness Robe during this phase to ensure proper positioning. After successful blocking, safe zones appear either surrounding the boss or at distance – immediately communicate safe zone locations to the opposing party for their survival.
Boss Switching and Final Mechanics
Continue damaging the blue boss until reaching 30 bars, then switch with the purple boss team once both reach threshold. Post-switch, await explosion sequence completion before engaging.
If beginning with purple boss, the blue boss will retain approximately 30 bars. Reduce his health to around 25 bars to trigger middle teleportation and energy gathering – identify and communicate white circle locations to ensure opposing party safety.
Final mechanics occur around 12 bars with another stagger check and blue/black orb pattern repetition. Complete the sequence and communicate whether interior areas provide safety. Beyond this point, no additional major mechanics exist for the blue boss.
Quick Positioning Reference
Q1: What color gate should I prepare for at my position?
Blue or white gates since you’re positioned at 11 o’clock.
Q2: Where should I position with my assigned orb color?
1 o’clock or 7 o’clock positions when carrying black orbs.
Understanding normal attack patterns is equally crucial as mastering special mechanics. These recurring attacks test raid awareness and positioning throughout the encounter.
One-Two Combo Variations
The boss executes a one-two punch combination followed by either a 270-degree kick or cross-shaped attack. Initial positioning behind the boss during his 1-2 sequence provides safety, but requires immediate evasion once danger zone telegraphs appear.
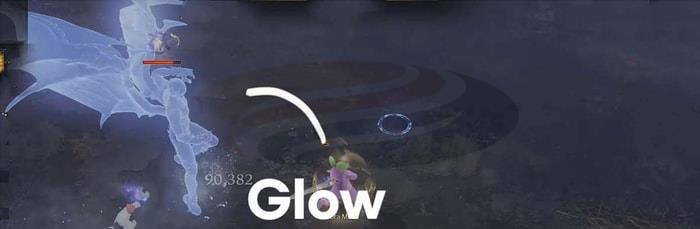
Advanced Combo Recognition
The boss may repeat the one-two punch but conclude with a cross attack, making rear positioning hazardous. Visual cue: the boss emits a glow during his 1-2 sequence when cross attack follows.
Velganos Orb Mechanics (Hard Mode Exclusive)
The boss suddenly teleports center-stage, creating an AoE attack with safe zones adjacent to him. After outer area explosions, he summons tracking orbs targeting all players.
Immediately exit safe zones to avoid orb absorption in central areas. Central puddles inflict significant damage – maintain distance. After exiting safe zones, allow orbs to pursue you toward map boundaries.
Advanced Strategy: deploy spacebar dash outward immediately upon orb appearance. Sprint toward map edges, then deliberately walk toward orbs before contact. Observe whirlwind rotation direction carefully – this indicates safe zone movement patterns (counterclockwise rotation requires counterclockwise running).
Pro Tip: Support alternate shields can mitigate final explosion damage if mechanics fail – clearly indicate shield absence to support players.
Dash and Clone Attack Patterns
The boss dashes toward the primary aggro holder, then summons clones that dissipate leaving X-shaped damage markers.
Boss-specific clone positioning: blue boss spawns clones to his left and right sides – avoid lateral positions post-dash. Purple boss generates clones front and rear – avoid these positions after his dash completes.
Kick Dash and Cone Attacks
The boss elevates his leg before dashing, then reorients toward aggro with cone-shaped attacks. Safe zones: position behind blue boss, in front of purple boss.
Laser and Final Phase Patterns
The boss gathers energy, summons two clones that discharge lasers, then teleports to aggro with linear safe zones.
Post-teleportation, extended DPS windows become available. Purple boss requires positioning within purple lines as cone-shaped safety zones manifest before him.
Strategic sidereal deployment: activate immediately after boss teleports to maximize damage output during vulnerable phases.
The boss concentrates energy single-handedly, then executes cone attacks forward that penetrate through him affecting rear areas. Blue boss repeats attacks twice consecutively while purple boss teleports before repetition – reposition laterally once attack direction fixes.
Pattern Recognition Quick Reference
Q1: 270-degree kick or cross attack?
Cross pattern – indicated by boss glowing during sequence
Q2: Boss teleported center – what mechanics expected?
Velganos orb mechanics activation
Q3: Optimal positioning during cone attacks?
Position behind the boss for maximum safety
Mastering these patterns through repeated practice significantly increases raid success rates and reduces potion consumption.
Action Checklist
- Coordinate party split assignments and sidereal skill deployment strategy before engaging
- Memorize orb color sequence (red, blue, green, white, black) and gate color assignments
- Prepare whirlwind grenades and high-stagger skills for 37-bar check
- Execute proper orb blocking positions and immediate safe zone communication
- Practice normal pattern recognition and positioning for each boss variation
- Coordinate boss switch mechanics and final phase execution
No reproduction without permission:OnLineGames Guides » Lost Ark: Ultimate Vykas Gate 1 Guide Master Vykas Gate 1 mechanics with detailed boss patterns, positioning strategies, and raid survival tips