TL;DR
- Forbidden Sanctum introduces rogue-like mechanics with permanent failure on resolve depletion
- Strategic room selection and relic optimization are crucial for consistent currency farming
- Combine with Eldritch Altar farming for maximum endgame profit efficiency
- Use Orbs of Horizon to maintain optimal map layouts for fast clears
- Focus on offering rooms early, transition to riskier paths as relics improve
Grinding Gear Games continues to innovate Path of Exile with groundbreaking seasonal content. The Forbidden Sanctum league introduces a sophisticated rogue-like experience that challenges even veteran players. While the community eagerly anticipates PoE 2.0, this current league demonstrates GGG’s commitment to delivering fresh, engaging mechanics. Our comprehensive guide focuses on mastering this challenging content while maximizing your PoE currency acquisition through strategic gameplay decisions.

The Forbidden Sanctum transforms Path of Exile’s gameplay by incorporating rogue-like elements into the core experience. Players can access this out-of-map feature called Sanctum once per completed map or zone, with the ability to bank up to eight encounters for simultaneous runs. This innovative system requires strategic route planning through a four-floor labyrinth featuring 32 distinct chamber types. Each floor culminates in a demanding boss encounter after clearing eight chambers, testing both your build optimization and decision-making skills.
The Sanctum presents numerous challenges, but understanding its mechanics provides the tools for success. Upon entry, you gain access to a critical resource called “resolve,” which functions as a secondary health bar that takes damage from environmental hazards and enemy attacks. Losing all resolve results in permanent run failure, requiring you to start over from the beginning.
Common mistake: Many players underestimate how quickly resolve depletes against certain enemy types. Always prioritize avoiding damage over dealing damage when your resolve is low.
Let’s explore the diverse mechanics and lucrative rewards awaiting discovery within this innovative game system.
Sanctum runs provide access to multiple resource types designed to help you progress further with each attempt. You’ll discover restorative springs in designated areas to replenish resolve, powerful blessings that provide defensive advantages against opponents, and Aureus coins for trading with the Sanctum’s merchant to acquire additional power.
This Forbidden Sanctum guide delivers essential strategies and advanced tactics to maximize your treasure acquisition while significantly improving your overall gameplay efficiency.
Sanctum Room Types
The Sanctum features several specialized room types, each serving distinct strategic purposes:
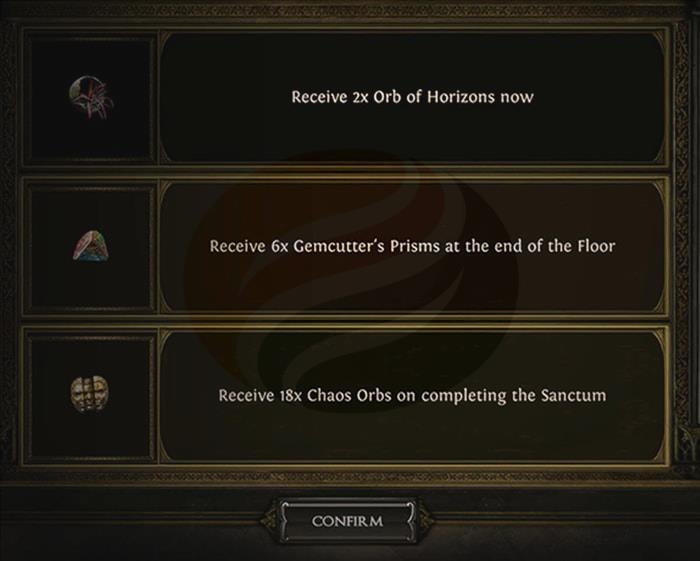
Offering Rooms – These chambers present immediate currency rewards either after completing the current level or at the Sanctum’s conclusion. Higher risk choices yield greater potential payouts, but failing to meet specified conditions results in complete reward loss.
Merchant Rooms – These trading posts feature vendors selling powerful boons to facilitate your run in exchange for Aureus coins. Occasionally, merchants may offer Sanctified and Common Relics at premium prices.
Fountain Rooms – These chambers contain restorative fountains that replenish your resolve. Beware of afflicted fountain variants that provide extra resolve at the cost of applying negative conditions to your run. Rarely, you might encounter exceptional fountains: Radiant (grants blessing and maximum resolve) or Benevolent (grants Inspiration and blessing or removes affliction).
Accursed Pact Rooms – These challenging rooms present three distinct options, each with unique benefits and drawbacks. Players can accept one pact, all three, or decline entirely. Making at least one pact unlocks access to a randomly selected currency offer.

Treasure Rooms – Available in two sizes upon completion: Minor (containing two chests) and Major (containing five chests), each filled with valuable Aureus coins. These currencies can be exchanged for enhanced power during subsequent Sanctum runs.
Afflicted Rooms – Visually distinguished by purple indicators, these chambers impose negative afflictions that persist for the remainder of your run. Carefully evaluate your current situation before entering Afflicted Rooms, as some detrimental conditions can completely ruin an otherwise successful attempt.
Pro tip: Always prioritize rooms with multiple connections to maximize your chances of encountering offering rooms while maintaining escape routes.
Within the Forbidden Sanctum, relics provide persistent power progression across multiple runs. As you advance through the league, additional tabs become available on your relic altar for placing discovered relics. Three distinct relic sizes exist, each with unique modifier pools, and positioning them on the altar activates their effects during Sanctum expeditions.
Small Relics – 2 by 1
Prefix Modifiers available on small relics include:
● Increase in Max Resolve
● Coin gain at the start of each run
Suffix Modifiers for small relics provide:
● Coin drop chance for monsters
● Coin drop chance for chests
● Gain Resolve on Boss Kill
● Map reveal
Medium Relics – 3 by 1
Medium relics offer enhanced Prefix modifiers:
● Recovered Resolve increase
● Inspiration at the start of the run
● Increased DMG to the Guards or Bosses
● Increase Merchant choices
● Chance of coins for completing the room
Suffix modifiers for medium relics include:
● Reduction in Merchant prices
● Chance of Resolve for completing the room
● Bosses and Guards Resolve impact reduction
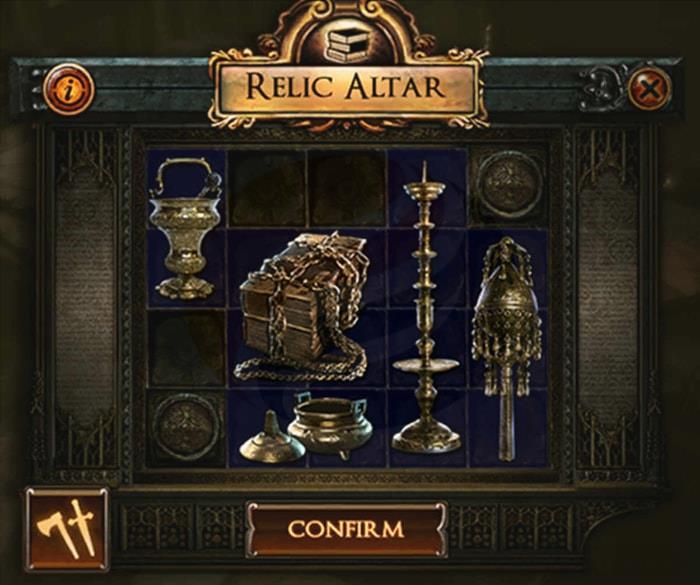
Large Relics – 2 by 2 and 4 by 1
Large relics provide powerful Prefix modifiers:
● Inspiration gained for receiving Affliction
● Increase in Max Resolve
● Increased DMG to the monsters
● Gain Resolve on Boss Kill
Suffix modifiers for large relics offer:
● Gain Max Resolve on Boss Kill
● Gain Max Resolve by using a fountain
● Relics can be placed on your board multiple times, with their benefits stacking cumulatively. For efficient Forbidden Sanctum farming, establishing a robust relic configuration is absolutely essential.
Advanced strategy: Prioritize relics that provide resolve recovery and coin generation early, transitioning to damage and merchant benefits as your build stabilizes.
Rewards
Early in the league cycle, adopting lower-risk approaches typically yields optimal returns. Approximately 40% of Sanctum chambers are offering rooms that provide direct currency rewards.
The Forbidden Sanctum introduces Sanctified Relics, a new equipment category exclusively available through league mechanics.
Regardless of other potential rewards, these items remain exceptionally valuable and typically make dedicated Sanctum farming economically worthwhile.
Gameplay
Completing any Campaign Area or Atlas Map grants access to an additional Forbidden Sanctum chamber. Farming compact areas proves excellent for accumulating complete Sanctum levels to run consecutively (maximum eight rooms).
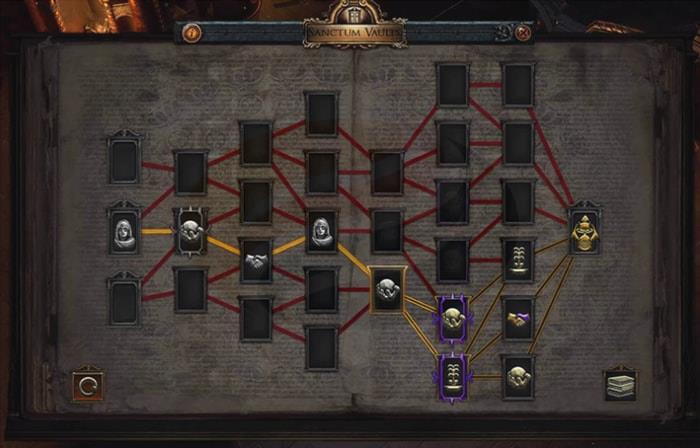
Strategic route planning through the Sanctum should prioritize chambers offering the most connection options. This approach significantly increases your probability of encountering offering rooms. Select the highest acceptable risk level when choosing reward chambers; calculated risks generally outperform conservative, low-yield approaches.
Consistently monitor your resolve levels and Aureus Coin reserves, selecting trader and fountain chambers only when strategically necessary.
Optimizing
Focus your objectives around these proven strategies for maximum profitability.
Strategy Synergies
Integrate your Forbidden Sanctum strategy with complementary atlas plans to ensure optimal currency generation during endgame phases.
Eldritch Altar Farming – This method pairs perfectly with Forbidden Sanctum by emphasizing rapid completion of compact maps with movement optimization. This approach becomes available exclusively during endgame content after unlocking altars.
Alch and Go – This streamlined approach complements Forbidden Sanctum by focusing on efficient map clearing while minimizing downtime.
Orbs of Horizon
Utilize Orbs of Horizon to optimize your map layout configurations. This enables maintenance of high-tier maps featuring layouts conducive to rapid clearing.
Each league introduces different map configurations as map tiers undergo adjustments. Replenish your map inventory by applying Orbs of Horizon to lower-tier maps you don’t require.
● Toxic Sewer and Graveyard for the Tier 16 maps
● Dunes, Grotto, and Ashen Wood for the Tier 15 maps
● Underground Sea and Canyon for the Tier 14 maps
Implementing these recommended maps facilitates straightforward maintenance of a sustainable map pool throughout the league. Certain maps excel for rapid clearing, while others provide adequate performance.
Time estimate: A complete Sanctum run typically requires 15-25 minutes depending on your build efficiency and room selection strategy.
Action Checklist
- Complete compact maps to accumulate Sanctum encounters (8 maximum)
- Prioritize offering rooms early in league, transition to riskier paths as relics improve
- Establish relic configuration focusing on resolve and coin generation
- Combine with Eldritch Altar farming for maximum endgame profits
- Use Orbs of Horizon to maintain optimal map layouts for efficiency
No reproduction without permission:OnLineGames Guides » Path of Exile – Forbidden Sanctum League Guide Master Path of Exile's rogue-like Sanctum with expert strategies for maximum currency gains