TL;DR
- Master clock spots, light parties, and pair positions for consistent raid coordination
- Execute Color Riot tank busters with precise debuff tracking and positioning
- Navigate desert hazards using established cactus patterns and quicksand mechanics
- Prioritize add elimination with specific kill orders and emergency stun sequences
- Complete bridge phase with proper tower soaking and final burn phase execution
Final Fantasy XIV’s Patch 7.2 introduces the formidable AAC Cruiserweight Savage raid, presenting one of the most demanding encounters in the current tier. This battle tests mechanical precision, raid coordination, and strategic execution across multiple complex phases. Based on Hector Lectures’ comprehensive YouTube analysis, this guide provides detailed strategies for conquering M6S. Whether you’re leading a progression team or pushing for consistent clears, these insights will help you navigate the encounter’s intricate mechanics successfully.
Proper positioning forms the foundation for raid success. Establish three critical formations before engaging:
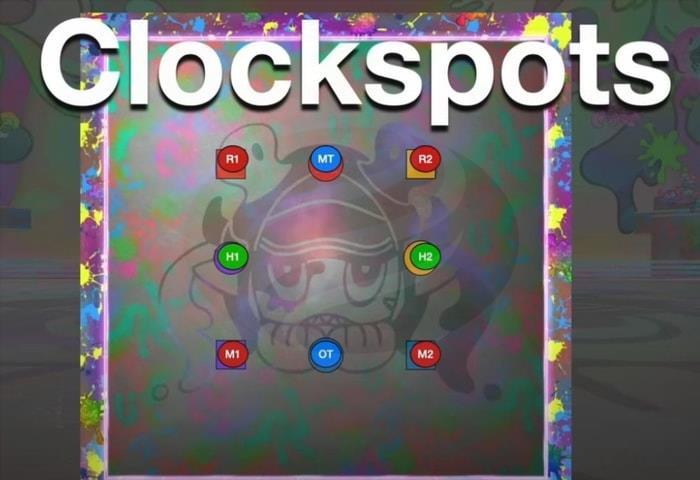
Clock Spot Assignments: Position all eight players around an imaginary clock face with the boss at center. This positioning system enables consistent resolution of spread mechanics and directional requirements throughout the encounter.
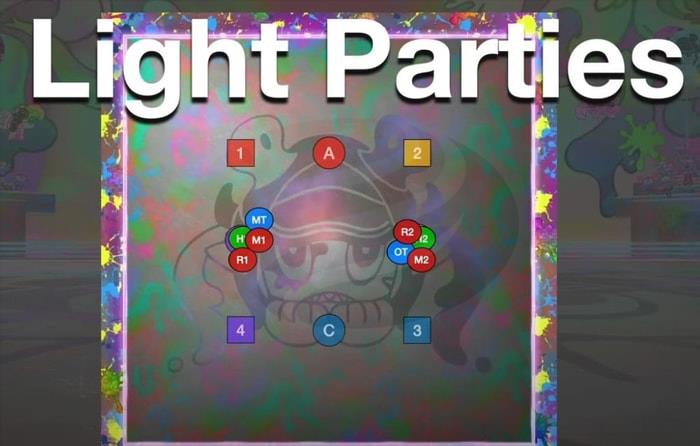
Light Party Formations: Divide into two groups of four players each, typically following standard party composition. These groups handle shared mechanics like stack markers and coordinated movement.
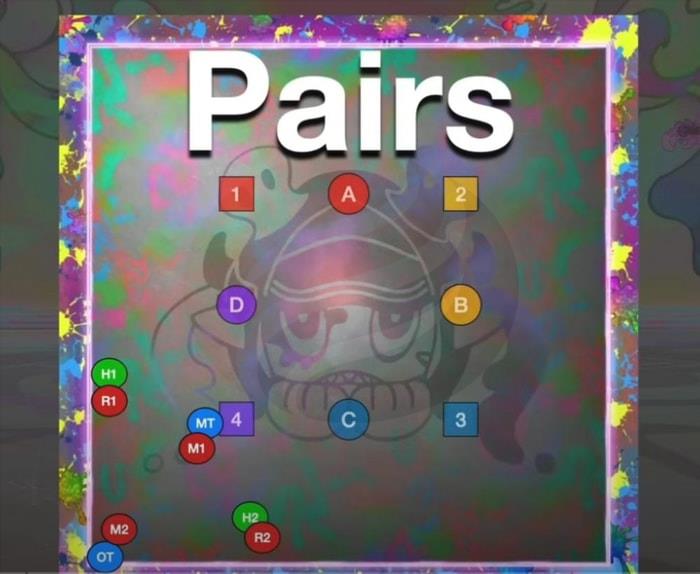
Pair Coordination Setup: Establish predetermined partnerships, usually healer-DPS combinations, to resolve paired mechanics efficiently.
Mousse Mural: This raidwide AoE requires standard healing and mitigation protocols. Coordinate cooldowns between healers and tanks to manage incoming damage efficiently while maintaining raid stability.
Color Riot (Tank Buster)
- The boss simultaneously targets the nearest and farthest players from its position.
- Position one tank directly beneath the boss while the other positions at maximum melee range.
- The upper gun’s color designation strikes the closest tank; the lower gun’s color designation targets the distant tank.
- This applies a persistent debuff that remains active even through death, creating mechanical dependencies in subsequent phases.
Wingmark: Each raid member receives a 20-second directional debuff. Upon expiration, you’ll be launched in the direction your character is facing, making positioning crucial.
Color Clash: Observe the number of aerial shots fired by the boss:
- 2 shots = Resolve using Light Party formations
- 3-4 shots = Handle through Pair coordination systems
Double Style: Spawns randomized mechanics throughout the arena. The mechanic variations include:
- Bombs: Detonate in their spawning location.
- Wing Bombs: Execute a jump before exploding.
- Succubus: Cast substantial area-of-effect attacks from fixed positions.
- Marble: Cleave along the sides while leaving flank positions secure.
Safe Spot Determination Patterns:
- 2 Marbles → Position between them for safety.
- 2 Succubus → Move away from both entities.
- Marble + Succubus → Move toward the Marble while distancing from the Succubus.
- Bombs + Marble → Distance from Bombs while approaching the Marble.
- Wing Bombs + Succubus → Approach Wing Bombs while retreating from Succubus.
Sticky Moosse:
- Targets two non-tank players with binding effects and stack markers.
- If each light party contributes one affected member, resolve within your designated light party formations.
- If both targets originate from the same party, proceed to the nearest two players. When uncertain about proximity, default to clockwise rotation.
Second Color Riot Execution:
Analyze gun directional indicators and correlate them with your tank debuff status. The tank possessing the debuff opposite to the upward-pointing gun assumes the position beneath the boss.
Sugarscape – The debuff applications include:
- All raid members receive a Sun damage-over-time effect.
- One DPS receives a stack marker debuff lasting 43 seconds.
- Four players obtain substantial defamation markers requiring careful placement.
Layer: Layer casting summons cacti with predetermined spawn configurations. Memorize these patterns for reliable evasion.
Following the final cactus spawn, execute these assignments:
- Tank with defamation → Northwest positioning
- DPS with defamation → Southwest placement
- Remaining party members → Central location
Sticky Moose (reappearance): Return to clock spot positions and prepare for additional stack marker resolution.
Layer + Quicksand Combination:
Evade the cactus-designated corner, then:
- Healer 1 → Position clockwise from the cactus location
- Healer 2 → Position counterclockwise
- Remaining raid members position opposite the designated corner.
Bomb Tether Mechanics Resolution:
- One role group receives standard bombs; the opposite group obtains wing bombs.
- Standard bombs navigate into quicksand areas.
- Wing bombs orient toward quicksand and utilize the Wingmark launch mechanism for placement.
- Maintain separation to prevent overlapping area-of-effect damage.
- Exit quicksand zones immediately following bomb placement completion.
Color Riot Tank Buster Repetition: Verify debuff status and repeat the established positioning strategy.
Add Type Analysis and Elimination Priorities:
- Mu: Moderate auto-attack damage. Eventually enrages if not eliminated. Lower elimination priority.
- Yan: Enhanced auto-attacks. Prevent proximity to Mu adds—they become lethal when combined. Medium elimination priority.
- Gimme Cat: Steals Limit Break gauge and utilizes jumping mechanics to bait area-of-effect attacks. Higher priority than Mu entities.
- Feather Ray: Forms tether connections to initial attackers (preferably ranged DPS). Deposits puddles that inflict damage-over-time and can eliminate tanks if struck repeatedly.
- Jabberwock: Targets a designated healer and advances toward them. Interrupt this progression by stunning the jabberwock. The stun sequence protocol is tank primary stunning followed by melee secondary stunning. Then execute focused damage, otherwise the targeted healer perishes.
Before add wave initiation commences, your Limit Break gauge will reset regardless. Consider deploying a Level 2 Limit Break from either your caster or physical ranged DPS to damage the initial add spawns. The timing demands precision, but delivers substantial burst damage when executed correctly. Experiment to determine optimal timing for your specific raid composition.
Wave 1 Execution: Two Mu, One Yan, One Cat
- Main Tank (MT) initiates in the Eastern position and secures the Mu add.
- Off Tank (OT) begins in the Western location and obtains the additional Mu.
- Tanks immediately separate their acquired adds: MT relocates to Southeast; OT moves to Western position.
- Melee damage dealers concentrate on the Yan add elimination.
- Ranged damage dealers focus on the Cat add, which will execute jumping maneuvers and eventually target random players.
- Avoid the Cat’s telegraphed area-of-effect pounce – it applies damage reduction and decreases maximum HP.
- Continue focused damage application on Yan and Cat throughout this initial wave.
Wave 2 Strategy: Two Mu (South), Two Feather Rays (North Corners)
As the Live Painting cast summons this wave, ranged players should transition to their corner assignments:
- Caster to Northwest corner
- Physical Ranged to Northeast corner
Tanking Protocol:
- OT secures the Northwest Feather Ray (while managing any remaining Yan adds).
- MT obtains the Northeast Feather Ray.
Elimination Sequence:
- Northwest Manta Ray elimination priority
- Northeast Manta Ray secondary priority
Tether Baiting Methodology:
- Ranged DPS should engage their respective manta rays initially to establish tether connections and bait puddle placements.
- With robust damage output and coordinated two-minute burst windows, you might eliminate the Northwest manta before it deposits a secondary puddle.
Critical Mechanic Awareness:
- During the subsequent Live Painting cast, the Northern slime transforms into a Yan add. If Mu adds remain in proximity, it will enrage immediately.
- MT must reposition and pull their Mu add southward, then westward.
- Concentrate damage on the manta ray, incorporating Mu add cleave damage when feasible.
Wave 3 Protocol: One Yan, One Cat, One Jabberwock (initially untargetable)
- OT advances North to secure the Yan add.
- Remaining raid members position near the Western area, targeting the Mu add.
Jabberwock Emergency Resolution:
- A randomly selected healer becomes targeted and immobilized in the corner.
- Jabberwock initiates advancement toward the bound healer – you must eliminate it before contact occurs.
- Stun Sequence Protocol: Tank primary stunning → Melee secondary stunning.
- Execute concentrated single-target damage on the Jabberwock until elimination and healer liberation.
Boss Casts “Ready ore Not”: A raid-wide area-of-effect attack. Apply appropriate healing and mitigation measures.
Muse Enrage – “Rigato”:
- If not addressed promptly, Muse will enter enraged state.
- Your raid can withstand one enrage activation, though it presents significant danger (substantial damage + bleeding effect).
- Optimally, prevent all enrage activations – maintain aggressive cleave damage throughout.
- Eliminate any remaining Muse adds, then address the Gimme Gat.
- Color Riot tank buster mechanics may coincide with remaining add presence.
- Subsequent to a Mousse raid-wide attack (if adds remain active excessively, the boss enrages).
- Boss Executes Northern Jump – “Sugarcape” Bridge Phase Initiation
- Reposition the boss Northwest and prepare for Double Style mechanics.
Mechanic Combination Resolutions:
Arrows + Thunder Spreads → Disperse across dry terrain areas.
Arrows + Fire Stacks → Consolidate in water zones to mitigate incoming damage.
Positioning Assignments:
Group 1 (support roles + melee damage dealers): Central positioning.
Group 2 (support roles + ranged damage dealers): Conceal behind southern bridge structures.
Layer Casting Sequences:
Water transitions to hazardous state (lava transformation) – evacuate immediately!
Consolidate in Northwest area between bridges and maintain position.
Lightning Mechanic Protocol:
- A lightning flash indicates delayed area-of-effect placement at current location. Execute immediate relocation (comparable to Twister or Stepped Leader mechanics).
- Monitor storm cloud development and maintain distance from its detonation area.
Electrified Ground + Cloud Area-of-Effect Combinations:
- Two players receive markers (1 support role, 1 damage dealer).
- The cloud progresses toward a designated platform.
Marked Player Execution Protocol:
- Orient facing the approaching cloud.
- Support role players consistently navigate clockwise/leftward.
- Damage dealer players consistently navigate counterclockwise/rightward.
- Deposit your area-of-effect distant from bridge structures – it electrifies the grassy areas on your assigned platform.
- All other raid members must position on bridge structures to maintain safety.
- This sequence repeats across four total waves, eventually affecting every raid participant.
Final Mechanic Execution: Consolidate on the ultimate bridge for “Putting Party” – a five-impact multi-hit stack mechanic.
Platform Distribution Protocol:
Melee damage dealers → Southern platform
Ranged Group 1 → Northwest platform
Ranged Group 2 → Northeast platform
Water and bridge structures transform to lava (resulting from Layer casting).
Mousse Drip Cast Resolution:
Ranged DPS should position at maximum distance from the boss to bait stack area-of-effect attacks.
Tower Mechanic Execution:
- Four tower spawns materialize in the southern area, two on each additional platform.
- Assign healers and ranged damage dealers to cover their respective towers.
- Coordinate your healers and ranged players to consolidate for stack mechanics that deposit four consecutive puddles.
- AVOID baiting puddles onto tower locations—they persist throughout tower mechanic sequences.
- Boss casts Moussacre — executes cleave attacks on nearest players.
- Melee damage dealers disperse to prevent cleave damage application to ranged/healer players.
- Following four puddle deposits, do not immediately enter your assigned tower.
- Position adjacent to your tower, await the lightning crack audio cue, then activate tower soaking.
Wing Mark & Tower Combinations (Jump Phase):
All raid members receive a 10-second Wing debuff, and additional towers appear.
Tower Configuration Variations:
(A) 4-2-2 Distribution:
- Towers distribute 4/2/2 across platform areas.
- Initiate in the southern area and execute clockwise rotation.
- All players rotate clockwise and prepare for jumping utilizing Wing debuff activation.
Jump Execution Techniques:
- Face the broadest, most substantial section of the opposing platform.
- Upon Wing debuff expiration, you’re propelled in your facing direction.
- Land safely, position near (but not within) your assigned tower, await lightning indication, then execute tower soaking.
(B) Complete Southern Consolidation:
- All players transition to the southern platform.
- Players already positioned in the southern area advance eastward, and face westward to execute return jumping.
- Again, position adjacent to your tower, await lightning, then enter the tower.
- Boss casts Moosse Mural (raid-wide attack). Phase transition initiation commences.
- Main tank should immediately reposition the boss to central location — you’re receiving Sticky Moosse mechanics, requiring adequate space for clock spread formations.
- If the boss remains positioned near the perimeter wall, simply execute spread formations and improvisational resolution, then consolidate in four-player groups.
- Tankbuster: Color Riot follows.
- Encounter cycles return to Wing Mark + area-of-effect patterns observed initially.
Final Phase Optimization Strategies:
- Melee gap-closing abilities become unnecessary; the boss follows the party’s positioning.
- Following central repositioning or awaiting jump execution, the boss casts Artistic Anarchy.
- Burn phase execution: You possess limited time until telegraph indications appear to eliminate the boss.
Action Checklist
- Establish clock spots, light party formations, and pair assignments before engagement
- Execute Color Riot tank busters with precise debuff tracking and positioning
- Master Double Style safe spot determination using pattern recognition
- Execute add phase with strict kill priority and emergency stun sequences
- Navigate bridge phase towers with proper timing and platform coordination
No reproduction without permission:OnLineGames Guides » FFXIV Patch 7.2 AAC Cruiserweight M6 Savage Guide – How to Conquer the Sugar Riot Master AAC Cruiserweight Savage with comprehensive phase breakdowns, expert strategies, and actionable execution plans