TL;DR
- Configure target filters separately for sheathed and unsheathed weapon states
- Optimize hotbar layout with 6×2 or 12×1 formats for better accessibility
- Organize essential skills by function: cooldowns, weapon combos, and movement abilities
- Use L1 + face button combinations for rapid target filter switching
- Customize UI settings to hide unassigned slots and display recast timers clearly
Mastering the Red Mage in FFXIV Shadowbringers requires precise controller configuration to maximize your combat effectiveness. As a hybrid DPS class that balances magical and physical damage, proper targeting and skill organization becomes critical for optimal performance. This guide builds upon Ginger Prime‘s comprehensive Red Mage Controller Guide to provide actionable strategies for controller players seeking to elevate their gameplay.
The controller interface offers powerful customization options that, when properly configured, can rival keyboard and mouse precision. Many players underestimate the importance of these settings, leading to slower reaction times and inefficient combat rotations. By implementing the following configurations, you’ll achieve faster targeting, smoother skill execution, and better situational awareness during intense battles.
Target Filter Settings
Effective targeting begins in Character Configuration > Filters, where you’ll establish separate targeting behaviors for different combat states. The Red Mage’s versatility demands smart filtering to quickly access enemies, allies, or environmental objects as the situation demands. Proper configuration here directly impacts your ability to execute complex rotations while maintaining battlefield awareness.
1. Sheathed Mode Targeting
When your weapon is sheathed, configure filters to prioritize non-combat interactions. Enable targeting for NPCs, gathering nodes, and environmental objects while typically disabling party member targeting since the D-pad up/down already cycles through your party list efficiently. This prevents accidental targeting of allies when you’re trying to interact with quest objectives or vendors between battles.
2. Unsheathed Mode Optimization
With weapons drawn, your filters should automatically restrict targeting to hostile entities. This ensures that left/right D-pad cycling only considers valid combat targets, eliminating wasted inputs during crucial moments. A common mistake is leaving too many target types enabled, which slows down your acquisition of priority enemies.
3. Advanced Custom Filter Creation
Create specialized custom filters for specific content types. For alliance raids, configure a filter that includes only enemies and critical NPCs. For treasure maps or housing districts, set filters that exclude combat targets entirely. This level of customization reduces cognitive load and allows for more instinctive gameplay.
The control scheme uses L1 (left bumper) combined with face buttons for instant filter switching. While Ginger Prime demonstrates with an Xbox controller, PlayStation users can achieve identical functionality through corresponding button mappings in their system configuration.
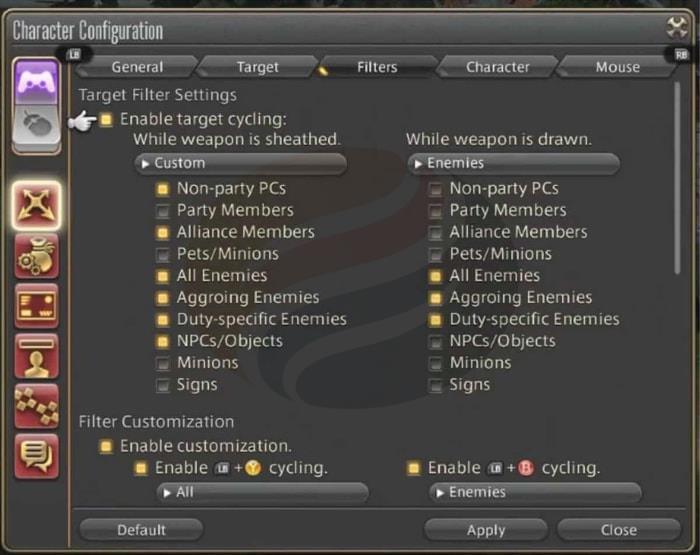
Practical application demonstrates the power of these settings: in residential areas, D-pad left/right cycles through all targetable objects, but drawing your weapon instantly restricts targeting to potential threats only. This intelligent context awareness significantly improves your reaction time in unexpected combat situations.
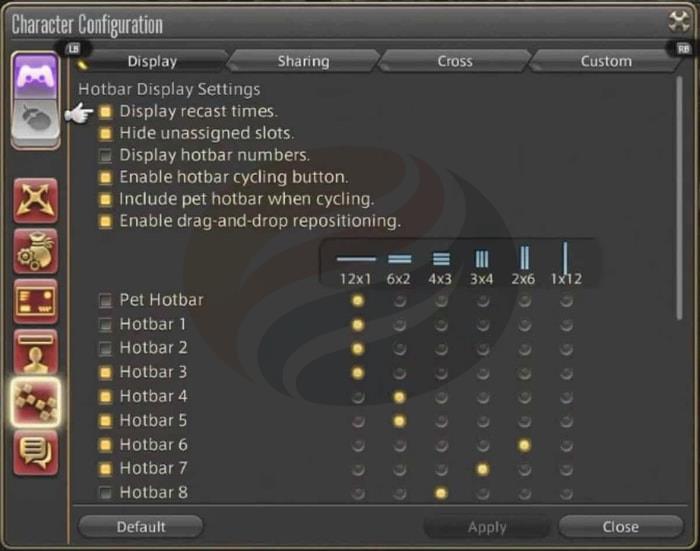
Hotbar Settings and Skills
Your hotbar configuration serves as the foundation of your combat effectiveness. Begin with Hotbar Display Settings configured to show recast times while hiding unassigned slots—this creates a cleaner interface that focuses attention on available abilities. The visual clutter from empty slots can distract from critical combat information during high-intensity encounters.
UI cleanliness directly impacts performance. When you disable the display of unassigned slots, you eliminate the gray bars that otherwise compete for your attention. Similarly, toggling hotbar numbers provides additional visual clarity, though some players prefer them for skill reference during learning phases.
Optimizing Hotbar Layout for Accessibility
Hotbar 3 typically defaults to a 12×1 horizontal layout, but consider switching to 6×2 for better thumb reach on controller face buttons. The compact vertical arrangement places more skills within comfortable range without requiring excessive thumb movement across the D-pad.
Skill organization follows logical combat flow. As demonstrated in the guide video, essential abilities should be grouped by function rather than acquisition level for more intuitive access during pressure situations.
Strategic Skill Placement on Hotbar 3
Critical cooldowns like Embolden, Acceleration, and Manafication (note: corrected from “Magnification”) form your core rotational enhancers. Position these on easily accessible slots since they’re used frequently throughout encounters.
Weapon skills including Riposte, Zwerchhau, and Redoublement should be sequenced according to their combo order, mirroring their execution pattern for muscle memory development.
Movement abilities such as Displacement and Corps-a-corps deserve prominent placement since positioning directly affects both damage output and survival.
Cross Hotbar Utility Skill Organization
Essential utility skills including Lucid Dreaming (mana management), Surecast (cast protection), Verraise (combat resurrection), Contre Sixte (AoE damage), and area spells like Verthunder II and Veraero II complete your combat toolkit. Group these by situational usage rather than stacking them with core rotational abilities.
Beyond basic configuration, mastering Red Mage combat requires understanding how these settings interact during actual gameplay. The dualcast mechanic—where every second spell becomes instant—demands fluid targeting transitions between single targets and groups.
Cooldown Management Strategy
Your “big three” cooldowns (Embolden, Acceleration, Manafication) should be tracked visually through your hotbar settings. Position them where peripheral vision can monitor their availability without diverting focus from enemy tells and mechanics.
Movement Skill Positioning
Displacement provides backward movement with damage, while Corps-a-corps offers forward engagement. These should be readily accessible for quick positional adjustments during mechanic execution.
Weapon skill sequencing follows a strict pattern: Riposte → Zwerchhau → Redoublement for optimal damage output. Practice this rotation until it becomes automatic, allowing mental bandwidth for fight-specific mechanics.
Common Controller Mistakes to Avoid
Many players place too many skills on extended hotbars requiring multiple trigger pulls. Instead, consolidate essential abilities within your primary cross hotbar pages for faster access. Another frequent error involves inconsistent filter settings that cause targeting hesitation during phase transitions.
Advanced players can create macro-assisted target switching for specific encounter mechanics, though this requires deeper system knowledge and practice to implement effectively without disrupting combat flow.
Action Checklist
- Configure separate target filters for sheathed (NPCs, objects) and unsheathed (enemies only) states
- Set Hotbar Display to hide unassigned slots and show recast times
- Reorganize Hotbar 3 layout to 6×2 format for better thumb access
- Group skills functionally: cooldowns, weapon combos, movement abilities
- Practice L1 + face button combinations for rapid filter switching
- Create custom filters for specific content types (alliance raids, treasure hunts)
No reproduction without permission:OnLineGames Guides » How to Play FFXIV Shadowbringers Red Mage Better Master FFXIV Red Mage controller setup with expert targeting filters and hotbar optimization strategies