TL;DR
- Seven soloable bosses drop valuable bind-on-equip gear for trading post sales
- Optimize luck gear, food buffs, and PvP mode for increased drop rates
- Sesa offers 1-minute respawns with abundant surrounding resources
- Articulon & Mozrul provide legendary items and Corrupted Tokens
- Server-specific pricing requires checking trading post before farming
Discover seven accessible open-world bosses in New World: Aeternum that you can confidently tackle alone. These formidable opponents yield major bind-on-equip equipment pieces that translate directly into substantial New World currency when sold. Every boss presents an opportunity to obtain at least one significant bind-on-equip item, which you can successfully market through the trading post for excellent returns. With standard gear and maximum character level, these encounters become manageable solo ventures that won’t consume excessive time. For those still progressing toward the level cap, we’ve included an exceptionally straightforward level 41 boss that remains within your capabilities.
Similar to all revenue-generating approaches in New World, equipment values fluctuate considerably between servers, making trading post price verification essential before initiating any farming method. Below, we’ll detail all primary items worth pursuing, enabling you to identify which pieces command premium prices on your specific server and target the appropriate bosses accordingly. Remember that selecting bosses dropping less valuable items can still yield profits when considering shorter respawn cycles, high market demand, or valuable adjacent resources.
Furthermore, regularly rotating between different bosses proves advantageous for acquiring diverse major items. When listing these items for sale, you can simultaneously offer multiple different pieces, accelerating your overall sales velocity and capital turnover.
Tips & Tricks
Before diving into specific boss encounters, let’s establish crucial preparation techniques. First, to optimize your profit potential, equip specialized luck-enhancing gear and consume fortune-boosting meals to dramatically improve your item acquisition rates. Correspondingly, if you possess maximum-tier gathering equipment, switching to these specialized sets while collecting resources can substantially boost your gold-per-hour efficiency. You might also activate PvP mode for additional luck bonuses, though this prevents grouping with other players farming the same location. If you opt for PvP mode or are relatively inexperienced, establishing a campsite near the boss respawn location ensures quick recovery if defeated.
Additionally, these boss encounters present ideal opportunities to utilize your daily Topaz Gypsum Attunement Potion, granting additional Topaz Gypsum Orbs. Each farming session also allows activation of the Territory Standing musical enhancement to improve your regional reputation. Naturally, you can also employ other musical buffs that better align with your current objectives.
Boss Introduction
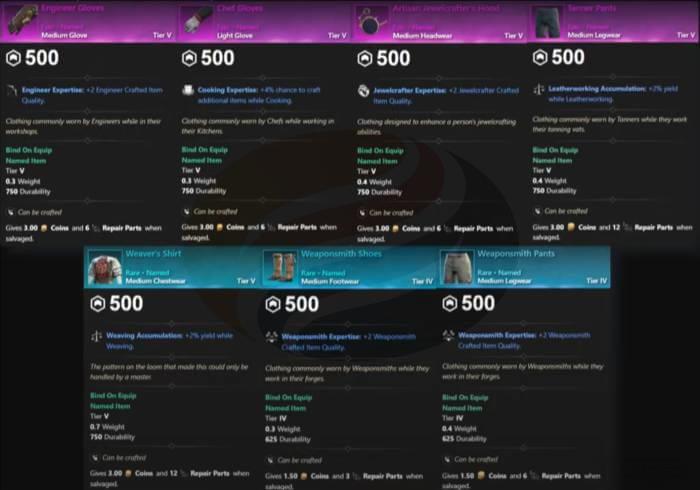
Sesa (Weaponsmith Shoes)
The initial boss, and among my preferred choices, is Sesa. The primary item you’re targeting is the Weaponsmith Footwear. Additionally, the surrounding area offers plentiful gathering opportunities. This adversary stands out for farming efficiency due to an exceptionally brief 60-second resurrection interval, permitting multiple eliminations within compact timeframes to enhance your shoe acquisition probability.
This opponent also serves as an excellent location for your daily Topaz Gypsum Attunement Potion because he’s straightforward to defeat, conveniently positioned, and carries potential for extremely valuable drops. However, he doesn’t yield Obsidian Gypsum. To access his position, teleport to the Serenity Shrine fast travel point then proceed to the Yeti Cave within Serenity Sanctuary, his spawning ground.
He presents minimal difficulty for solo combat, particularly once you’ve mastered his assault patterns. Should you find the cave creatures problematic, employ long-range weaponry to draw him outside for isolated engagement or address the additional enemies before confronting him. Following his defeat, he’ll reappear within one minute. If you prefer active engagement during waiting periods, numerous resources surround the vicinity including abundant Starmetal, Platinum, Hemp, Ironwood, and Violet Prismabloom.
Putris & Krockes (Engineering Gloves & Jewelcrafter’s Hood)
Next, we’ll present the second and third bosses, as they inhabit identical locations. They are Putris and the Lost Alchemist Krockes. Each provides a major item: Putris yields the Jewelcrafter’s Headpiece, while Krockes provides the Engineering Handwear. This configuration offers dual opportunities for major item acquisition per respawn cycle, with approximately 3-minute revival periods, enabling rapid item accumulation.
To reach their position, teleport to the central settlement then trace the route to Mosswater Bog, their appearance point. These two adversaries present minimal solo challenge, surpassing even Sesa in accessibility, establishing them as perfect initiation points for novice players. The sole irritation involves their projectile viscous purple sludge that reduces movement speed, and Krockes possesses damage mitigation abilities, but otherwise they’re swiftly overcome.
The only disadvantage of this area involves nearly nonexistent adjacent gathering resources. Consider visiting when requiring AFK periods, eliminate the bosses, then wait passively during their 3-minute resurrection period.
Broadpaw (Weaver’s Shirt)
Next, the fourth boss, which we suggest for players potentially below maximum level. This opponent is Broadpaw (the ursine), which exists in multiple variants, though the elevated-level iterations prove considerably challenging, so we’ll only cover the exceptionally manageable level 41 version currently. Here, you’re pursuing the Weaver’s Tunic, but owing to the 6-minute revival duration, significant inactive periods will occur at this farming location, reducing shirt acquisition likelihood.
To access his location, teleport to the Malerie Shrine fast travel point in Weaver’s Fin then proceed eastward to Broadpaw’s Den, where he patrols exterior to the cavern. This ranks among the most straightforward bosses to defeat, and if you await resurrection inside the cave while employing ranged arms, you can eliminate him before he approaches closely. We strongly endorse this approach for lower-level participants seeking monetary gain.
Articulon & Mozrul (Weaponsmith Pants & Tanner Pants)
Next, let’s introduce the fifth and sixth bosses, which constitute a pair, and you might even cultivate them alongside the subsequent boss to create a trio. First, let’s present these two adversaries: Articulon the Unshackled and Mozrul the Herald. The major items you’re seeking are the Weaponsmith Leggings from Articulon and the Tanner Trousers from Mozrul. These two opponents feature remarkably short 60-second revival intervals, enabling multiple eliminations within brief periods to accumulate numerous items.
These two bosses now prove exceptionally accessible because a new fast travel point has been implemented at the Shrine of the Herald. Transport to this location in Great Cleave, and you’ll locate them adjacent to Loadstone Grom. Articulon remains concealed within an Orichalcum deposit, necessitating initial mining of the vein, while Mozrul patrols nearby. Should you prefer, you can defeat Mozrul initially then extract Articulon, rendering this position increasingly convenient. Although previously presenting substantial solo difficulty, they’ve become quite manageable following balance adjustments. Once acquainted with their combat mechanics, you might even confront them concurrently. If defeated, the resurrection shrine remains proximate, facilitating quick return.
Note that if your excavation skill falls below 150, you cannot extract Articulon and must concentrate solely on Mozrul. However, achieving 150 mining proficiency presents minimal challenge. Regarding surrounding resources, virtually none exist except several containers, and mining Articulon won’t produce Orichalcum Ore. However, given their abbreviated revival cycles, you’ll scarcely have opportunity for resource collection.
Beyond major items, these two bosses also yield numerous legendary pieces that can be dismantled for Dark Matter, and many items feature appealing aesthetics for transmogrification. Although these pieces cannot be enhanced to peak gear scores, certain trade profession equipment they drop performs admirably and can serve until obtaining maximum-level gear or be sold for supplementary currency. Additionally, they provide Corrupted Tokens, applicable for upgrading Corrupted Combat Trophies.
For experienced players seeking to maximize efficiency, consider implementing strategic boss rotation patterns that account for server prime times and market saturation. Monitor trading post trends to identify which crafted items maintain consistent demand versus those subject to price volatility. Time your farming sessions during off-peak hours when competition decreases, potentially increasing your kill frequency and loot acquisition. Advanced practitioners should track their gold-per-hour metrics across different bosses to identify which combinations yield optimal returns based on current server economics.
Common mistakes include over-investing in single boss routes, neglecting luck optimization, and failing to adapt to market fluctuations. Avoid these pitfalls by diversifying your farming portfolio and remaining flexible in your approach.
Action Checklist
- Check trading post prices for all major bind-on-equip items to identify most profitable targets
- Equip luck gear, consume luck food, and consider PvP mode activation
- Establish camp near boss spawn point for safety respawn
- Begin with Sesa for quick 1-minute respawn farming
- Rotate between Putris/Krockes and Articulon/Mozrul for variety
- Utilize daily Topaz Gypsum Attunement Potion during farming sessions
No reproduction without permission:OnLineGames Guides » New World Aeternum Farming Guide: Six Great Bosses to Solo for Gold Master solo boss farming strategies to maximize New World gold earnings with efficient routes and gear optimization