TL;DR
- Great Axe/War Hammer build prioritizes 300 Strength and 200 Constitution for maximum melee damage output
- Master weapon rotations: Gravity Well → Charge → Maelstrom → Shockwave → Wrecking Ball → Path of Destiny
- Greatsword/Sword build balances 200 Strength, 150 Dexterity with medium armor versatility
- Critical ability sequencing creates devastating crowd control and damage combinations
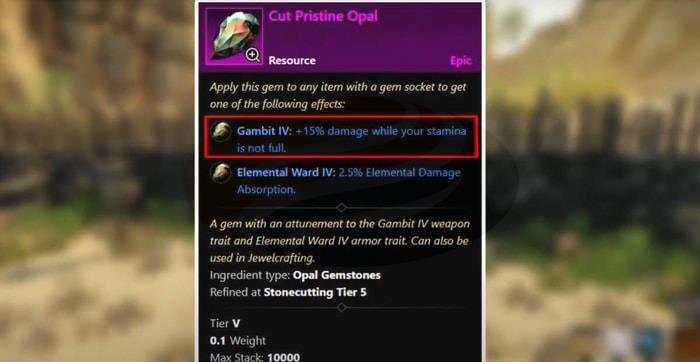
- Proper gem selection (Opal, Malachite, Onyx) significantly enhances build effectiveness
New World offers extensive character customization through attribute allocation, weapon mastery trees, gem socketing, and gear selection, all of which directly impact your combat effectiveness and preferred playstyle. Selecting the optimal build configuration is essential for achieving both competitive success and personal enjoyment throughout your adventures in Aeternum.
This comprehensive guide reveals the two most powerful melee builds for New World in 2023. I’ll detail the precise attribute distributions, essential weapon mastery selections, critical gem choices, and specific gear combinations needed to maximize your damage potential. Additionally, I’ll demonstrate proper weapon rotation techniques and combat strategies that separate average players from elite performers.
The premier build combines Great Axe and War Hammer for devastating close-quarters combat. Below you’ll find the essential attribute configuration required for peak performance.
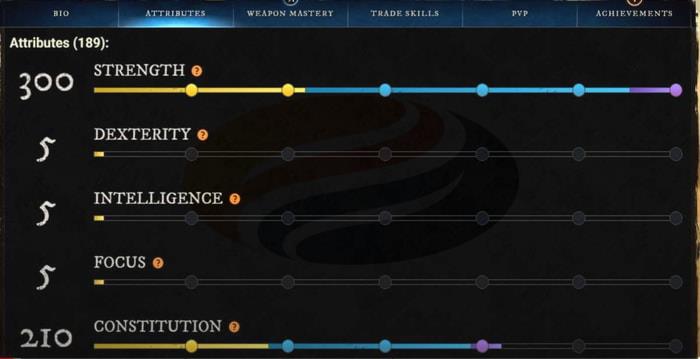
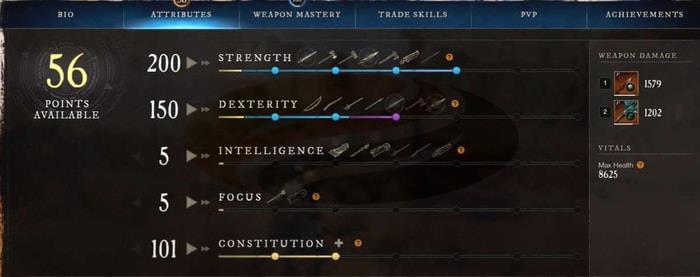
Regardless of your starting level, prioritize reaching 200 Strength points while maintaining 100 Constitution for survivability. Continue investing all additional points into Strength until reaching the soft cap. At level 60 with 625 gear score equipment, aim for approximately 300 Strength and 200 Constitution. The visual indicator shows yellow bars representing level-gained attributes, blue indicating gear-derived stats, and purple displaying food buff contributions. For armor weight classification, select medium category by combining heavy helmet, heavy chest armor, medium gloves, light pants, and medium boots – this provides the ideal balance of mobility and damage reduction.
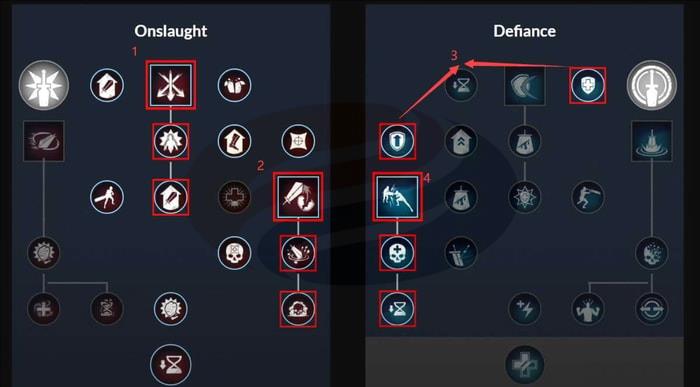
For your Great Axe mastery progression, follow this optimized path:
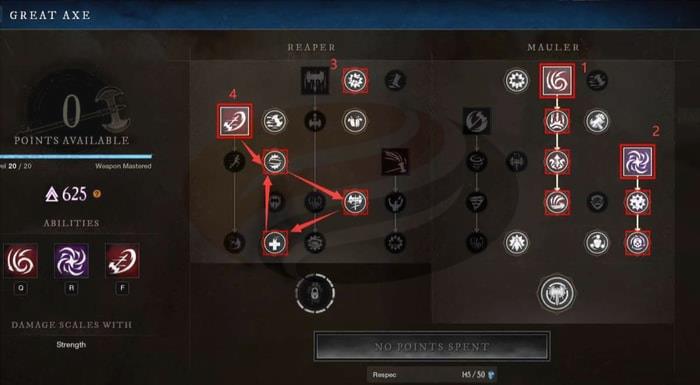
Begin by unlocking the Maelstrom ability and acquiring its three associated perks. Next, obtain the Gravity Well skill with two perks, then transition to the opposite tree branch to select one crucial perk as indicated by marker “3” in the reference image. Finally, secure the Charge ability with three perks. Beyond this foundation, you have flexibility to customize additional perk selections based on personal preference.
Your secondary weapon, the War Hammer, requires this specific mastery configuration:

First, acquire the foundational perk marked “1” in the reference image. Then unlock both Shockwave and Path of Destiny abilities while collecting four associated perks. Cross to the opposing tree section to obtain two perks indicated by marker “3”, then finally secure the Wrecking Ball ability with two perks. From this point forward, you possess the core toolkit and can expand remaining perks according to your preferred specialization.
Mastering the ability rotation is crucial for maximizing this build’s potential. For Great Axe, your primary spell Maelstrom executes a rapid spinning assault that draws all enemies within 2.5 meters, delivering substantial area-of-effect damage. Your secondary ability, Gravity Well, swings your axe to generate an electrical storm that stuns opponents while inflicting significant damage. The Charge skill serves as both mobility tool and damage dealer, enabling a 10-meter dash concluding with 120% weapon damage.
With War Hammer, your Shockwave ability slams the ground to create a 3-meter airquake that damages, staggers, and immobilizes enemies for two seconds. Path of Destiny creates a powerful ground strike dealing massive damage across its effective range. Wrecking Ball concludes your combo by striking the earth with your war hammer, simultaneously dealing damage and knocking down adversaries.
The combat rotation follows consistent principles whether engaging PvE mobs or PvP opponents. Initiate encounters with Great Axe by casting Gravity Well. Immediately follow with Charge to close distance rapidly. When enemies attempt disengagement, utilize Maelstrom to pull them back into melee range. Then weapon swap to War Hammer and deploy Shockwave followed by Wrecking Ball. Conclude your assault with Path of Destiny to eliminate wounded foes.
This weapon combination creates an exceptionally high-damage melee bruiser specialization capable of controlling engagements through crowd control and burst damage.
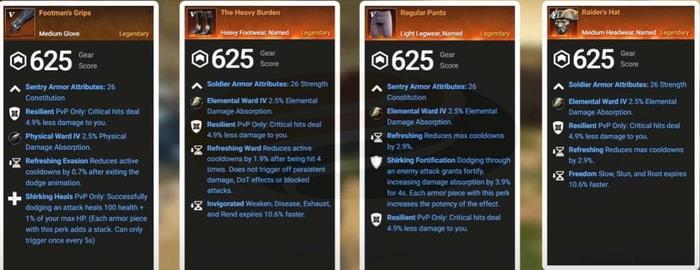
These represent the optimal glove, boot, leg armor, chest piece, and helmet selections:
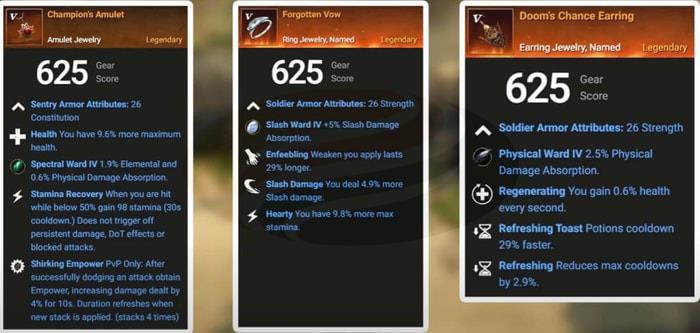
Additionally, here are the top three jewelry pieces essential for completing your gear setup:
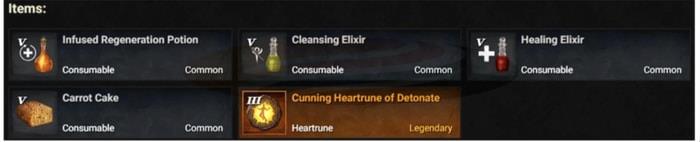
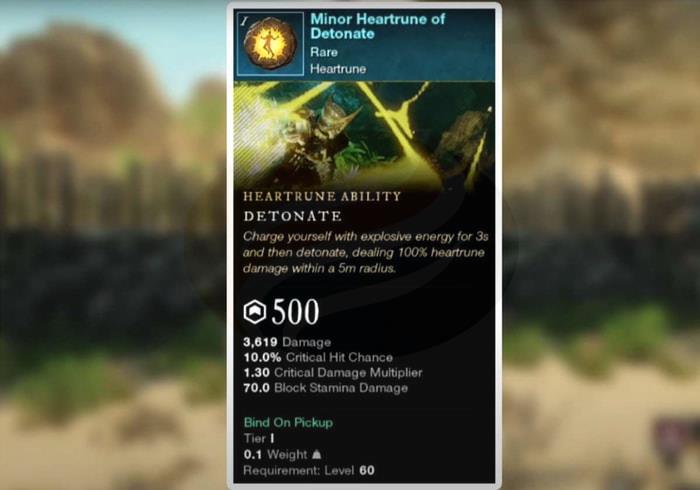
While this build performs effectively with various gear pieces maintaining the specified attribute and weapon configuration, ensure your action bar includes health potions alongside situation-specific consumables like cleansing potions. Always utilize Carrot Cake for attribute buffs and equip the Heartrune of Detonate for additional combat utility.
If you seek an exceptionally entertaining melee specialization offering dynamic gameplay with tremendous damage output, this build delivers outstanding results. For players requiring additional currency for gear acquisition, consider secure marketplace options for New World gold transactions.
The secondary elite build utilizes Greatsword paired with Sword and Shield for versatile combat adaptability. Here’s the attribute framework for this configuration:
Starting from level 1, simultaneously develop Strength and Dexterity to 200 points before beginning Constitution investment. Upon reaching level 60, target approximately 200 Strength, 150 Dexterity, and 100 Constitution. Maintain medium armor classification by carefully selecting shield weight – different shield types vary in encumbrance, so choose the lightest available shield that still qualifies for medium weight category.
For your Greatsword weapon mastery development, implement this progression:
First, unlock the Crosscut ability while obtaining two associated perks, then acquire Skyward Slash with two additional perks. Transition to the opposing tree section to secure two perks marked “3” in the reference image. Finally, obtain the Steadfast Strike ability with two perks. Beyond this core setup, distribute remaining mastery points according to your preferred combat style.
Your secondary weapon setup, Sword with Shield, requires this mastery configuration:
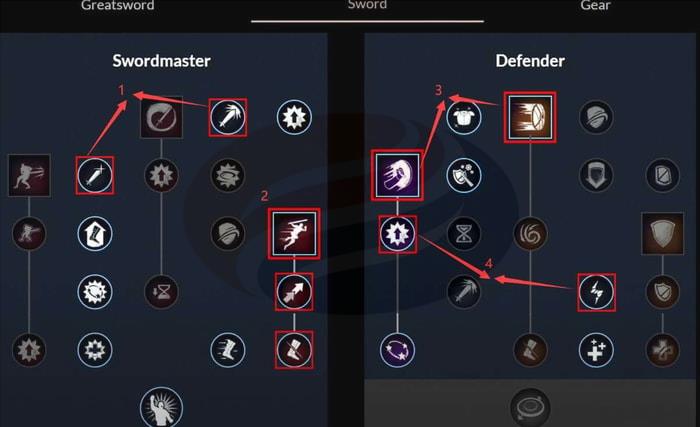
Begin by selecting the two foundational perks indicated by marker “1”, then unlock Leaping Strike with two perks. Proceed to the opposite branch to obtain the final two abilities – Shield Rush and Shield Bash – while securing the two perks marked “4”. Subsequently, allocate any remaining mastery points based on your specific gameplay preferences.
Now examining the practical application, I’ll demonstrate the optimal combat methodology for this build configuration.
With Greatsword, your premier ability Crosscut executes three rapid slashing strikes with escalating damage per successive hit. Secondary skill Skyward Slash swings your blade upward to damage enemies while applying debilitating stacks. Finally, Steadfast Strike stabs opponents for up to two hits, dealing increased damage while restoring Mana upon animation completion. In PvE scenarios, this ability effectively draws aggression from multiple enemies simultaneously.
For Sword with Shield combat, your primary spell Leaping Strike propels you forward to damage and stagger adversaries. Shield Rush enables rapid forward advancement while dealing damage and repelling enemies backward – excellent for counter-attacking to interrupt enemy animations or providing tactical support to allies. Shield Bash delivers a concise stunning effect lasting two seconds, representing the game’s longest duration crowd control ability.
The combat rotation follows this sequence: Begin engagements with sword and shield, utilizing Leaping Strike to minimize distance between you and targets. Immediately follow with Shield Rush, then as the stagger effect concludes, deploy Shield Bash immediately. During this brief window, switch to Greatsword and activate Crosscut, then maintain heavy attack pressure. When enemies retaliate, employ Skyward Slash to simultaneously damage and stagger. Conclude with Steadfast Strike before continuing Greatsword assaults until target elimination. If encountering dangerous situations, revert to sword with shield configuration and maintain defensive posture by holding right-click to block incoming attacks. This weapon combination delivers exceptionally entertaining gameplay while medium armor provides sufficient durability to withstand damage while maintaining high damage-per-second output.
For both Greatsword and Sword with Shield weapons, incorporate Opal Gems for enhanced performance:
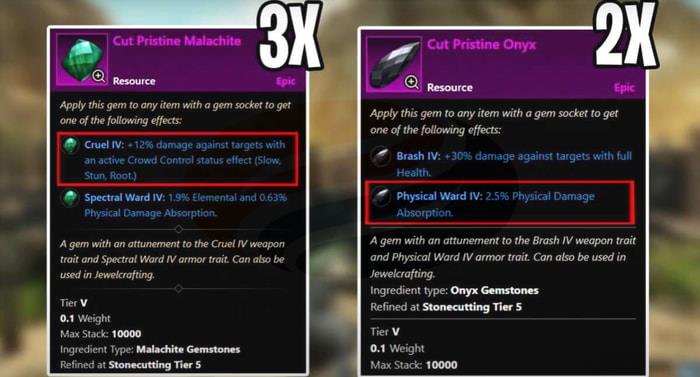
Throughout your equipment, socket three Malachite and two Onyx gems for optimal statistical benefits:
Finally, equip the Heartrune of Detonate on your character for additional combat capabilities:
Beyond the foundational builds, several advanced optimization techniques can significantly enhance your performance. Understanding common mistakes helps avoid costly errors in build development.
Critical Optimization Tips:
• Always maintain stamina management – overcommitting to attacks without stamina reserves leaves you vulnerable
• Master animation canceling to increase your damage output and responsiveness
• Adapt your consumable selection based on specific content (expeditions require different preparations than open-world PvP)
• Time your crowd control abilities to chain effectively rather than overlapping unnecessarily
• Practice weapon swapping during ability cooldowns to maintain constant pressure
One frequent error involves improper attribute distribution during early leveling phases. Players often over-invest in Constitution prematurely, sacrificing crucial damage scaling that accelerates leveling efficiency. Another common mistake involves neglecting gear score progression – while attribute distribution is vital, insufficient gear score substantially undermines your statistical effectiveness.
For players transitioning between these builds, remember that medium armor classification provides the optimal balance for most melee specializations. However, each shield type carries different weight values, so meticulously select the lightest shield that maintains medium weight status.
When optimizing for endgame content, consider consulting our Complete Guide to Battlefield 6 mechanics for additional strategic insights. Those focusing on weapon progression should reference the comprehensive Weapons Unlock guide, while players determining their combat role will benefit from the detailed Class Guide for role-specific recommendations.
Action Checklist
- Allocate 200 Strength and 100 Constitution as foundation, then prioritize Strength to 300
- Master Great Axe rotation: Gravity Well → Charge → Maelstrom → weapon swap → Shockwave → Wrecking Ball → Path of Destiny
- Configure medium armor: heavy helmet/chest, medium gloves/boots, light pants
- Socket three Malachite and two Onyx gems across gear pieces
- Equip Heartrune of Detonate and maintain Carrot Cake buff
- Practice defensive transitions: switch to sword/shield when health drops below 50%
No reproduction without permission:OnLineGames Guides » New World – Top 2 Best New Builds 2023 Master New World's top melee builds with optimized attributes, weapon rotations, and gear strategies for 2023 dominance