TL;DR
- Solve the soldier number puzzle using bomb responses: Fall Down (smaller number), Fly Up (larger number), Bingo (correct target)
- Master Roukougu’s attack patterns in both normal and recharging modes with proper positioning
- Coordinate with your team for optimal DPS and survival during boss encounters
- Avoid common mistakes like incorrect bomb sequencing and poor aggro management
- Use class-specific abilities and timing to maximize efficiency throughout the dungeon
While Sundered Nexus presents a manageable challenge in Blade and Soul, many players struggle with its unique mechanics. This comprehensive guide provides battle-tested strategies to navigate every phase successfully, from the initial puzzle room to the final boss encounter. Understanding these mechanics will transform your dungeon experience from frustrating to rewarding.
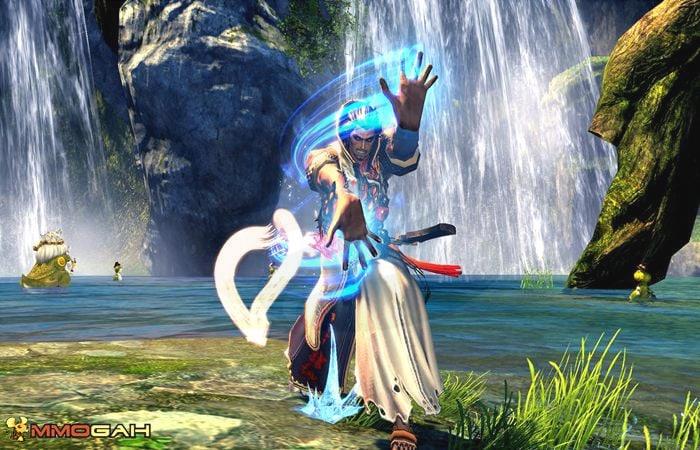
I’ll break down each of the three stag bosses systematically, starting with Roukougu’s dual-mode mechanics. Proper preparation includes ensuring your gear meets the minimum requirements and coordinating with your team about role assignments before entering.
 The initial chamber features soldiers arranged in a circular formation, each marked with a visible number. Your objective is to systematically eliminate them using the available bombs through a logical deduction process.
When you throw a bomb at a soldier, observe the reaction carefully:
1. Fall Down: This indicates you must target a soldier with a lower number. The sequence requires descending numerical order.
2. Fly Up: This signals the need to attack a soldier with a higher number, moving upward numerically.
3. Bingo: This confirms you’ve identified the correct soldier, triggering the mini-boss activation.
Pro Tip: Start with the soldier displaying the median number (usually 5 or 6 in an 8-soldier formation) to minimize the number of attempts required. Advanced players can complete this puzzle in 3-4 throws with proper strategy.
 First Stage: Normal Mode Boss
Roukougu begins in normal mode, presenting a manageable but still dangerous opponent. While less aggressive than his recharging counterpart, certain attacks require precise positioning and timing to avoid significant damage.
1. Frontal Normal Attack: This cone-shaped assault targets players directly in front of the boss. Position yourself at his sides or rear to avoid this damage entirely while maintaining DPS uptime.
2. Circular Sweep: Roukougu periodically performs a 360-degree attack that requires all players to either use iframes or move outside the indicated range.
3. Targeted Charge: The boss will occasionally fixate on a random player and charge toward them. The targeted player should lead the charge away from the group while others reposition.
Proper aggro management is crucial here. The tank should maintain consistent threat generation while DPS classes utilize their optimal class abilities for maximum damage output without pulling aggro.
 Recharging Mode Transition
After reaching approximately 70% health, Roukougu enters his enhanced recharging mode. This phase introduces several new mechanics that require coordinated team execution.
1. Energy Absorption: The boss will target random players with energy tethers that drain health and provide him with damage buffs if not interrupted quickly.
2. AOE Pulse Waves: These expanding circles require precise timing to dodge. The pattern typically follows a predictable sequence that experienced players can anticipate.
3. Enraged State: Below 30% health, Roukougu gains increased attack speed and damage. Save major cooldowns and defensive abilities for this critical phase.
Team Composition Optimization: A balanced team with proper weapon loadouts can reduce clear times by 25-30%. Ranged DPS should prioritize mobility while melee classes focus on burst damage during safe windows.
Common mistakes include failing to interrupt energy absorption, standing in pulse waves, and poor cooldown management during the enraged phase. Practice these mechanics in normal mode before attempting higher difficulties.
 Success in Sundered Nexus requires methodical execution of each phase. Follow this systematic approach to maximize your success rate and minimize wipe potential.
Advanced Optimization Strategies: For experienced players looking to speedrun, consider these techniques: pre-positioning before phase transitions, animation canceling for optimal DPS, and coordinated burst windows during vulnerability phases.
Understanding the deeper game mechanics, such as aggro tables and damage type resistances, will significantly improve your performance. Check our complete strategy guide for additional advanced tactics.
Action Checklist
- Solve soldier puzzle starting with median number, following bomb response patterns
- Position team members at Roukougu’s sides to avoid frontal attacks
- Monitor boss health for recharging mode transition at 70%
- Assign interrupt responsibilities for energy absorption tethers
- Coordinate defensive cooldowns for enraged phase below 30% health
No reproduction without permission:OnLineGames Guides » Sundered Nexus Details for Three Stags Boss Master Sundered Nexus with expert strategies for all three bosses and puzzle mechanics