TL;DR
- Armor Master provides massive resistance boosts but requires specific skill slots
- Mara’s Balm excels against DoT builds with automatic healing on cleanse effects
- Clever Alchemist delivers exceptional burst damage through potion consumption mechanics
- Wretched Vitality solves resource sustainability issues with easy-to-proc recovery buffs
- Rallying Cry dominates small-scale combat with critical healing bonuses and group support
In The Elder Scrolls Online’s competitive PvP environment, your back bar configuration serves as the foundation for tactical flexibility and survival. This secondary weapon slot typically houses utility skills, defensive abilities, and set bonuses that activate regardless of your active weapon. Proper back bar selection can transform your combat effectiveness, allowing you to adapt to dynamic battlefield conditions and counter specific enemy strategies.
Understanding back bar mechanics requires recognizing that certain set bonuses remain active even when you switch to your front bar, creating powerful synergies between your primary damage-dealing setup and supportive capabilities. The sets featured in this guide represent the most impactful choices for various playstyles and situations, each offering unique advantages that can tip the scales in intense combat encounters.
5. Armor Master

Armor Master stands as one of the most formidable craftable defensive sets available, offering substantial survivability enhancements for tank-oriented builds. The three-piece bonus delivers 1,206 maximum health alongside 1,487 armor, with the fourth piece reinforcing this armor bonus further. The fifth piece elevates your maximum health by 5% whenever an Armor ability occupies a skill slot during combat, making it particularly synergistic with Warden skills like Polar Wind that scale with health pools.
Activation requires utilizing an Armor skill from the appropriate skill line—whether that’s a protective shield from light armor, defensive buffs from heavy armor, or the evasion benefits of Shuffle from medium armor. Upon execution, you receive a massive 5,940 boost to both physical and spell resistance lasting 10 seconds. When layered with major and minor resolve buffs, this creates an almost impenetrable defensive posture that can withstand tremendous punishment.
However, strategic limitations accompany these defensive advantages. Running five pieces of the set constrains your gear flexibility, while the mandatory skill requirement consumes a valuable slot that could otherwise accommodate additional utility or damage abilities. Many players overlook the importance of timing these resistance buffs to coincide with enemy burst windows rather than maintaining them continuously.
4. Mara’s Balm
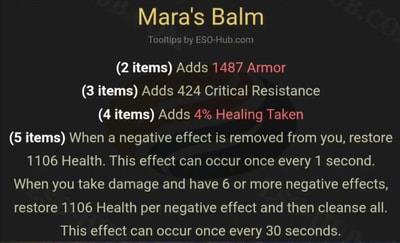
Mara’s Balm has undergone multiple adjustments throughout various patches, yet retains specialized utility against specific threat profiles. During its peak performance period, this set rendered players virtually indestructible through its powerful self-healing mechanics. The two-piece bonus provides 1,487 armor, three-piece offers 424 critical resistance, and four-piece enhances healing received by 4%.
The fifth piece triggers health restoration whenever a negative effect gets cleansed from you, generating substantial healing output in scenarios where multiple debuffs accumulate simultaneously. This cleansing synergy proves exceptionally valuable in outnumbered engagements, where multiple opponents typically apply numerous damaging conditions simultaneously.
Strategic pairing with the Cleansing Revival Champion Point creates an almost unbreakable defensive loop against damage-over-time compositions. However, its current positioning reflects the meta’s shift away from DoT-heavy builds and the cumulative impact of successive nerfs reducing its overall potency compared to historical performance levels.
Common mistakes include over-relying on Mara’s Balm in compositions light on DoT effects, where its healing potential remains largely untapped. For optimal performance, coordinate with allies who can apply additional debuffs to maximize cleansing opportunities.
3. Clever Alchemist

Acquiring Clever Alchemist presents minimal barriers—either purchase it with ESO gold from Guild Traders or craft it personally if you possess the necessary traits. This set shines in ball-group formations and turn-and-burn tactical approaches, though many players fail to leverage its full potential through proper timing and resource management.
The second and third pieces collectively provide 1,206 maximum health, while the fourth piece contributes 129 to both weapon and spell damage. The true power emerges from the fifth piece bonus: consuming any potion during combat amplifies your weapon and spell damage by 675 for 20 seconds, creating devastating burst windows.
This equipment excels within kiting-oriented builds that emphasize mobility and controlled engagements. With standard potion cooldowns around 25 seconds without set bonuses, you’ll want to concentrate on rapid positioning adjustments and ultimate generation to eliminate one to five opponents during unexpected offensive surges.
Despite its impressive damage amplification, Clever Alchemist presents accessibility challenges for newer players who may struggle with cooldown management and burst timing. Veteran combatants have historically achieved remarkable results by synchronizing potion consumption with other damage multipliers and executing precisely timed assaults.
2. Wretched Vitality

Wretched Vitality earns recognition for its exceptional versatility and straightforward activation requirements. This collection directly tackles the resource sustainability problems that frequently plague inexperienced PvP participants. The second piece enhances magicka recovery by 129, third piece boosts stamina recovery by 129, and fourth piece adds 129 weapon and spell damage.
During combat engagements, the fifth piece bonus activates upon applying any major buff or debuff, granting 260 magicka and stamina recovery for 15 seconds, with an additional 130 recovery when triggering minor buffs or debuffs. Activation proves effortless with numerous commonly-used skills; employing Race Against Time or Hurricane simultaneously applies both major and minor buffs, immediately triggering both set components.
This mechanism transforms resource management from a constant struggle into an automated process, liberating you from dependency on sustain-focused food items. This freedom allows selection of tri-stat nourishment that elevates your overall attribute maximums—particularly advantageous within the current hybrid-oriented game balance.
Advanced optimization involves deliberately cycling low-cost buff skills to maintain near-permanent recovery buffs, creating an almost limitless resource pool for sustained combat effectiveness.
1. Rallying Cry

Rallying Cry provides 657 critical chance alongside 1,096 magicka. The fifth piece delivers a distinctive buff mechanism: achieving a critical heal on yourself or any ally bestows upon you and nearby group members 1,650 critical resistance and 300 weapon and spell damage enduring 20 seconds.
While suboptimal for large-scale engagements, this set demonstrates exceptional performance in smaller confrontations, making it ideal for solitary adventurers or compact teams numbering up to four participants. The critical chance enhancement substantially improves survivability probabilities, while the supplementary weapon and spell damage amplification strengthens both healing output and damage potential.
The set truly shines when paired with healing-over-time abilities that have multiple critical roll opportunities, increasing the probability of maintaining near-permanent uptime on its powerful group buffs. This combination of offensive and defensive utility establishes Rallying Cry as the premier selection for your back bar configuration in appropriate combat scenarios.
Strategic implementation involves positioning to maximize group coverage during critical healing moments and coordinating burst phases to capitalize on the damage amplification windows.
Mastering back bar sets extends beyond individual selection to understanding how they interact with your front bar equipment and overall build strategy. Hybrid configurations that combine defensive back bar sets with offensive front bar options can create remarkably resilient yet deadly combatants capable of adapting to diverse battlefield conditions.
Counter-meta considerations should guide your set choices based on prevalent opponent compositions. If facing numerous burst damage specialists, Armor Master provides crucial damage mitigation, while Wretched Vitality offers the sustained pressure needed to outlast opponents in extended engagements.
Skill rotation optimization becomes critical when using sets with activation requirements. For Clever Alchemist, this means aligning potion consumption with ultimate availability and enemy vulnerability periods. For Armor Master, timing your armor skill usage to anticipate incoming damage spikes rather than reacting to them.
For those seeking comprehensive guidance on character development, our Class Guide provides detailed analysis of skill synergies across different playstyles and specializations.
Selecting the optimal back bar configuration for PvP engagements can dramatically elevate your combat performance and adaptability across varying confrontation types. Whether emphasizing durability through Armor Master, resource sustainability via Wretched Vitality, or explosive damage potential with Clever Alchemist, each featured set accommodates distinct tactical approaches and personal preferences.
For combatants frequently encountering DoT-heavy compositions, Mara’s Balm delivers specialized utility, whereas Rallying Cry emerges as the definitive option for balanced offensive and defensive capabilities in limited-scale battles.
Testing different combinations to identify which best harmonizes with your specific build and strategic philosophy remains essential. Equipped with appropriate back bar gear, you’ll possess the tools necessary to command the battlefield throughout The Elder Scrolls Online’s diverse PvP landscapes.
If you found this analysis valuable, consider subscribing to KlausMan66’s channel and distributing this content among fellow adventurers.
YOU MAY ALSO LIKE:
Top 5 Front Bar Damage Sets for ESO PvP – Update 47
ESO Events 2025: A Guide to the Writhing Wall Event
Maximize Your Gold in Update 47 of The Elder Scrolls Online
Action Checklist
- Assess your primary playstyle and identify whether you prioritize survival, burst damage, or sustained pressure
- Acquire your chosen set through crafting or Guild Trader purchases
- Test activation requirements and skill rotations in controlled environments
- Coordinate with team members to maximize set synergies in group scenarios
- Evaluate performance in actual PvP encounters and adjust accordingly
No reproduction without permission:OnLineGames Guides » Top 5 Back Bar Sets for PvP in ESO – Update 47 Master ESO PvP with these essential back bar sets for dominance and versatility