TL;DR
- Bleed builds with Rivers of Blood deliver massive damage through Blood Loss status effects
- Sorcery builds offer safe distance combat with Glintstone magic and staff progression
- Defensive builds provide exceptional survivability through shield mechanics and stamina management
- Hybrid battlemage builds combine melee aggression with spellcasting versatility
- Proper rune investment and stat allocation are crucial for maximizing build effectiveness
Elden Ring’s extensive itemization system creates unparalleled build diversity, allowing players to craft characters that perfectly match their preferred combat approach. The game’s flexibility extends beyond initial choices, featuring a comprehensive respeccing mechanism in the mid-to-late game that enables experimentation with multiple specialized builds within a single playthrough. This freedom transforms character development from a linear progression into a dynamic creative process.
When your character surpasses the soft level cap and you accumulate substantial Elden Ring Runes, testing different build configurations becomes an optimal resource allocation strategy. Our comprehensive guide examines the most effective item builds across various playstyles, providing detailed optimization strategies for both new and experienced players.
Understanding build mechanics requires recognizing how different stats interact with specific weapons and spells. Each build below includes specific stat thresholds, equipment progression paths, and combat techniques that maximize effectiveness against Elden Ring’s diverse enemy types.
Core Components
- Primary Weapon: Rivers of Blood
- Optimal Starting Class: Bandit
- Essential Stats: Strength, Dexterity, and Arcane
- Key Ability: Corpse Piler
Bleed-focused builds have become exceptionally popular within the Elden Ring community due to their extraordinary damage output through the Blood Loss status effect. When this effect triggers, enemies suffer percentage-based health damage that ignores conventional defenses, making it devastating against high-health bosses and tanky opponents.
The Rivers of Blood katana represents one of the most powerful late-game bleed configurations. Its signature Corpse Piler weapon art unleashes a six-hit combination that rapidly builds bleed accumulation on virtually any enemy encountered. The Bandit class provides an ideal foundation with its naturally high Arcane attribute and balanced physical stats.
Success with this build demands aggressive engagement tactics to maximize bleed proc frequency. At advanced levels, allocating Elden Ring Runes to Vigor becomes essential for survivability, while the weapon’s exceptional attack speed enables rapid Blood Loss buildup.
Critical optimization tip: Combine this build with Mimic Tear spirit summons to create overwhelming pressure through coordinated bleed application. This synergy dramatically reduces boss encounter durations while maintaining effectiveness across both PvE and PvP scenarios. Common mistake to avoid: neglecting Vigor investment in favor of pure damage stats, which often results in premature deaths during extended engagements.
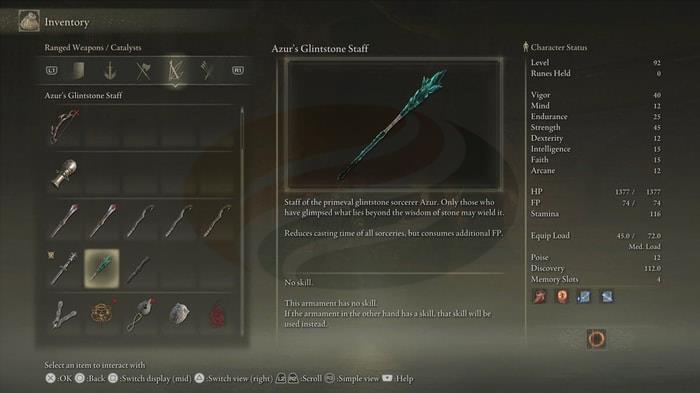
Essential Equipment
- Weapons: Astrologer’s Staff, Azur’s Glintstone Staff
- Recommended Class: Astrologer
- Primary Attributes: Intelligence and Mind
- Core Spells: Swift Glintstone Shard, Glintstone Cometshard, Carian Slicer
Sorcery configurations appeal strongly to both casual players and newcomers to FromSoftware titles. Elden Ring significantly enhances magic viability compared to previous entries, creating excellent options for those preferring tactical engagement from safe distances.
This specialized sorcery setup excels at delivering consistent damage while maintaining optimal positioning away from immediate threats. Glintstone Sorcery provides diverse spell options enabling strategic target elimination without entering melee range, transforming challenging boss encounters into manageable tactical exercises.
Maximizing magical damage output requires prioritizing Intelligence and Mind as core attributes. However, neglecting Vigor investment creates the classic glass-cannon vulnerability that experienced players avoid through balanced stat distribution.
The Astrologer’s Staff accompanies character creation for Astrologers, though it’s alternatively purchasable at the Liurnia Lake Shore Site of Grace. For progression through main storyline content, acquiring Azur’s Glintstone Staff from the Academy of Raya Lucaria’s Church of the Cuckoo represents a critical power spike. Advanced players should note that staff upgrading follows different progression than conventional weapons, requiring specific smithing stone types.
Build Foundation
- Weapons: Katana, Nagakiba, any Tower shield
- Ideal Starting Class: Samurai
- Core Statistics: Strength and Endurance
- Compatible Abilities: Any
While defensive and tank-oriented configurations don’t enjoy the same popularity as bleed or sorcery builds, they demonstrate remarkable effectiveness in Elden Ring due to excellent item scaling with relevant defensive attributes. Despite their classification, these builds don’t involve passive damage absorption but rather provide extended engagement windows against aggressive opponents.
Select this defensive melee approach when your objective involves withstanding substantial damage while maintaining position against relentless foes.
Strength and Endurance form the foundation of this configuration, utilizing katanas for rapid offensive responses while employing substantial tower shields for enhanced damage mitigation.
The Samurai class represents the optimal starting point, providing immediate access to appropriate weaponry from character creation.
Endurance significantly boosts both stamina reserves and equip load capacity, enabling extended blocking sequences and utilization of superior armor sets like the Twinned Armor configuration.
Strength enables wielding specialized shields that improve damage negation percentages while permitting use of more powerful combat implements. Supplemental Vigor investment ensures adequate health reserves for situations where blocking proves insufficient.
Essential equipment includes a substantial tower shield for your off-hand, crucial for interrupting enemy assault patterns and preventing rapid health depletion. Early in Castle Stormveil, locate a powerful tower shield through the western entrance hall containing the Grafted Scion. The Hawk Crest Wooden Shield resides in an adjacent chamber accessible via Stonesword Key application on the Imp Seal.

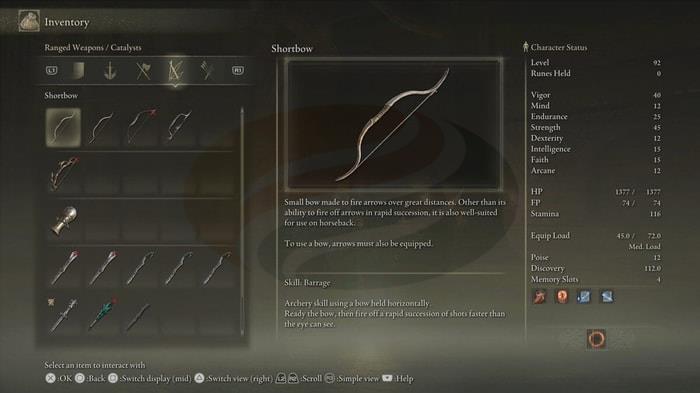
Archery Components
- Weapons: Longbow, Shortbow
- Recommended Classes: Samurai or Bandit
- Primary Attributes: Dexterity, Vigor, and Endurance
- Key Abilities: Barrage, Mighty Shot
Elden Ring marks the first FromSoftware title where dedicated archery builds achieve genuine viability. While they don’t match the overwhelming damage output of bleed configurations or sorcery setups, they compensate through exceptional style and tactical utility.
Archery-focused configurations provide subtle alternatives for players disinterested in magical approaches while maintaining combat distance. Though more demanding than the previously detailed magic build, they offer immensely satisfying gameplay for those preferring traditional ranged combat over magical or melee-oriented approaches.
Elevated Dexterity represents the most critical attribute for ranged archery effectiveness, enhancing damage output while enabling use of more powerful bows and specialized arrows.
Critical success factor: This approach only achieves maximum effectiveness when combined with consistent weapon upgrades and strategic arrow selection tailored to specific combat scenarios. Endurance follows closely in priority, as evasion and rapid disengagement from melee proximity constitute essential survival skills. The health augmentation from increased Vigor proves invaluable, particularly for builds likely to sustain incidental damage during learning phases.
Advanced technique: Master the jump-shot mechanic to create distance while maintaining offensive pressure. Common mistake: attempting to trade shots with faster enemies rather than utilizing the mobility advantage that archery builds provide.
Essential Equipment
- Primary Weapon: Rapier
- Ideal Classes: Astrologer or Prisoner
- Core Statistics: Intelligence and Dexterity
- Key Spells: Scholar’s Armament, Glintstone Pebble, Carian Greatsword
Battlemage configurations merge close-quarters combat proficiency with spellcasting versatility. Beyond their stylistic appeal, these hybrid builds compete effectively with dedicated melee configurations in terms of damage output while offering greater tactical flexibility.
This configuration utilizes Scholar’s Armament to enchant your Rapier, creating a magically-enhanced thrusting weapon. Subsequently activating L2 unleashes Glintstone Phalanx, though this Ash of War only receives enhancement when utilizing the Keen affinity variant.
Counter Glintstone Phalanx burst attacks by employing your Rapier, which features a Critical Rating of 130 capable of delivering substantial damage to staggered opponents.
Glintstone Pebble serves to reduce enemy numbers or reach otherwise inaccessible targets when melee or mounted approaches prove impractical. When facing numerical disadvantages or operating from horseback, deploy Carian Greatsword to rapidly eliminate adversaries across wide frontal arcs when situational demands dictate.
Advanced combat technique: Chain Carian Slicer immediately after a rapier thrust to create seamless magic-melee combinations that overwhelm defensive responses.
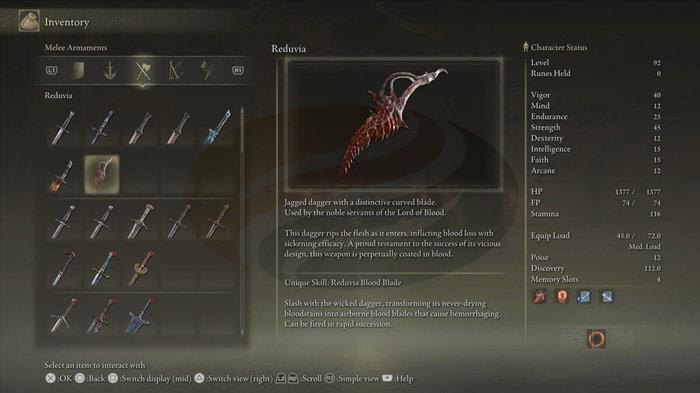
Build Components
- Weapons: Reduvia and Eleonora’s Poleblade
- Optimal Starting Class: Warrior
- Essential Stats: Dexterity and Endurance
- Core Abilities: Reduvia Blood Blade, Bloodblade Dance
This dual-wielding aggressive melee configuration excels when your objective involves closing distance rapidly to unleash overwhelming attack sequences.
This configuration emphasizes Dexterity and Endurance while utilizing complementary weapons that synergize through bleed effect application.
As previously established, Endurance enhances both stamina capacity and equip load, two vital metrics for melee-oriented builds. Sufficient Endurance investment enables wearing superior armor like the Twinned configuration while maintaining lightweight for rapid evasion maneuvers.
Two distinctive weapons focusing on applying the bleed status effect should be employed. Equip Eleonora’s Poleblade, discoverable in the Second Church of Marika, in your primary hand. The Reduvia dagger functions effectively as an off-hand implement. Defeat Bloody Finger Nerijus near Murkwater Cave to acquire this weapon.
Eleonora’s Poleblade serves to rapidly close engagement distance, while Reduvia immediately applies bleed accumulation to targeted opponents.
Build Foundation
- Primary Weapon: Moonveil
- Recommended Classes: Samurai or Prisoner
- Core Attributes: Intelligence, Vigor, and Dexterity
- Essential Abilities: Transient Moonlight, Loretta’s Greatbow, Glintstone Pebble, Carian Greatsword
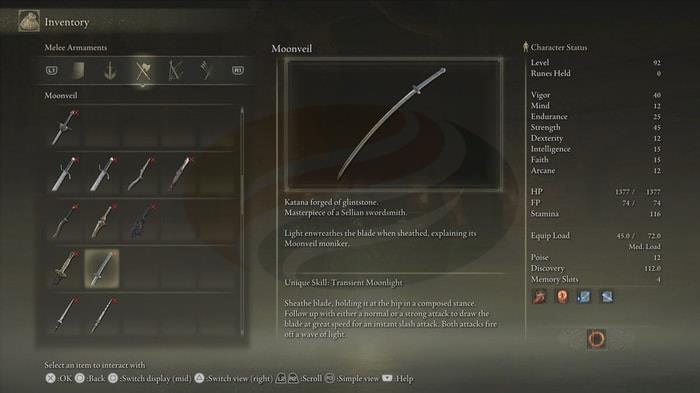
The Moonveil katana ranks among Elden Ring’s most exceptional weapons due to its integrated Transient Moonlight skill. Activating this ability assumes a sheathed stance position, with light attacks releasing magical projectiles and heavy attacks performing downward slashes with magically-extended blade projections.
This configuration maximizes the katana’s unique capabilities. When adversaries become staggered by Transient Moonlight, this hybrid melee-mage setup can inflict substantial critical damage. Stun opponents using Transient Moonlight then execute critical strikes with R2 rather than R1 inputs. Through utilization of the Assassin’s Cerulean Dagger and Carian Filigreed Crest, FP depletion ceases to present limitations.
Against challenging distant opponents, employ Loretta’s Greatbow and Glintstone Pebble strategically. At closer engagement distances, utilize Glintstone Pebble to either create separation or maintain offensive momentum. With Radagon Icon assistance, Carian’s Greatsword delivers effective area-of-effect damage against grouped enemy formations.
Constructing any effective build in Elden Ring initially requires obtaining necessary equipment and abilities. Even during respeccing processes, certain stat minimums may remain necessary for equipment utilization. Beyond this consideration, gear enhancement represents another critical component for achieving maximum damage potential.
For both these requirements, substantial quantities of Elden Ring Runes become essential resources.
Players may opt to utilize various farming locations throughout the game world to accumulate thousands of Runes within several hours. However, if time constraints prevent extensive farming activities, our specialized service provides access to purchase Elden Ring Runes necessary for completing your ideal item configuration.
Strategic rune allocation follows specific priority frameworks: primary damage stats first, followed by Vigor for survivability, then supplementary attributes for equipment requirements.
Action Checklist
- Select your preferred playstyle and corresponding build from our detailed configurations
- Acquire essential weapons and equipment through exploration or merchant purchases
- Allocate Elden Ring Runes according to stat priority guidelines
- Upgrade primary weapons to at least +6 before major boss encounters
- Practice build-specific combat techniques against manageable enemies before challenging difficult areas
- Optimize your configuration through respeccing once you acquire necessary items
- Experiment with different weapon combinations and spell selections to find your optimal playstyle
No reproduction without permission:OnLineGames Guides » Elden Ring Item Build Guide – The Best Builds for Any Playstyle Master Elden Ring's most powerful item builds with expert strategies, stat optimization, and combat techniques