TL;DR
- Gold Scarab provides 20% more runes, essential for efficient leveling
- Soreseal talismans offer massive stat boosts with manageable trade-offs
- Defensive talismans like Dragoncrest Greatshield can reduce physical damage by 20%
- Spellcasters need Radagon Icon for faster casting and Graven-Mass for damage
- Stamina management talismans are crucial for weapon skill spam builds
- Proper talisman selection can increase your damage output by 15-20%
Elden Ring’s talisman system represents one of the most impactful customization mechanics in modern gaming. These powerful accessories provide substantial stat boosts, damage amplification, and utility effects that can transform mediocre builds into powerhouse configurations. Understanding which talismans synergize with your playstyle is crucial for overcoming the game’s toughest challenges.
Strategic talisman selection separates average players from elite Tarnished. Whether you’re running strength-based bruisers, dexterity-focused assassins, or intelligence-driven sorcerers, the right combination can mean the difference between victory and defeat against formidable bosses.
Gold Scarab
Effect: Boosts rune acquisition from defeated enemies by 20%.

The Gold Scarab stands as arguably the most valuable talisman for progression efficiency. This 20% rune multiplier compounds significantly over time, potentially saving hours of grinding. The efficiency gain is most pronounced during levels 30-80, where rune requirements escalate dramatically.
Pro Tip: Combine with gold-pickup weapons for maximum farming potential. Many players underestimate how quickly this bonus adds up—defeating just 100 enemies yielding 10,000 runes would net an additional 2,000 runes, equivalent to several additional kills.
How to Get the Gold Scarab
Located in the treacherous Abandoned Cave within Caelid’s scarlet rot-infested landscape. Navigate east from Smoldering Wall Site of Grace, but prepare for the dual Cleanrot Knight encounter—one of the more challenging early-game boss fights.
Radagon’s Soreseal
Effect: Grants +5 to Strength, Dexterity, Vigor, and Endurance while increasing damage taken by 15%.
This talisman provides the equivalent of 20 character levels distributed across four crucial attributes. The damage penalty is manageable for players who master dodging mechanics, making it ideal for learning proper combat timing.
Advanced Strategy: Use Radagon’s Soreseal to meet weapon requirements early, then transition to specialized talismans once you’ve naturally leveled those stats.
How to Get Radagon’s Soreseal
Found in Fort Faroth within Dragonbarrow, this area presents significant danger for underleveled characters. Consider starting with Radagon’s Scarseal from Weeping Evergaol as a stepping stone.
Green Turtle Talisman
Effect: Accelerates stamina regeneration by approximately 17.7%, translating to roughly 8 additional stamina points per second.
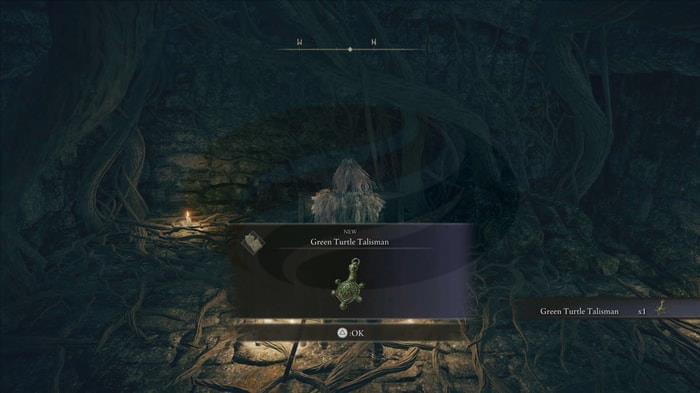
Stamina management separates competent players from masters. This talisman effectively reduces your stamina recovery window by nearly one-fifth, enabling more aggressive playstyles and frequent skill usage.
Common Mistake: Players often overlook stamina regeneration in favor of raw damage, only to find themselves unable to dodge or attack at critical moments.
How to Get the Green Turtle Talisman
Requires one Stonesword Key to access the underground chamber in Summonwater Village. The area contains harmless turtles rather than the expected boss encounter.
Great-Jar’s Arsenal
Effect: Enhances maximum equipment load capacity by 19%.

Equipment load management becomes increasingly critical as you acquire heavier armor and weapons. The 19% boost frequently enables wearing full heavy armor sets while maintaining medium roll capability.
Poise Breakpoint Insight: This talisman allows reaching crucial poise thresholds (51 or 101) that dramatically impact stagger resistance during boss encounters.
How to Get the Great-Jar’s Arsenal
The Great Jar in Caelid’s northern canyon presents three phantom NPC challenges. These summons scale with your level and equipment, creating uniquely tailored duels that test your current build’s effectiveness.
Radagon Icon
Effect: Reduces spellcasting time by providing 30 virtual dexterity points toward the hidden casting speed stat (maximum 70).
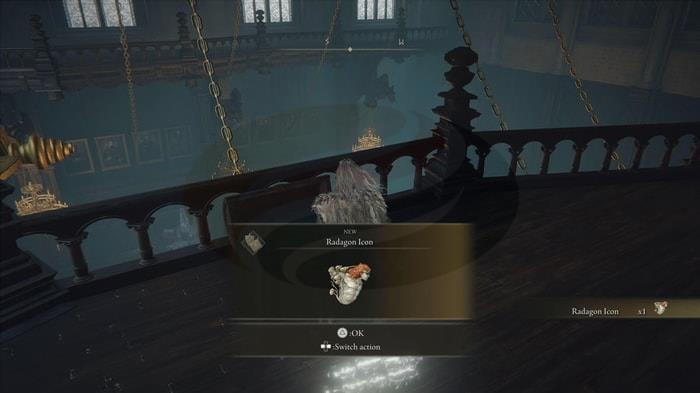
Casting speed represents a critical DPS factor for magic builds. The virtual dexterity boost significantly impacts longer casting animations like Comet Azur or Founding Rain of Stars.
Practical Application: This talisman reduces the casting time of most sorceries and incantations by approximately 10-15%, creating larger attack windows between enemy patterns.
How to Get Radagon Icon
Acquired after defeating the Red Wolf of Radagon in Raya Lucaria Academy. From Debate Parlor Site of Grace, locate the hidden balcony access leading to a chest above the main hall.
Claw Talisman
Effect: Amplifies jump attack damage by 15% (does not affect bow jump attacks).
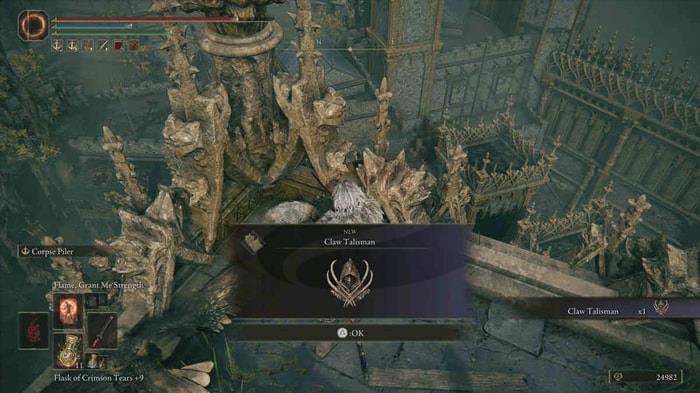
Jump attacks serve dual purposes—significant damage output and enhanced posture breaking. The 15% damage modifier applies multiplicatively with other damage bonuses.
Strategic Advantage: Combine with heavy weapons and the appropriate class setups for maximum stagger potential against heavily armored opponents.
How to Get the Claw Talisman
Located atop a watchtower in Stormveil Castle. Requires platforming from Rampart Tower Site of Grace to access the rooftop location.
Dragoncrest Greatshield
Effect: Enhances physical damage negation by 20%.
This talisman represents the pinnacle of defensive optimization. The 20% physical damage reduction effectively increases your effective health pool by 25% against physical attacks.
Late-game bosses like Malenia and Godfrey utilize devastating physical combos that can one-shot many builds. Dragoncrest Greatshield transforms these lethal attacks into survivable encounters.
How to Get the Dragoncrest Greatshield
Found in Elphael, Brace of the Haligtree, accessible from the Drainage Channel Site of Grace via intricate branch navigation to the church rooftop.
Graven-Mass
Effect: Boosts sorcery damage output by 8%.
Pure intelligence builds benefit tremendously from this damage multiplier. The 8% increase applies to your total sorcery scaling, making it particularly effective with high-intelligence builds and staff upgrades.
Damage Calculation: On a sorcery dealing 1000 damage, Graven-Mass provides an additional 80 damage per cast.
How to Get Graven-Mass
Located within Albinauric Rise in Consecrated Snowfield. Requires using a Bewitching Branch on one of the imps guarding the entrance to break the magical seal.
Shard of Alexander
Effect: Increases weapon skill and Ash of War damage by 15%.
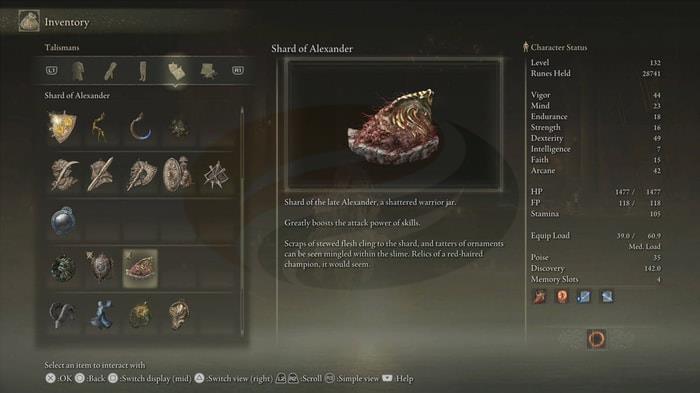
This talisman synergizes exceptionally well with meta builds utilizing powerful weapon skills like Rivers of Blood’s Corpse Piler or Blasphemous Blade’s Taker’s Flames.
Weapon Skill Optimization: The 15% damage boost applies to the total damage calculation after all other modifiers, creating substantial DPS increases.
How to Get the Shard of Alexander
Requires completing Iron-fist Alexander’s questline across multiple regions, culminating in a duel in Crumbling Farum Azula.
Marika’s Soreseal
Effect: Grants +5 to Intelligence, Faith, Mind, and Arcane while increasing damage taken by 15%.

This talisman enables hybrid caster builds to reach crucial spell requirement thresholds while substantially increasing FP reserves.
Strategic Consideration: The damage penalty affects magic-based characters more significantly due to their typically lower vigor. However, the stat benefits often outweigh the risks for skilled players.
How to Get Marika’s Soreseal
Located in Elphael, Brace of the Haligtree at the Prayer Room site of Grace. Requires two Stonesword Keys to access the fog gate protecting this powerful talisman.
Mastering talisman combinations requires understanding both individual power and synergistic potential. The most effective setups often involve complementary effects rather than stacking similar bonuses.
Build-Specific Combinations:
• Strength Builds: Great-Jar’s Arsenal + Claw Talisman + Dragoncrest Greatshield
• Dexterity Builds: Radagon’s Soreseal + Green Turtle Talisman
• Intelligence Builds: Radagon Icon + Graven-Mass
• Faith Builds: Marika’s Soreseal + appropriate elemental damage talismans
Common Mistakes to Avoid:
1. Overvaluing raw damage over utility effects
2. Ignoring stamina management in skill-spam builds
3. Using Soreseal talismans without compensating for the damage penalty
4. Failing to adjust talisman loadout for specific boss encounters
Swapping Strategy: Maintain situational talismans in your inventory for quick changes between exploration and boss fights. The complete game guide offers additional optimization strategies for challenging encounters.
Pro Tip: Create dedicated talisman sets for specific activities—farming, exploration, and boss battles—to maximize efficiency throughout your journey.
Action Checklist
- Acquire Gold Scarab from Abandoned Cave for 20% rune boost
- Obtain Radagon’s Soreseal for early stat optimization
- Collect Green Turtle Talisman for stamina management
- Progress through Alexander’s questline for Shard of Alexander
- Complete Raya Lucaria for Radagon Icon
- Tackle Great Jar challenge for equipment load boost
No reproduction without permission:OnLineGames Guides » Elden Ring Items – The Best Talismans and How to Get Them Essential talismans to optimize your Elden Ring build and dominate the Lands Between