TL;DR
- High-investment melee build combining Static Strike with Shockwave Support for massive area damage
- Slayer ascendancy provides exceptional sustain through permanent life leech and damage bonuses
- Requires specific unique items including Hegemony’s Era and Disintegrator for optimal performance
- Excellent mapping capabilities but requires strategic positioning for boss encounters
- Proper skill rotation and gear progression are crucial for maximizing return on investment
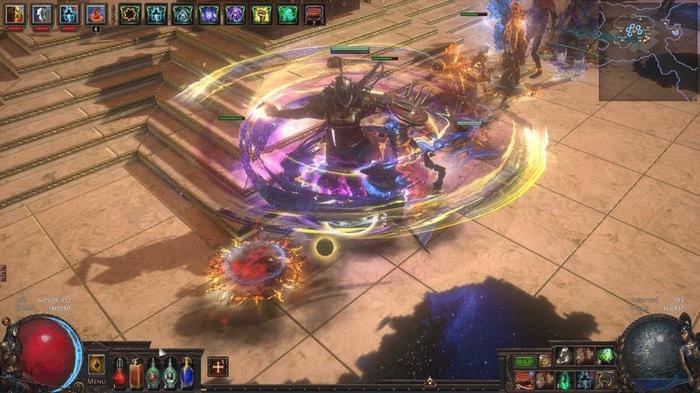
The Static Strike Shockwave Slayer represents one of Path of Exile’s premier high-budget melee builds, delivering explosive area clear through sophisticated skill interactions. This powerhouse setup leverages the unique mechanics of Static Strike to trigger devastating Shockwave explosions that decimate entire screens of enemies.
This comprehensive guide examines Palsteron’s optimized version, providing detailed analysis of strengths, weaknesses, complete progression guidance, and currency investment requirements. By mastering these elements, you’ll transform this complex build into a reliable endgame powerhouse.
What We Know About Static Strike Shockwave Slayer
This elite build demands substantial investment, particularly for acquiring essential unique items that form its foundation. However, the gameplay experience delivers exceptional satisfaction through its chain-reaction combat mechanics and visual spectacle.
Static Strike functions as your primary attack, generating static energy that periodically releases beams to nearby enemies over six seconds. These beams consistently activate the Shockwave Support, creating massive area-of-effect explosions that clear entire packs instantly.
The synergy between these skills creates a combat rhythm where you attack once every six seconds, then reposition while Shockwaves automatically annihilate everything around you.
Pros and Cons of Static Strike and Shockwave Slayer
Understanding this build’s trade-offs is essential before committing your resources. Here’s what you need to consider:
Pros
High Damage Output – The combination of Static Strike and Shockwave Support generates extraordinary area damage capable of eliminating entire monster groups with single activations.
Good Survivability – Slayer’s ascendancy delivers superior life leech mechanics and regeneration, enabling sustained combat endurance.
Great for Mapping – Exceptional area coverage makes this build ideal for rapid map clearing and efficient farming.
Versatile Playstyle – Adaptable combat approach allows switching between close-quarters melee engagement and strategic positioning for Shockwave coverage.
Cons
Expensive to Gear Up – Multiple high-cost unique items are mandatory for optimal performance, representing significant currency investment.
Can be Squishy Against Bosses – Area-focused damage mechanics can struggle against single-target encounters without proper skill adjustments.
Requires Careful Positioning – Combat effectiveness depends heavily on proper enemy engagement positioning and Shockwave optimization.
Can be Challenging to Level Up – Specific item dependencies and skill gem requirements complicate the leveling process compared to more straightforward builds.
Palsteron’s Static Strike and Shockwave Slayer passive tree strategically balances offensive power, defensive layers, and utility functions. Damage allocation emphasizes physical and elemental damage enhancement, critical strike probability, and multiplier effects to maximize Static Strike and Shockwave Support destructive potential.
Survivability investments concentrate on life regeneration mechanics, maximum life increases, and leeching capabilities. The Slayer ascendancy further amplifies sustainability through specialized life leech bonuses and Onslaught effects. Additionally, strategic mana node selection ensures consistent skill sustainability during extended combat sequences.

Advanced players should prioritize cluster jewel setups that enhance area effect and critical strike capabilities. The most effective pathing avoids unnecessary travel nodes while maximizing value from keystones like Iron Reflexes and Elemental Overload when appropriate for your gear level.
Mastering skill interactions is crucial for maximizing this build’s potential. Each ability serves specific purposes in different combat scenarios.
1. Static Strike + Shockwave
Static Strike serves as your primary combat initiator. Upon striking an enemy, you accumulate static energy that automatically discharges beams to surrounding targets for six seconds. These beams consistently trigger Shockwave Support, generating the massive explosions that define this build’s visual identity and clearing power.
Shockwaves constitute your primary damage source, appearing as the substantial explosive effects dominating your screen. While static energy remains active, you continuously generate Shockwave damage automatically. The Apollyon Shockwave effect enhances visual presentation while maintaining identical mechanical functionality.
2. Frozen Legion
Frozen Legion delivers exceptional burst damage potential within short timeframes. Strategic statue placement enables maximum damage optimization against challenging enemies and boss encounters. Effective utilization demands precise timing awareness and strategic positioning skills to maximize damage effectiveness.
3. Battlemage’s Cry
Battlemage’s Cry converts your spell damage into attack damage contributions. This synergy becomes particularly potent when combined with Iron Will and strength stacking strategies, collectively providing substantial damage amplification.
4. Shield Charge
Shield Charge facilitates rapid gap closing between you and enemies or emergency disengagement from dangerous situations. Both attack speed and movement speed investments enhance this skill’s effectiveness for mobility and positioning.
Selecting Slayer as your ascendancy class provides multiple synergistic benefits for this specific build configuration. You gain substantial damage enhancements, expanded area coverage for attacks, powerful life leech mechanics, and damage reduction capabilities.

1. Impact
The Impact ascendancy node delivers three crucial benefits: damage amplification, expanded area of effect for attacks, and accuracy improvements. Enhanced damage accelerates enemy elimination, while broader area coverage improves multi-target engagement efficiency. Accuracy enhancements ensure more consistent attack connections, minimizing missed strike frustrations.
2. Brutal Fervour
Brutal Fervour enables continuous life recovery even at maximum health capacity. This means your life leech effects persist indefinitely at full life, providing permanent regeneration benefits outside active combat situations.
3. Bane of Legends
Bane of Legends provides two fundamental combat advantages. First, it significantly increases damage against unique enemies, typically the most challenging encounters. Second, it provides additional damage bonuses following recent enemy eliminations, enhancing clearing momentum.
4. Headsman
Headsman dramatically simplifies defeating powerful enemies. When enemy health drops below 20% of their maximum life, they instantly perish. This proves exceptionally valuable during boss encounters and other high-health enemy situations.
Equipment selection and optimization are absolutely critical for achieving this build’s maximum potential. Successful implementation demands specific unique items complemented by high-tier rare items to optimize both damage output and survivability characteristics.
The foundational unique items include Hegemony’s Era staff and Disintegrator belt. Hegemony’s Era enhances physical damage while providing endurance charge generation on critical melee strikes. Disintegrator contributes spell damage improvements, area effect enhancements, and spell block chance increases.
Additional essential unique items encompass Impresence amulet for additional aura capabilities and Atziri’s Step boots offering movement speed, evasion rating, and spell dodge chance.
For rare item acquisitions, concentrate on securing elevated physical damage values and critical strike chance enhancements for your weapon selections. Body armor should prioritize life, resistances, and additional defensive layers depending on your current progression stage.
The Static Strike and Shockwave Slayer combat approach involves high-tempo melee engagements focused on maximizing area effect damage potential. Static Strike generates the static energy that periodically damages surrounding enemies while activating Shockwave Support for massive area destruction.
Mapping
During map exploration, activate Static Strike every six seconds to maintain continuous Shockwave generation. Utilize Battlemage’s Cry every ten seconds for consistent damage amplification. Employ Shield Charge for rapid mobility and positioning while your abilities systematically eliminate all opposition.
Bossing
Switch Blood and Sand to Blood Stance configuration when preparing for boss encounters. For frequent boss combat situations, incorporate Ancestral Warchief into your setup and position it strategically before engagements commence.
When bosses appear, apply Withering Step to inflict Wither debuffs, then rapidly engage with Static Strike to activate Shockwave sequences. Deploy Frozen Legion for substantial damage contributions and patiently await statue cooldown recovery before subsequent activations. Should Static Strike duration expire mid-fight, promptly reactivate to maintain damage continuity.
For players advancing beyond initial build completion, several optimization strategies significantly enhance performance. Focus on awakening level enhancements for critical support gems, particularly Shockwave and Melee Physical Damage. Consider transitioning to elevated influenced items once you’ve accumulated sufficient currency resources.
Damage scaling primarily occurs through critical strike multiplier investments, gem level increases, and weapon quality improvements. Defensive optimization involves layering multiple mitigation methods including endurance charges, spell suppression, and additional maximum resistances where feasible.
Currency investment should prioritize weapon upgrades first, followed by body armor enhancements, then jewelry optimization. This progression sequence ensures consistent damage improvements while maintaining adequate survivability throughout your advancement.
Common mistakes include neglecting mana sustain solutions, underestimating positioning requirements, and improper skill rotation timing. Master these elements to transform your investment into exceptional gaming performance.
Action Checklist
- Acquire core unique items: Hegemony’s Era staff and Disintegrator belt
- Set up passive tree focusing on damage, life, and leech nodes
- Configure skill gems with proper support links and quality enhancements
- Practice Static Strike timing (every 6 seconds) and Battlemage’s Cry rotation (every 10 seconds)
- Master positioning and mobility using Shield Charge for optimal combat effectiveness
No reproduction without permission:OnLineGames Guides » Static Strike and Shockwave Slayer – The Melee Bomber PoE 3.21 Full Guide Master the high-budget Static Strike Shockwave Slayer with expert tips, optimization strategies, and common pitfalls to avoid